LED Needle fix for 92-96 es300
 04-18-06, 09:28 PM
#1
Driver
Thread Starter

well like many of you the needles on my cluster were going out... i looked everywhere but i could not find any replacement for just the needles... so i decided to take matters into my own hands...
basically what this fix involves is soldering a 3mm LED to the needle contacts on the back... its very simple to do but if you suck at soldering or working with electronics be careful...
the LEDs i ordered were 3mm white LEDs that came with resistors to allow them to work with a 12v source...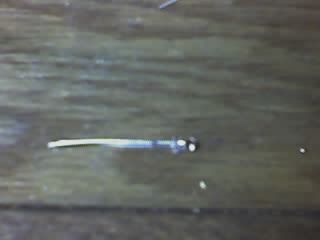
first i of course removed the needles from my cluster... since im making my own LED cluster mine was already taken apart...
next i popped the old line of LEDs out of the needles... they come out pretty easy if you use a tiny skill flat head... they will come out all together and leave an open space in the back of the needle... and this is where you will put your new 3mm led...
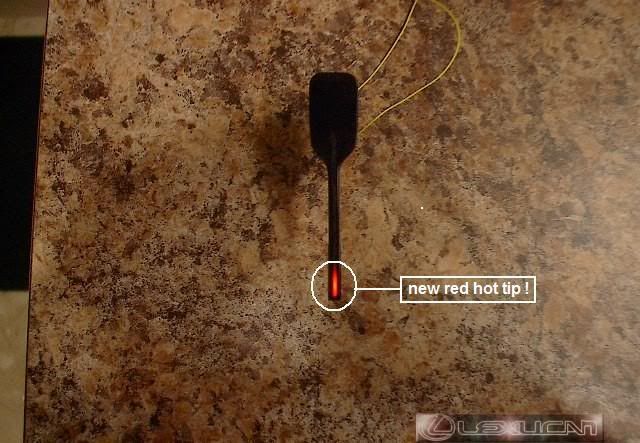
now to solder the new 3mm LED in i used a small electronics soldering gun and tiny solder... you must solder a resistor in line or the LED will not work with the 12v source the cluster puts out... you know the little metal pieces on the back side of the needle that slide onto the posts in the cluster? well those are what carry the 12v electricity and that is what you wil solder your LED to... as you can see in the first picture my LED came with pretty long posts so i had to cut them down... after i had soldered the resistor in line to one of the posts i made sure the LED with resistor fit snug in the crevice on the back side of the needle right where the needle begins to widen... i pointed the LED to shoot light down the length of the needle....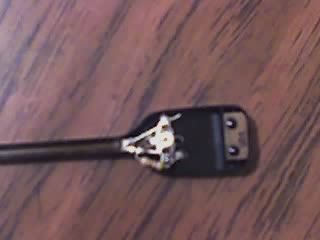
hopefully you can see what i did there... i know these pics are poor quality... i took them with a camera phone... sorry...
anyway... next i tested the needle to make sure it lit up... it lit up very brightly... in fact brighter then the stock LED row...
now the next thing i did was take some black duct tape and using a very thin strip i covered the back side of the needle so that the light from the new LED did not shine onto the cluster from the back... the key to this step is to use black duct tape because it sticks really well and you can stick it up along the edges of the needle a little without it being noticeable... electrical tape would work just the same but i feel that electrical tape is not as sticky and would not adhere as well...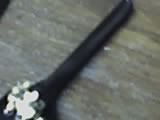 as you can see in mine (hopefully) the tape completely covers the back side of the needle and folds over the edges slightly to insure that it stays on...
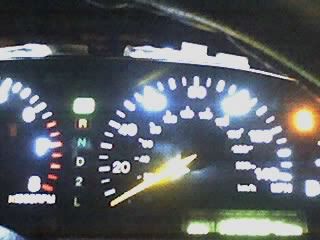
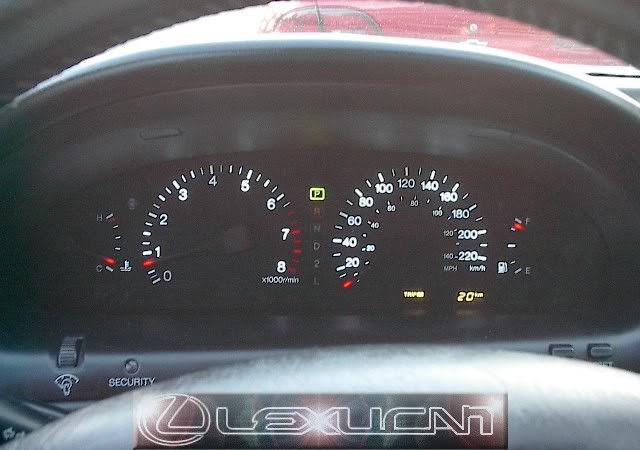
here is a picture of it in the cluster... it looks like the needle is brighter near the base but that is just the crappy phone... in real life the needle actually illuminates along the length uniformly... and it is very bright... brighter then the stock needles... as you can see it illumintaes in a yellow color... i did all of my needles so that they were uniform color... if you do not do that... it might look weird...
here is a closer pic... like i said before it looks like its brighter at one end but in real life it is uniform brightness along the whole LED... the camera on this phone is just really poor and pics up bad glare...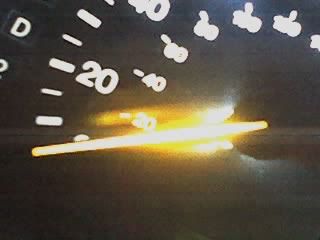
altogether the LEDs cost 5 dollars on ebay and the black electrical tape was 3 dollars at a local auto parts store... i already had solder and the gun... but if you dont have that add another 10 dollars...
they are definitely brighter then stock and i think the yellow is nicer looking then the orange... and it sure beats paying 300-400 dollars for a new cluster...
as you can probably see im also working on illumintaing my cluster with LEDs so when im finished with that project i will show you all how to do it... its pretty easy as well...
basically what this fix involves is soldering a 3mm LED to the needle contacts on the back... its very simple to do but if you suck at soldering or working with electronics be careful...
the LEDs i ordered were 3mm white LEDs that came with resistors to allow them to work with a 12v source...
first i of course removed the needles from my cluster... since im making my own LED cluster mine was already taken apart...
next i popped the old line of LEDs out of the needles... they come out pretty easy if you use a tiny skill flat head... they will come out all together and leave an open space in the back of the needle... and this is where you will put your new 3mm led...
now to solder the new 3mm LED in i used a small electronics soldering gun and tiny solder... you must solder a resistor in line or the LED will not work with the 12v source the cluster puts out... you know the little metal pieces on the back side of the needle that slide onto the posts in the cluster? well those are what carry the 12v electricity and that is what you wil solder your LED to... as you can see in the first picture my LED came with pretty long posts so i had to cut them down... after i had soldered the resistor in line to one of the posts i made sure the LED with resistor fit snug in the crevice on the back side of the needle right where the needle begins to widen... i pointed the LED to shoot light down the length of the needle....
hopefully you can see what i did there... i know these pics are poor quality... i took them with a camera phone... sorry...
anyway... next i tested the needle to make sure it lit up... it lit up very brightly... in fact brighter then the stock LED row...
now the next thing i did was take some black duct tape and using a very thin strip i covered the back side of the needle so that the light from the new LED did not shine onto the cluster from the back... the key to this step is to use black duct tape because it sticks really well and you can stick it up along the edges of the needle a little without it being noticeable... electrical tape would work just the same but i feel that electrical tape is not as sticky and would not adhere as well...
as you can see in mine (hopefully) the tape completely covers the back side of the needle and folds over the edges slightly to insure that it stays on... here is a picture of it in the cluster... it looks like the needle is brighter near the base but that is just the crappy phone... in real life the needle actually illuminates along the length uniformly... and it is very bright... brighter then the stock needles... as you can see it illumintaes in a yellow color... i did all of my needles so that they were uniform color... if you do not do that... it might look weird...
here is a closer pic... like i said before it looks like its brighter at one end but in real life it is uniform brightness along the whole LED... the camera on this phone is just really poor and pics up bad glare...
altogether the LEDs cost 5 dollars on ebay and the black electrical tape was 3 dollars at a local auto parts store... i already had solder and the gun... but if you dont have that add another 10 dollars...
they are definitely brighter then stock and i think the yellow is nicer looking then the orange... and it sure beats paying 300-400 dollars for a new cluster...
as you can probably see im also working on illumintaing my cluster with LEDs so when im finished with that project i will show you all how to do it... its pretty easy as well...
 04-18-06, 09:39 PM
#2
Driver


Join Date: Apr 2006
Location: TX
Posts: 128
Likes: 0
Received 0 Likes
on
0 Posts
hmm, did you replace the backlight bulbs with LED bulbs also? because I tried looking for LED bulbs to replace the speedometers backlight bulbs but they don't carry it in that size at the stores I check out 
04-18-06, 09:43 PM
#3
Keeper of the light
iTrader: (17)
Holy blown out contrast, batman. 
Good attempt my friend, you did very well. The 3mm led's do not give much performance in the needles unfortunately. Also you'll probably see them die out soon, they don't take voltage down the throat very well. They are too small.
No, it IS brighter at the base.... where the led is. The camera doesn't lie, contrast is blown out at the brightest points, like in your backlight.
The ES needles are one of the hardest to make work correctly and look good. I've been custom building them for 3 years, I definitely know. Keep working on it and you'll get it to look like this one day I am sure, you are starting out where I was 3 yrs back and there will be many setbacks that you can only learn through trial and error.
Once you build it a few times and change some things out, you'll end up with a nice, clean, evenly lit cluster like a Lexus should be
Kudos for your efforts
(sc cluster with ES needles and led backlight)

(es cluster, led backlight, no needles lit)

Good attempt my friend, you did very well. The 3mm led's do not give much performance in the needles unfortunately. Also you'll probably see them die out soon, they don't take voltage down the throat very well. They are too small.
here is a picture of it in the cluster... it looks like the needle is brighter near the base but that is just the crappy phone
No, it IS brighter at the base.... where the led is. The camera doesn't lie, contrast is blown out at the brightest points, like in your backlight.
The ES needles are one of the hardest to make work correctly and look good. I've been custom building them for 3 years, I definitely know. Keep working on it and you'll get it to look like this one day I am sure, you are starting out where I was 3 yrs back and there will be many setbacks that you can only learn through trial and error.
Once you build it a few times and change some things out, you'll end up with a nice, clean, evenly lit cluster like a Lexus should be
Kudos for your efforts
(sc cluster with ES needles and led backlight)
(es cluster, led backlight, no needles lit)
Last edited by O. L. T.; 04-18-06 at 09:46 PM.
04-18-06, 10:07 PM
#4
Driver
Thread Starter
yeah the led for the back light is something i soldered on... not a bulb you can buy... but like OLT said its way too bright where they sit so i ordered more and im going to just make a string of them along where i want them so they are more uniform... ill let you know what happens... and as for the needles... they are really bright man... i mean all i have to compare it to is my fuel stock LED but they are way brighter then the stock one... and as for it being brighter near the end it really isnt at all... ill take a pic with a better camera so you guys can see...
but like you said... this is an ongoing project and i have been working on my cluster for about a month now and i still do not have it as i would like it... but im getting much closer...
thanks for the nice comments and the support!
but like you said... this is an ongoing project and i have been working on my cluster for about a month now and i still do not have it as i would like it... but im getting much closer...
thanks for the nice comments and the support!
04-18-06, 10:19 PM
#5
Lexucanafer
Originally Posted by djdoughboy
yeah the led for the back light is something i soldered on... not a bulb you can buy... but like OLT said its way too bright where they sit so i ordered more and im going to just make a string of them along where i want them so they are more uniform... ill let you know what happens... and as for the needles... they are really bright man... i mean all i have to compare it to is my fuel stock LED but they are way brighter then the stock one... and as for it being brighter near the end it really isnt at all... ill take a pic with a better camera so you guys can see...
but like you said... this is an ongoing project and i have been working on my cluster for about a month now and i still do not have it as i would like it... but im getting much closer...
thanks for the nice comments and the support!
but like you said... this is an ongoing project and i have been working on my cluster for about a month now and i still do not have it as i would like it... but im getting much closer...
thanks for the nice comments and the support!
What value resistor did you use on the needles?
If your new 3mm white LED makes the needle look yellow, what color were the original LED strips that made the needles look orange? Were the old LEDs red in color maybe?
Would sure like to see some new pics of your work....some that are maybe in focus?
(j/k)Great write-up !
If you are looking for LEDs for your cluster backlighting, check this out:
http://cgi.ebay.com/ws/eBayISAPI.dll...PCN_BIX_Stores
They will plug right in to your sockets on your cluster so no soldering necessary. I just bought a set for my '93 ES and they are arriving tomorrow

Good luck with the rest of your project !!
...and thanks!
Last edited by Lexucan; 04-18-06 at 10:32 PM.
04-18-06, 10:29 PM
#6
Driver
Thread Starter
yeah man for sure ill get a real camera and take some pics so you guys can see better... for the resistors i used 470 ohm resistors...
as for what color the stock LEDs were i guess they must have been red because the white LED makes the needles light up yellow...
good luck... im sure you will find that its pretty easy to do if you work in an electronics store... post up some pics when youre done yo!
as for what color the stock LEDs were i guess they must have been red because the white LED makes the needles light up yellow...
good luck... im sure you will find that its pretty easy to do if you work in an electronics store... post up some pics when youre done yo!
04-19-06, 07:16 AM
#7
Lexucanafer
Originally Posted by djdoughboy
im sure you will find that its pretty easy to do if you work in an electronics store... post up some pics when youre done yo!

So how easy is it to remove the needles from the cluster face to work on them? Use any tools? Do they come off intact without springs or other parts flying off in every direction?

Trending Topics
04-19-06, 07:55 AM
#8

I'm glad you did it yourself!
I'd just rather pay OLT the $200 to get him to replace all the backlighting & do new needes out of SMD's so they're bright all the way down the needle. Every car & ebay gauge kit on the planet has the "shoot down one end" lit needle. Not for me.
"To each, his own." Tho.
I'd just rather pay OLT the $200 to get him to replace all the backlighting & do new needes out of SMD's so they're bright all the way down the needle. Every car & ebay gauge kit on the planet has the "shoot down one end" lit needle. Not for me.
"To each, his own." Tho.
04-19-06, 08:05 AM
#9
Driver
Thread Starter
lexucan the needles come off very easily with no tools required... taking the gauge cluster out is pretty easy too... just a couple screws... i have an extra set of needles i could send you if you would like to experiment... just let me know... send me a PM and we can talk about it...
pheonix... i would rather build my own stuff and fix my own car... cause to me that is the whole fun of modding a car! wait til you guys see my custom dash kit for the navigation unit i put in!! plus when you see the needles in person you cant tell that the LED is placed at one end... ill take some better pics for you guys so you can see... but you are right... Lextech has some awesome stuff they can do... and i think their clusters look great!! but i have some ideas of my own and i just want to experiment... i guess thats just how i am... hehe... ill post some pics up when im done with the cluster... also i did my whole climate control in green LED to match my navigation unit... it came out really nice... ill post up some pics later when i get that digi cam hahaha....
lexucan... maybe you and i could work together on coming up with a string of smaller LEDs that can fit in the back side of the needles so that it would be more like the way the stock LEDs are set up... let me know if this is a possibilty... id be very interested in trying something like that...
Last edited by djdoughboy; 04-19-06 at 08:14 AM.
 04-19-06, 01:03 PM
#11
Driver
Thread Starter
i know man! thanks for the support... lexucan pointed me in the direction of SMD LEDs so im going to try those out... and ill let you guys know how those look... with a better camera too hehehe
04-22-06, 01:49 PM
#12
let us know on the reliability and heat issue with the smd's when you get it done.
lol and anyone with a customer cluster & needle combo noticed other drivers checkin it out goin down the road. costantly happening to me on the trip from colorado springs to denver. lol.
lol and anyone with a customer cluster & needle combo noticed other drivers checkin it out goin down the road. costantly happening to me on the trip from colorado springs to denver. lol.
05-15-06, 05:50 PM
#14
Lexucanafer
Well I just installed my own version of djdoughboy's needle fix. Rather than using a 3mm LED to replace the burnt out original LEDs, I used a surface mount (SMD) LED and two 330 ohm resistors connected in series.
Here is what the new needle looks like:
Underside

Topside
I also replaced the incandescent instrument cluster backlight bulbs with blueish white LEDs.
Here are a couple of pics of cluster with new LED backlighting and newly fixed gauge needles:
Close-up (daylight shot so it doesn't look very bright)
From the side at dusk (sorry...a little blurry)
Thanks to djdoughboy for the inspiration!
Here is what the new needle looks like:
Underside
Topside
I also replaced the incandescent instrument cluster backlight bulbs with blueish white LEDs.
Here are a couple of pics of cluster with new LED backlighting and newly fixed gauge needles:
Close-up (daylight shot so it doesn't look very bright)
From the side at dusk (sorry...a little blurry)
Thanks to djdoughboy for the inspiration!
Last edited by Lexucan; 09-24-06 at 05:21 PM.
05-15-06, 07:38 PM
#15
Man, both of you are like mad scientists. Very inspirational with the modding and Lexucan, I have to say that your dash looks totally different with just the tips lit like that. I can' t decide which one I like better. Guys keep up the good work and maybe yall might start taking orders for other installs. Different color needles would definately set off my LS. Guys keep up the great work.

