When you click on links to various merchants on this site and make a purchase, this can result in this site earning a commission. Affiliate programs and affiliations include, but are not limited to, the eBay Partner Network.
2007 ES350 - Broken Window Clip - Problem and Solution w/ Lots of Pictures
Update:
I've redesigned the part a bit...nice strong radius sweeps at the bottom and a much nicer finish. Check out my website for more details: http://www.bluemooseengineering.com and PM me for a super secret link to a PayPal button for a 15% Club Lexus member discount on the kit.
I've been lurking here for a little while, and have used this forum on and off for many years. My father-in-law is a die-hard Lexus owner (I'm a Honda/Acura guy myself but I still really like Lexus) so over the years I've helped him fix his cars many times, and have always found Club Lexus (and to be fair, other forums) to be a great resource.
Our most recent adventure involves the now-infamous broken window clip debacle. Our repair of this has gone so well, and I have seen nobody on any forum provide a similar solution, so I thought I'd share what we did and how we did it.
First a little bit about me. I have a background in Quality and Engineering, and mechanical design and fabrication. I have worked at a few glass and plastics manufacturers in Southern California over several years, so I may be uniquely qualified to work on this specific problem. Currently, I'm the Quality Manager at an industrial flat glass manufacturer. We specialize in glass machining and specialty flat glass parts for aerospace, scientific, medical, display, and lighting.
So here's a summary of what I know about this problem based on my reading. I'm providing this in case you are just discovering that your car has this problem, and this is the first thread you've happened upon. For the veterans on the forum, please feel free to correct any of this information:
The earlier models of the 5th gen ES350 suffer from a chronic failure of the plastic clip that joins the window regulator to the window
This seems to affect the passenger window only
This seems to affect the first three model years (2007-2009) - is this true?
The only real solution so far has been to replace the entire piece of glass, which comes with new clips pre-adhered to the glass - not a bad fix but also fairly expensive and now, most often outside of warranty coverage
It is alleged that the clip was redesigned on later models and on replacement parts so the failure does not recur - can someone confirm this?
We went through the process of reporting the problem to the Lexus dealer, and attempting to negotiate a free or discounted repair. They were not completely inflexible and agreed to fix the problem for the retail price of the part (sparing us the labor charge). This was still going to cost ~$400 and we thought we could do as good of a job for less $$$.
Before I share our repair, I just want to comment on the nature of the failure.
I have seen several posts in several threads that theorize about the root cause of the failure and how to fix it. Nearly all of this speculation is probably wrong. Some deride the use of a plastic clip - there is nothing inherently wrong with using molded plastics for these applications. This part is exposed to very little stress linearly or laterally so a properly designed molded piece should not fail...we know this because most cars use a similar system and do not fail chronically.
Someone else commented that a hole should be drilled in the glass and the regulator arm joined directly to it. It's not that this couldn't work, but its important to think of holes in a piece of glass as defects, or potential defects. Drilling a hole in a piece of glass forever compromises that piece of glass, and for a moving part, should probably be avoided. I have seen this design fail many times so its not surprising that the industry has moved away from it. It is more costly and more likely to fail intermittently and unpredictably.
Also the term "waterjet" was used...just an FYI - water-jetting glass is really a no-no. The initial blast of abrasive-filled water causes substantial chipping and flaking at the entry site and is not the proper way to put a hole, or cut any shape, in glass, unless it is going to undergo substantial further machining.
So why does this part fail? Well not surprisingly, I believe it can be traced back to the design of the part, and keep in mind that this is just a theory. Take a look at the pictures below:
First, you'll notice that the point of failure, at least on this part, is a very thin section at the bottom of the U. This does not defy expectations..there's absolutely no reinforcement in that area...it's very thin.
I believe that since the window is curved, and travels on a curved path, and because the window regulator is straight, and travels up and down quite linearly, that at the extremes of the window's travel, there are very slight lateral forces being applied to the clip. The part was never designed to handle these types of forces repeatedly.
That, combined with thermal cycling of a fairly extreme nature (depending on where you live) and the rate at which the passenger window is actually cycled up and down, leads to a failure of the plastic part. To me, this is actually good and bad engineering. It would be very difficult to overcome the problem of curved window and path/straight regulator. So the fact that the smallest and presumably cheapest part in the assembly fails, is in many ways good..you wouldn't want those forces being transferred through to the glass (although I don't foresee heat tempered glass breaking that easily).
You could argue circularly for hours about whether the motion design or the part design is the true root cause. But, since the motion design would be very difficult to overcome, and the part design fairly easy to overcome, the burden of fault lies with the part. It's just weak.
I have not seen the redesigned part from Lexus but I imagine that it contains bracing or is thicker in the area highlighted by the red triangles in my illustration above. Perhaps someone who has received a replacement dealer window can confirm?
Either way, if you find that your car is suffering from this failure, what are you to do? Well most people will have to just suck it up and pay for a replacement window. We took a different path.
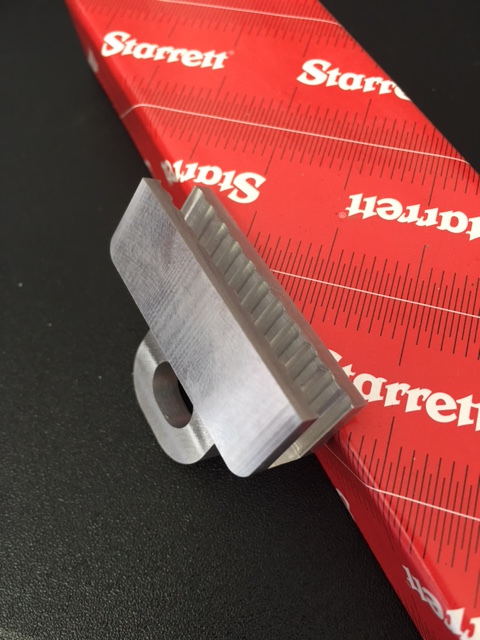
I have access to machining capability and expertise so I decided to leverage that and just create a new clip. We machined this from aluminum (didn't record the grade - not particularly important for this application):
Side-by-side comparison
Another side-by-side
Grooved to increase surface area - this mimics the design of the original part
The new part came out beautifully and I couldn't wait to get it installed.
The first step was to remove the door panel and speaker. There are numerous how-tos for this everywhere so I'm not going to repost all of that. Once the door panel was removed we dropped the window regulator low enough to access the site of the broken clip.
The next task was to remove the old adhesive. This is a fairly soft rubberized adhesive (more on that in a bit) so it scrapes off very easily using a fresh razor blade:
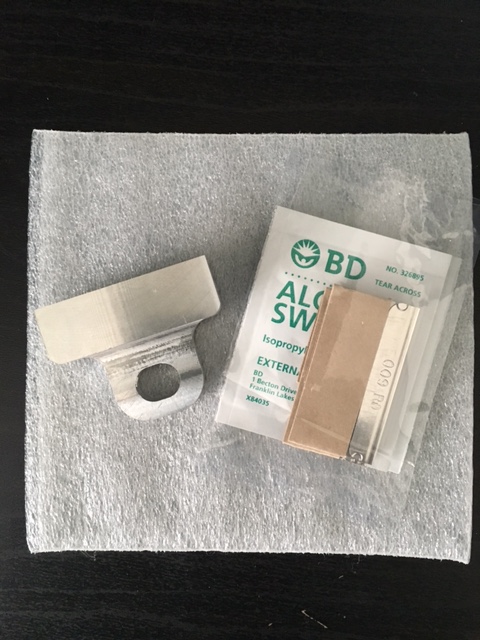
We did our best to get the area as clean as possible. It's tough to reach some spots. Once we removed as much of the adhesive as we thought we could, we wiped the surface with isopropyl alcohol (you could use acetone or equivalent solvent):
Once the area was clean we gave the part a test fit:
Looks great and it kind of clips right into place. It's obvious that the fitment is perfect.
Then we removed the part and filled the gap full of adhesive. I spent a LONG time selecting an adhesive for this and finally settled on a 3M Urethane-based windshield adhesive for a number of reasons:
This adhesive is designed specifically for adhering glass to coated and uncoated metal substrates - perfect - that's exactly what we are doing
The adhesive in this application acts as both a damper and as a bonding agent, securing the part to the glass and absorbing vibratory forces transferred through the vehicle frame to the door and to the regulator so it needs to be thick and rubbery
The adhesive should have a fairly short work time and a high strength bond - this has an ~15 minute work time and a 72 hour Lap Shear strength of 550psi - our bondline is going to be thicker than that used for the lap shear test, but the takeaway is that this is a tough application-specific adhesive
The adhesive we used is 3M part number 08693 and is available off the shelf at O'Reilly/Autozone/Pepboys/et al for about $15. We used less than an ounce of it but you can just plug the tube and keep it for something else:
MAJOR NOTE: WEAR RUBBER GLOVES - just touching this adhesive spreads it around like wildfire and it doesn't come off your skin easily - ask me how I know
Once the entire gap is filled in with adhesive, I used one finger to press the regulator arm backward to make space, and using my other hand, slid the clip up onto the glass in the approximate location. I let the regulator arm come forward to its natural position, then moved the clip into place centered over the bolt hole:
A lot of adhesive will be forced out. This is good. This is exactly what the factory job looked like. in this case, more is better!
I smeared a little extra on and around the part just as a precaution. It looks messy but that's okay! Nobody's going to see it anyway:
The only thing left to do was wait for it to cure then test it and put it all back together. We waited way past the actual cure time (24 hours) of the adhesive and went for about 60 hours before testing. Check out the attached video for our "test". The window operates totally smoothly with no noise at all. I call this a tremendous success.
Additional note: For some reason taking apart the passenger-side door panel and control disabled the drivers-side switch for that window, and also the auto function on the passenger-side window switch. Maybe someone here knows more about this than we do (I believe it has something to do with "pinch protection"?) but we were able to get things working again by using the down +5 seconds and up +5 seconds trick.
So what do you think?
Edit: I don't know why the video is playing on its side - it's rotated 90� the wrong way - maybe a mod can fix it...
Edit 2: Honesty and transparency are important to me so I might as well just come out and say that I've been toying with producing and selling these. This whole thing started as me helping out my father-in-law, but the more I read, the more I realized that there are probably a lot of people in need of a more affordable solution for this problem.
I'm making a few more parts and creating a CAM file then I'm going to talk to a machine shop about actual production.
I admit that I didn't read the fine print so I want to say that my intent is not to break forum rules. I'm here primarily to share my work openly with the community, and secondarily, to perhaps sell some of these parts. If this requires vendor status and paying my due to the forum operators, I'd be happy to discuss that. Mods - please PM me if you want to talk about this.
Last edited by Blue Moose Engineering; 08-18-16 at 02:40 PM.
A great write up. I've seen quite a few posts about broken passenger side windows. I'm dreading that it will happen to me at some point (not sure if the clip was redesigned for the 2008).
Since I don't have access to a milling machine I was wondering if a clip could be manufactured by a 3D printer (I have a couple of friends who own one). I believe most models use some sort of nylon.
That's a good question.
I would say that it depends on the type of plastic. Nylons in general are going to be a fairly large no.
I toyed with using 3M's Delrin but the problem with these substrates is that they are notoriously difficult to adhere anything to. After repeatedly cycling the window, the piece would probably pull away from the adhesive.
I chose aluminum specifically because it is such an excellent substrate for adhesion and because it is easy to machine.
Edit: See Edit 2 at the bottom of my original post
what a great post. my 07 has not suffered this flaw yet but this is a great solution. you should fabricate a few more clips and make them available to CL members
On the power window auto close function, this pdf tells u how to initialize the system
what a great post. my 07 has not suffered this flaw yet but this is a great solution. you should fabricate a few more clips and make them available to CL members
On the power window auto close function, this pdf tells u how to initialize the system
See Edit 2 at the bottom of my original post re: making more clips
Excellent job on this. I just had my passenger window replaced by Lexus as a goodwill (100,100 miles on the odometer - right past warranty) and would have loved to do this myself, as I had previously had all windows tinted. Now I get to go see if the tint dealer has something similar in stock when I have some free time. Would definitely be interested in picking up a clip or two just for security as I don't plan on letting my car go for quite some time.
Does anyone know if they redesigned the clip on the ones that have been repaired? Maybe I'll do my best to take a look if I ever get around to replacing my door speakers. I'm guessing due to the length and weight, this type of failure is only happening on the front two side windows and not the rear ones.
Does anyone know if they redesigned the clip on the ones that have been repaired? Maybe I'll do my best to take a look if I ever get around to replacing my door speakers. I'm guessing due to the length and weight, this type of failure is only happening on the front two side windows and not the rear ones.
That's a good question. I've heard rumors that it's redesigned but I have seen no evidence. And yes, seems to be only the front clip on the front window and primarily the passenger side. I don't think I've seen a single thread complaining about the driver side front window.
Excellent work. I like your permanent solution, once the clip breaks.
I think there are more opportunities for a "preventative" option (i.e. before the clip breaks rather than after it breaks). Looking at your pictures of the weak area and your installation, there seems to be sufficient room to add a reinforcement plate.
If you can make a strong thin plate, and sold it cheap enough (because most people can probably fabricate their own) you could find a good market.
P.S. I'll be happy to test the reinforcement plate for you!
That's a good idea and has a lot of merit for anyone who wants to fix, or prevent this, on their own.
I imagine someone could do this at home with basic tools and a bench vise in only a couple hours.
From a manufacturing perspective, this would be tough to make but sell cheaply at the low volumes we're talking about.
It would require a cut step and a drilling step, two 90 degree bends, an edge grind, and maybe a painting or coating step.
That's a lot of motion and effort for a part that people probably wouldn't spend more than $15 for! I doubt it could be made for that little.
But again, definitely a great idea for someone at home looking for a promising preventive measure!
Im curious about the bolting arrangement. Is it on tight or loose to allow some play between the arm and the window clip?
That is actually a VERY good question and also one that doesn't necessarily matter and I'll explain why.
The short answer is that I installed the new part the same way that the factory part was installed...hand tight...maybe 1/4-1/2 turn past snug. Probably somewhere in the realm of 20-30 inch lbs. this is just the way it works but I don't know why.
As I was installing the new part, I wondered this myself but did not take the time to investigate.
I designed the new clip to have the same thickness mounting tab as the original.
The factory bolt is fairly short and as you can see, has a flat washer fixed at the head of the bolt. This washer does rotate but does not come off of the bolt.
The part doesn't experience that much rotation in relation to the regulator arm...maybe 20-30 degrees over the whole range of movement.
I was concerned that the metal-to-metal contact would make noise but it is quieter than the drivers-side door, oddly enough.
In the factory design there are no bushings and no source of lubrication or bearing...it just works.
If you take one apart and analyze it let me know what you discover. I'll take a closer look at my photos today.
Bump - I'm discussing becoming a vendor with Heather at Internet Brands. It looks like I'm going to pull the trigger on this soon.
It's tough to gauge how many cars are still suffering or will suffer from this particular ailment. It looks like Lexus produced about 150,000 ES350s for the US and Canada in 2007 and 2008. My father-in-law's 2007 has 90,000 miles and just broke last month.
In some ways I may have missed the party, but also, it seems like many of the original breaks were covered under warranty. I imagine that the 2nd and 3rd owners of these cars are more likely to be hands-on people, or people who are interested in an economical and effective repair. I just sold a part to a guy at a body shop in Las Vegas for this reason...his customer didn't want to pay $400+ for the new window.
On another note, I recently saw a seller on eBay offering the whole window for $108 plus shipping. This seems like a bad move to me. I can't imagine that a window that cheap will be anywhere near OEM quality. I think that's one of the advantages of my part...it allows you to retain your factory ES350 window without spending $1000.
It's tough to gauge interest in a part like this but it seems worth it to at least try.
Once I get vendor status I'll have links to the website I just built. In the meantime, if you are suffering from this problem and absolutely NEED a part, PM me.
 08-04-16, 12:00 PM