xanderES's Modification Build Thread
 03-29-12, 04:44 AM
#1

I introduced myself a while ago and wanted to finally start posting about my experiences modding the ES350. I must say that if you are trying to mod an 350 that there are very few mods options and even less information regarding them unless you're on CL or likewise forum. I have not seen anyone with a complete mod list thread so I thought I'd try creating one. I have gathered most of information for these mods from lurking here on CL since the ES350 came out so I thought I'd give a little bit back  .
.
The most intensive thing I have done to date is the audio system upgrade and soundproofing the whole car. The speakers were professionally installed at a car audio shop here in so-cal and I have pulled apart the interior and trunk to sound deaden the car.
07 Es350 in Black Sapphire
Currently:
- Tint: 20% back 35% front
- Upgraded "premium" audio system with:
Helix competition RS6 components in the front doors and the dash
Boston Acoustics SR65 coaxials in the rear
FI Audio Q 12" subwoofer in ported box tuned to 30hz
- Custom Amp rack in trunk mounted with:
JL Audio 300/4
Sundown Audio 1200/1
- Big 3 electrical upgrade
- Audiocontrol LC sound processor
- Dynamat Extreme on all four doors, rear deck, and full trunk
- Polyurethane foam in the trunk lid + panel behind the license plate
- Roof, trunk roof, rear sunshade soundproofed with Alpha Damp
- Turnsignal Mirrors
- Weathertech Digital floor mats (black)
- Puddle, Courtesy, Mirror light bulb swap (194)
- IS350 white footlights/center console
- Rear tail-light vinyl tint
- Ultra Racing rear sway - (currently removed due to increased chance to snap bracket - will reinstall when brackets are strengthened )
- E&G grill ( Do NOT do business with this company, they are incompetent. They sent me 8-9 grills over a 6 month period before they could get it right, I had to mix and match parts from different shipments for it to work and I even had to speak to both the district manager of E&G and the main techs)
-Gloss black vinyl covering the outside window chrome
- Coilovers - BC-R's on the way
- 18" WedsSport Sa60M in BBM w/ 225/45/18 Yokohama Avid Envigors
- Front tab modification
Edit: About done with modifications. Last thing to do is gusset the rsb plates and reinstalling the rear sway.
Finished product.
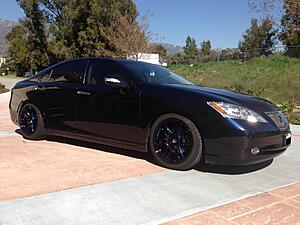
If you have any questions feel free to ask! I've learned a lot while trying to make my car different from the pack...
. The most intensive thing I have done to date is the audio system upgrade and soundproofing the whole car. The speakers were professionally installed at a car audio shop here in so-cal and I have pulled apart the interior and trunk to sound deaden the car.
07 Es350 in Black Sapphire
Currently:
- Tint: 20% back 35% front
- Upgraded "premium" audio system with:
Helix competition RS6 components in the front doors and the dash
Boston Acoustics SR65 coaxials in the rear
FI Audio Q 12" subwoofer in ported box tuned to 30hz
- Custom Amp rack in trunk mounted with:
JL Audio 300/4
Sundown Audio 1200/1
- Big 3 electrical upgrade
- Audiocontrol LC sound processor
- Dynamat Extreme on all four doors, rear deck, and full trunk
- Polyurethane foam in the trunk lid + panel behind the license plate
- Roof, trunk roof, rear sunshade soundproofed with Alpha Damp
- Turnsignal Mirrors
- Weathertech Digital floor mats (black)
- Puddle, Courtesy, Mirror light bulb swap (194)
- IS350 white footlights/center console
- Rear tail-light vinyl tint
- Ultra Racing rear sway - (currently removed due to increased chance to snap bracket - will reinstall when brackets are strengthened )
- E&G grill ( Do NOT do business with this company, they are incompetent. They sent me 8-9 grills over a 6 month period before they could get it right, I had to mix and match parts from different shipments for it to work and I even had to speak to both the district manager of E&G and the main techs)
-Gloss black vinyl covering the outside window chrome
- Coilovers - BC-R's on the way
- 18" WedsSport Sa60M in BBM w/ 225/45/18 Yokohama Avid Envigors
- Front tab modification
Edit: About done with modifications. Last thing to do is gusset the rsb plates and reinstalling the rear sway.
Finished product.


If you have any questions feel free to ask! I've learned a lot while trying to make my car different from the pack...
Last edited by xanderES; 02-18-13 at 09:53 PM.

 03-30-12, 01:47 AM
#3
Thank you. I got a good deal on them from my audio shop that I couldn't pass up when redoing my system.
The turn signal mirrors are from a vendor here on CL named Nigel-JDMParts. I had the same shop wire up the electrical for me and I just ran the wires and installed them myself. I believe they tapped the wires to a fuse box behind the lowest panel under the steering wheel.
If you or other members decide to install them I would be happy to give a run down of the installation process.
that I couldn't pass up when redoing my system. The turn signal mirrors are from a vendor here on CL named Nigel-JDMParts. I had the same shop wire up the electrical for me and I just ran the wires and installed them myself. I believe they tapped the wires to a fuse box
behind the lowest panel under the steering wheel. If you or other members decide to install them I would be happy to give a run down of the installation process.
08-16-12, 10:59 AM
#5
Driver
iTrader: (1)
Join Date: Feb 2011
Location: GA
Posts: 190
Likes: 0
Received 0 Likes
on
0 Posts
I am going to be doing a full upgrade on my non-ML nav system. Will the Apline Alpine SPS-610C tweeter fit in the factory dash location? Is there any adapter needed for the dash?
System upgrade:
Alpine MRP-M500 mono amp
Alpine Type-R 12" sub with sealed enclosure
Alpine MRP-F300 4-ch amp
Alpine SPS-610C (front)
Alpine SPS-610 (rear)
AudioControl LCQ-1
I will post up a new thread with pics when I put it in.
System upgrade:
Alpine MRP-M500 mono amp
Alpine Type-R 12" sub with sealed enclosure
Alpine MRP-F300 4-ch amp
Alpine SPS-610C (front)
Alpine SPS-610 (rear)
AudioControl LCQ-1
I will post up a new thread with pics when I put it in.
11-12-12, 03:01 AM
#7
Notice: Use of this information is at your own risk. I am not responsible for any injury, loss, claim, damage, or any direct, incidental or consequential damages of any kind pertaining to the use of this information.
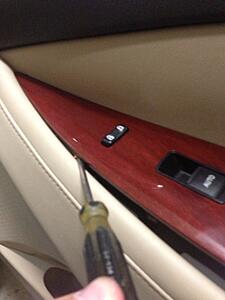
Door Removal DIY.
Needed materials - Philips head screwdriver, Flat head screwdriver, masking tape
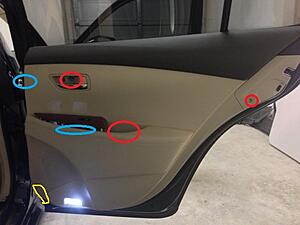
Red circles - screw locations - this is for rear doors.
Blue circles - additional areas where screws will be for the front doors.
Yellow - we'll come back to this later.
Pre-step - Wrap the flat head screwdriver in masking tape so you do not mess up the finishes or leather.
All the screws are + heads
1. Remove door stop screw on the right side (upper right red)
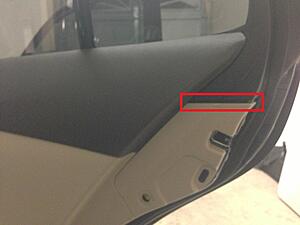
2. Place flat head behind the cover next to the door handle pull it out. It will come out easy and expose this screw. (upper left red)
3. Use your fingernail or something else to pry the carpet off and expose screw (lower middle red)
Additional screws on front doors
Left blue (red in below picture, sorry!) - in the vent pictured below.
Right blue - after removal of panel you will gain access.
Now that you've removed the screws you're ready to take off the window switch panel.
4. Use your masked off flat head to get under it from the back and pry it up. Then move down the side pushing the panel up and moving down to the next clip as you go (shown)
Here is a picture of the underside of the panel and all the clips/attachment points.
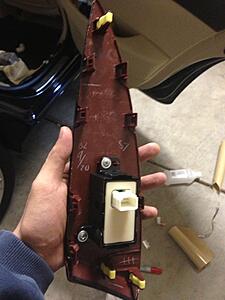
5.You will need to detach what ever these are called (give me a break its 2:30 am) attached to the window switch panel and later the inside of the door panel. I will no longer include these as a step - it is common sense If they're connected to something you're removing - take them off
You will now unscrew the 5th and final screw under the panel if you are doing the fronts.
Refer to first picture - you are now ready to take off the door panel.
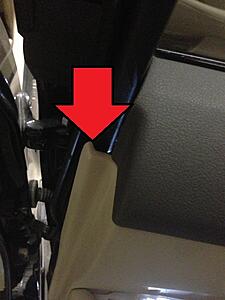
6. Grab the yellow part - there will be a place for your hand - Pull HARD you will disengage the push fasteners. Move up and to the right. NOTICE - the very top of the door panel is connected to the door. DO NOT TRY AND PULL OFF THE WHOLE PANEL IN THIS STEP
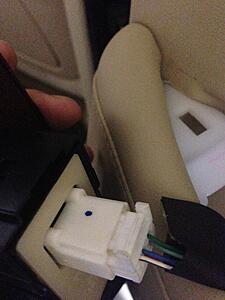
7. When you get to the top of the door you will encounter these. Tan = pull out with the door panel and leave the black part untouched. (this picture is just for reference - the fronts are different colors but you should get the idea)
8. After clearing them pull UP. Just enough to get the whole panel off. You will have to pull hard but stop exactly after the panels off - remember that the bottom light, door handle and other possible connections depending on front/rear are still connected to the interior of the door and you do not want to rip these out.
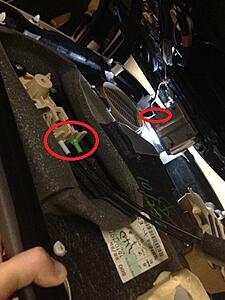
These are the rears - there will be more pin connectors if you are doing the fronts.
9. Hold the door panel with 1 hand and remove items from top to bottom - pull these green and white wires away from you and then get the ball out of the handle and lock switch.
Congrats your door panels are now off!
Reinstallation Protip- do with your window down
Take the top part of the door off that made your life a pain in step 7. Use a flat head and push in the most middle part of each bare stainless steel connector and rotate the flat head. It will release and push the piece off. (If this is not working you are not catching the tiny metal edge)
Clip it back onto the top of the door making sure the male part of the clips are facing towards you.
Line up the biggest male part on the top right corner of the door to the female part on the door panel. This will line up the top right side. Push in.
Then line up the push fasteners on the right side. This will align all the fasteners of the door and push/bang on the cover until all the fasteners push in.
Install complete!
Door Removal DIY.
Needed materials - Philips head screwdriver, Flat head screwdriver, masking tape

Red circles - screw locations - this is for rear doors.
Blue circles - additional areas where screws will be for the front doors.
Yellow - we'll come back to this later.
Pre-step - Wrap the flat head screwdriver in masking tape so you do not mess up the finishes or leather.
All the screws are + heads
1. Remove door stop screw on the right side (upper right red)
2. Place flat head behind the cover next to the door handle pull it out. It will come out easy and expose this screw. (upper left red)
3. Use your fingernail or something else to pry the carpet off and expose screw (lower middle red)
Additional screws on front doors
Left blue (red in below picture, sorry!) - in the vent pictured below.
Right blue - after removal of panel you will gain access.

Now that you've removed the screws you're ready to take off the window switch panel.

4. Use your masked off flat head to get under it from the back and pry it up. Then move down the side pushing the panel up and moving down to the next clip as you go (shown)
Here is a picture of the underside of the panel and all the clips/attachment points.

5.You will need to detach what ever these are called (give me a break its 2:30 am) attached to the window switch panel and later the inside of the door panel. I will no longer include these as a step - it is common sense
If they're connected to something you're removing - take them off
You will now unscrew the 5th and final screw under the panel if you are doing the fronts.
Refer to first picture - you are now ready to take off the door panel.
6. Grab the yellow part - there will be a place for your hand - Pull HARD you will disengage the push fasteners. Move up and to the right. NOTICE - the very top of the door panel is connected to the door. DO NOT TRY AND PULL OFF THE WHOLE PANEL IN THIS STEP
7. When you get to the top of the door you will encounter these. Tan = pull out with the door panel and leave the black part untouched. (this picture is just for reference - the fronts are different colors but you should get the idea)


8. After clearing them pull UP. Just enough to get the whole panel off. You will have to pull hard but stop exactly after the panels off - remember that the bottom light, door handle and other possible connections depending on front/rear are still connected to the interior of the door and you do not want to rip these out.

These are the rears - there will be more pin connectors if you are doing the fronts.
9. Hold the door panel with 1 hand and remove items from top to bottom - pull these green and white wires away from you and then get the ball out of the handle and lock switch.
Congrats your door panels are now off!
Reinstallation Protip- do with your window down
Take the top part of the door off that made your life a pain in step 7. Use a flat head and push in the most middle part of each bare stainless steel connector and rotate the flat head. It will release and push the piece off. (If this is not working you are not catching the tiny metal edge)
Clip it back onto the top of the door making sure the male part of the clips are facing towards you.
Line up the biggest male part on the top right corner of the door to the female part on the door panel. This will line up the top right side. Push in.
Then line up the push fasteners on the right side. This will align all the fasteners of the door and push/bang on the cover until all the fasteners push in.
Install complete!
Last edited by xanderES; 11-12-12 at 04:03 AM.
Trending Topics
11-12-12, 03:31 AM
#8
Notice: Use of this information is at your own risk. I am not responsible for any injury, loss, claim, damage, or any direct, incidental or consequential damages of any kind pertaining to the use of this information.
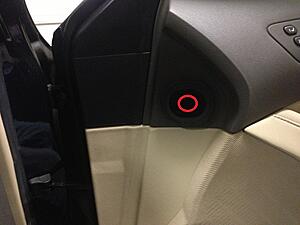
Center Console light change DIY
Many of us have changed the ugly amber front footwell lights that come stock with the isx50 white leds. While disassembling my interior to sound deaden it I found an easy way to replace the center console box light.
Needed materials - pry tool or strong grip and some fingernails - 1 footwell light here 12$ - shipping is terrible for CA residents though Part NO.: 81080-22040
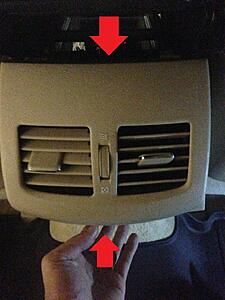
1. Sittin in the rear seats open the door to the center console - it should slide up and out exposing where the top connects to the rest of the center console. Grab it or use a pry tool.
2. Work your way under the very bottom of the back of the center console where it meets your carpel and pull both the top and the bottom.
It should look like this after. It is only held in by push fasteners
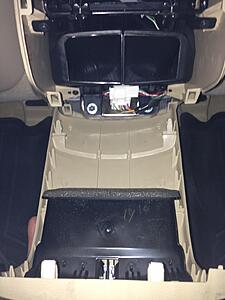
3. Light housing will be exposed. pull out the pin connector (not shown) the twist it all the way up.
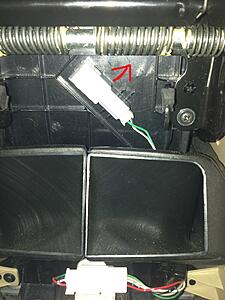
4. Work a flat head under it and rotate - it will push it out.
5. Take your replacement and push it into the hole - it will have to be in the same position as when you took it out. This will be a bit difficult as the space you're working with is small.
6. I found it impossible to rotate the light back into the regular position with my fingers so i made something hooked with a paperclip and a pair of pliers. If you happen to have some sort of hooked object use it - but make sure it wont push so far into the back of the led that itll damage the pins (check with the one you took off)
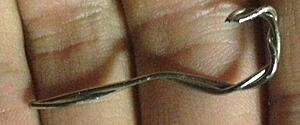
ingenuity at its best
7. Insert the paperclip or other object while holding the other side of the light like picture 2 and pull/twist that light until it comes down.
You now have a bright white led as opposed to the amber light in your center console!

Ok, thats enough for tonight. Ill update more tomorrow about sound deadening the hell out of the trunk and other problematic areas that i find rattle in the car.
Center Console light change DIY
Many of us have changed the ugly amber front footwell lights that come stock with the isx50 white leds. While disassembling my interior to sound deaden it I found an easy way to replace the center console box light.
Needed materials - pry tool or strong grip and some fingernails - 1 footwell light here 12$ - shipping is terrible for CA residents though
Part NO.: 81080-220401. Sittin in the rear seats open the door to the center console - it should slide up and out exposing where the top connects to the rest of the center console. Grab it or use a pry tool.
2. Work your way under the very bottom of the back of the center console where it meets your carpel and pull both the top and the bottom.

It should look like this after. It is only held in by push fasteners

3. Light housing will be exposed. pull out the pin connector (not shown) the twist it all the way up.

4. Work a flat head under it and rotate - it will push it out.
5. Take your replacement and push it into the hole - it will have to be in the same position as when you took it out. This will be a bit difficult as the space you're working with is small.
6. I found it impossible to rotate the light back into the regular position with my fingers so i made something hooked with a paperclip and a pair of pliers. If you happen to have some sort of hooked object use it - but make sure it wont push so far into the back of the led that itll damage the pins (check with the one you took off)

ingenuity at its best
7. Insert the paperclip or other object while holding the other side of the light like picture 2 and pull/twist that light until it comes down.


You now have a bright white led as opposed to the amber light in your center console!
Ok, thats enough for tonight. Ill update more tomorrow about sound deadening the hell out of the trunk and other problematic areas that i find rattle in the car.
Last edited by xanderES; 11-12-12 at 04:11 AM.
12-13-12, 12:53 AM
#9
Went a bit overkill on sound deadening and decided to take apart my whole interior to get to the roof which used to flex. I am now quite sure I have the most sound proofed ES350 rolling around .
Heres a few pictures.
about 1/3rd of the parts it took to remove the interior.
Attachment 501258
rear deck sound-deadened (that rear curtain holder rattles like crazy because it is not solid - oval holes cut throughout.)
Attachment 501259
dash out!
Attachment 501260
roof finished
Attachment 501261
and a sneak peek of my wheels that just came in!

.Heres a few pictures.
about 1/3rd of the parts it took to remove the interior.
Attachment 501258
rear deck sound-deadened (that rear curtain holder rattles like crazy because it is not solid - oval holes cut throughout.)
Attachment 501259
dash out!
Attachment 501260
roof finished
Attachment 501261
and a sneak peek of my wheels that just came in!

Last edited by xanderES; 12-13-12 at 11:50 PM.
 02-18-13, 09:42 PM
#12
Finally got the coils installed and just finished modifying the front fender tabs. No more rub! Riding 5/7 F/R from full soft and it is considerably bumpier. I'm definitely glad I went with 40 series sidewalls.
Bring on the opinions with your love/hate! Its been quite the journey.
Pictures in first post!
Bring on the opinions with your love/hate! Its been quite the journey.
Pictures in first post!
02-20-13, 08:26 AM
#14

Car looks amazing, good job, I just got one question, you said you took the Anti sway bar off because you didn't want to snap a bracket? Which bracket are you referring to as I'm installing the same one on my ES as we speak
02-20-13, 10:22 PM
#15
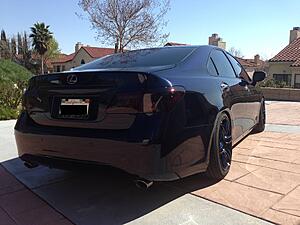
Thank you both. I'm actually surprised that no one has voiced that the look isn't their cup of tea. After all, the rims look deep purple in the light as you can see from the first picture. Not exactly what I expected from the color being called "black/blue machine" but it sort of color matches in the shade or looks black. I guess I got lucky with that one
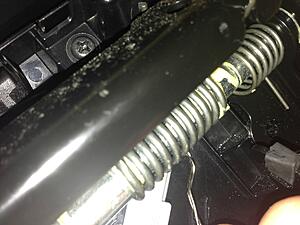
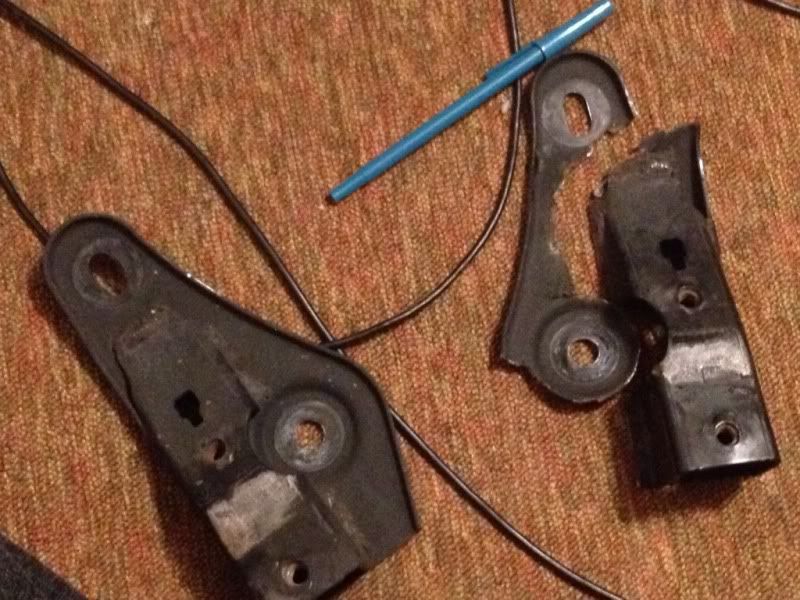
Anyways, the bracket should look like this:

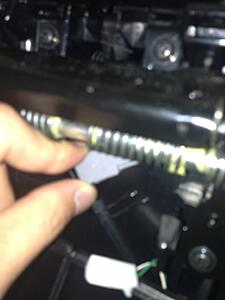
It will eventually break at the welds from 20,000 - never depending on your luck, but should be calculated into cost of ownership of the rear sway. If you purchased the 23 mm sway, I wouldn't chance it without reinforcing the piece.
Heres a picture of a broken one.
Anyways, the bracket should look like this:
It will eventually break at the welds from 20,000 - never depending on your luck, but should be calculated into cost of ownership of the rear sway. If you purchased the 23 mm sway, I wouldn't chance it without reinforcing the piece.
Heres a picture of a broken one.