When you click on links to various merchants on this site and make a purchase, this can result in this site earning a commission. Affiliate programs and affiliations include, but are not limited to, the eBay Partner Network.
Hi fellow Lexus owners,
I got a problem on my hands, need some insight.
I recently finished a very long job that included the replacement of the following:
1- 2 knock sensors
2- intake gasket
3- valve cover gaskets
4- throttle body gasket
5- spark plugs
6- new PCV valve
7- new knock sensor harness
8- new coolant
Took me a while to get all of these done, I did a little bit of work everyday for about a week.
Anyways, I put everything back today and started the car hoping everything would turn out fine.
The car started and immediately was revving at 1,800 RPM - 2,000 RPM. Some smoke started showing from the back of the plenum near the rear valve cover gasket. I turned off the car immediately. Looked under the car and there was some liquid leaking. I thought it was the coolant.
Started the car again, let her run for about a minute, then I checked under the car, and oh
A HUGE PILE OF OIL!
I didn't know where it was coming from, but it looked like the rear valve cover gasket was leaking like crazy. I took everything apart again(plenum & throttle body ) to remove the rear valve cover.
The thing is, I remember not taking my time with the rear valve cover. I just removed the old gasket and cleaned the surface a little bit with some throttle body cleaner, also same thing for the cover, just cleaned the edges with some throttle body cleaner. I then aligned the gasket on the cover and screwed everything back on. So I didn't really take my time with it, and I'm assuming it is the problem behind the oil leakage.
^I almost didn't want to write a new thread because I figured if I just clean it right, align it properly everything would be fine.
But I thought it wouldn't hurt to get some advice from you guys who had done this before.
Any tips will be very helpful, thank you all! And enjoy you the holidays.
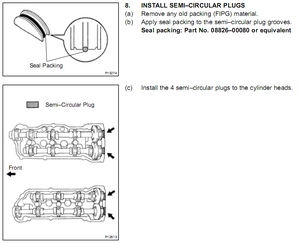
Without sealant in the corners etc. it can leak really bad, like pissing oil. BTW are we talking about an LS or ES? That picture is not correct you don't need sealant in some of those red areas shown.
Without sealant in the corners etc. it can leak really bad, like pissing oil. BTW are we talking about an LS or ES? That picture is not correct you don't need sealant in some of those red areas shown.
Oh boy, it was almost leaking like a waterfall!
I just didn't give much attention to the RTV thinking it wouldn't be a deal breaker, ya know?
I am talking about my 2000 ES, but yeah the picture I grabbed is from the first generation LS400.
Thank you for the diagram you posted above, that's where it's supposed to have some sealant.
And if the manual calls for it, it will sure be important I guess.
I'll tackle it tomorrow and report back on how it goes. Much thanks again.
Not mentioned in your (good) explanation is, did you torque it correctly in the right sequence (the valve covers). Very critical and I get the feel if you did not know that or convey that, it may have been not been doen right
As another comment, I look at the list of things you did and I'd never do that many things at once. I'd do one or two and verify normal function. Then I don't wonder later "what did I screw up and where?" This is good practice on cars, in medicine, etc.
There are a lot of opinions about how to do valve cover gaskets. I like to not shoot a ton of crap in random crevices. I use Permatex #3 Aviation smoothly on all surfaces. I have had no subsequent leaks valve covers or transmissions I have rebuilt for a few years. It is old school and eschews expensive modern mouse-milks, but to me it works great when surfaces are cleaned and things then applied carefully.
Not mentioned in your (good) explanation is, did you torque it correctly in the right sequence (the valve covers). Very critical and I get the feel if you did not know that or convey that, it may have been not been doen right
I just remembered actually, I had a friend working a ling with me, and he was the on to torque the rears and I torqued the front cover. That might also be an affecting factor to the dilemma.
I'll be sure to torque the bolts down to 69 lb/ft.
Although I'm scared I'll snap a bit like I did the first time. These short screws suuuuuck.
I had to drill the inner part of the screw for the screw extractor to hold on to the snapped piece and remove it.
Originally Posted by Oro
There are a lot of opinions about how to do valve cover gaskets. I like to not shoot a ton of crap in random crevices. I use Permatex #3 Aviation smoothly on all surfaces. I have had no subsequent leaks valve covers or transmissions I have rebuilt for a few years. It is old school and eschews expensive modern mouse-milks, but to me it works great when surfaces are cleaned and things then applied carefully.
I just hope the sealant does the job.
This is an AFTER cleaning pic, wish I took a pic before, you couldn't see silver. It was black inside out.
Yep, sorry meant to say 69 inch pounds, not very used to the english measurements, always used the metric system.
Hmmm, so isn't too much sealant a bad idea? Would it interfere with the gasket? That is if applied too much sealant. If it's not leaking, then I guess it works. I'll go by the book just to be safe.
How is replacing the bolts with new ones any different? I Don't agree with that. I think the old bolts won't be any different from the new ones.
Thanks for your input man.
nah a thin coat of FIPG will prevent the rear from leaking as the engine is slightly tilted they way it's mounted.
BTW, those bolts, you are supposed change the Washers, cause they are crush washers, you can buy the OEM washers separately or new bolts come with the washers installed.
The other option is to use regular washers you can buy at a hardware store to build up the distance so the bolts don't bottom out. Not sure how you snapped that bolt cause it should have bottomed out before you could apply enough torque to snap them.
Speedkar9 has a good video on replacing the valvecover gaskets.
if you are still following, I understand redoing he half moons (2) and it looks like RTV on the flat side of the half moons where they meet the block. But what's happening on the other side (timing chain side)? Calls for RTV on the outside of the bolts?
 11-26-15, 03:38 PM