
Rear Creaking Noise, Replaced Strud Rod Wheel Hub Bushings, FIXED!!!
 10-20-13, 06:15 AM
#1
Driver School Candidate
Thread Starter

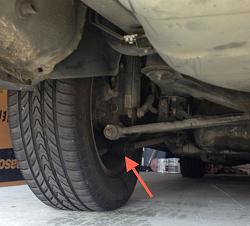
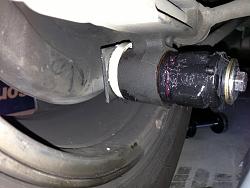
Past 2 years or so my 99 ES300 has been “creaking” like an old mattress especially in the cold weather going over speed bumps or rough roads. I have ignored this annoying sound for so long because I wasn’t sure what was causing the noise.
One fine summer weekend I decided it was time to tackle the problem with the help of a great friend Opa! My friend was fairly confident the problem was the Strud Rod bushings but Toyota did not sell them. Buying the whole strud rod from Toyota would not have solved the problem since the sound was coming from the wheel end of the strud. Since the part wasn’t readily available we needed to make sure Strud Rud bushing was the issue.
To test his theory we soaked the bushing on the wheel hub with WD-40, drove the car to the nearest shopping center with lots of speed bumps and….. Hallelujah the sound is gone!
Here is how I replaced the bushings in about 1 hour!
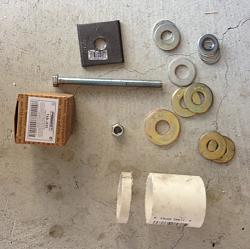
Parts needed:
2 bushings (Toyota part number: 48725-03010 Not available in the US so I bought Febest Tab-J520 from online for $14 a piece)
1 PVC 1,5” coupler from hardware store $0.74
1 2” square washer (found it by deck building materials in hardware store)$1
1 5” long 3/8 screw & nut plus misc size washers $1.75
1. Cut away ˝” thick piece from the end of PVC coupler
2. Lightly grease the new bushing for easy insertion
3. With a 17mm socket remove the screw/nut and push the strud rod away. (I used an electric impact wrench, since I could not remove it with a regular socket and could not find my breaker bar)
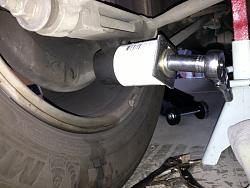
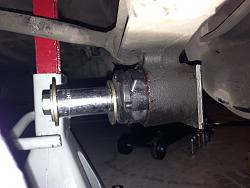
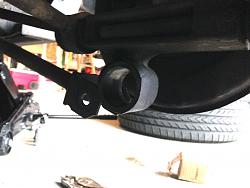
4. Place the PVC coupler on top of the bushing housing, put through the 5” bolt through the PVC, old bushing. Put a large washer (1.5” is what I used) and nut on the tire side and “pull” the old bushing in the PVC coupler buy screwing the bolt!
5. Once the old one is removed wipe clean the bushing housing
6. Reverse the process and “pull” the new bushing in the housing with the ˝” PVC. (This short PVC allows the “lip” of the new bushing the come out.)
7. Put the nut and bolt back in place and tighten the Strud rod as much as you can!
8. Enjoy a cold one, and enjoy your quite Lexus for years to come!

One fine summer weekend I decided it was time to tackle the problem with the help of a great friend Opa! My friend was fairly confident the problem was the Strud Rod bushings but Toyota did not sell them. Buying the whole strud rod from Toyota would not have solved the problem since the sound was coming from the wheel end of the strud. Since the part wasn’t readily available we needed to make sure Strud Rud bushing was the issue.
To test his theory we soaked the bushing on the wheel hub with WD-40, drove the car to the nearest shopping center with lots of speed bumps and….. Hallelujah the sound is gone!

Here is how I replaced the bushings in about 1 hour!
Parts needed:
2 bushings (Toyota part number: 48725-03010 Not available in the US so I bought Febest Tab-J520 from online for $14 a piece)
1 PVC 1,5” coupler from hardware store $0.74
1 2” square washer (found it by deck building materials in hardware store)$1
1 5” long 3/8 screw & nut plus misc size washers $1.75

1. Cut away ˝” thick piece from the end of PVC coupler
2. Lightly grease the new bushing for easy insertion
3. With a 17mm socket remove the screw/nut and push the strud rod away. (I used an electric impact wrench, since I could not remove it with a regular socket and could not find my breaker bar)
4. Place the PVC coupler on top of the bushing housing, put through the 5” bolt through the PVC, old bushing. Put a large washer (1.5” is what I used) and nut on the tire side and “pull” the old bushing in the PVC coupler buy screwing the bolt!


5. Once the old one is removed wipe clean the bushing housing
6. Reverse the process and “pull” the new bushing in the housing with the ˝” PVC. (This short PVC allows the “lip” of the new bushing the come out.)

7. Put the nut and bolt back in place and tighten the Strud rod as much as you can!
8. Enjoy a cold one, and enjoy your quite Lexus for years to come!
Last edited by faydin; 02-20-14 at 11:52 PM. Reason: title change
 10-20-13, 06:35 AM
#2
Driver School Candidate
Thread Starter
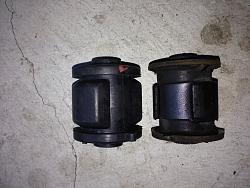
Old vs new bushings
When the screw touched the rear wheel break protector I improvised, but you may want to buy a shorter screw to insert the bushing and use the longer screw to extract the bushing
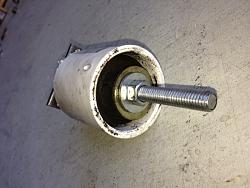
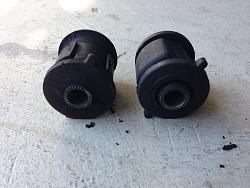
Bushing removed
Part number found online foreign site


When the screw touched the rear wheel break protector I improvised, but you may want to buy a shorter screw to insert the bushing and use the longer screw to extract the bushing

Bushing removed

Part number found online foreign site

Last edited by faydin; 10-20-13 at 06:51 AM.
10-20-13, 09:33 AM
#4
Rookie

Join Date: Jul 2009
Location: MN
Posts: 34
Likes: 0
Received 0 Likes
on
0 Posts
Have questions regarding your DIY, great photos and detail.
1. What is the ID" & OD" on the PVC tube.
2. You have two photos showing different installation, can you clearify the
Photo 1 and Photo 2 on which step you use.
3. 1 PVC 1,5” coupler from hardware store $0.74
Can you clearify this are you talking about 1" and 5" PVC or just 5" PVC.
Thanks!
1. What is the ID" & OD" on the PVC tube.
2. You have two photos showing different installation, can you clearify the
Photo 1 and Photo 2 on which step you use.
3. 1 PVC 1,5” coupler from hardware store $0.74
Can you clearify this are you talking about 1" and 5" PVC or just 5" PVC.
Thanks!
Last edited by kakarot; 10-20-13 at 09:42 AM.
10-20-13, 12:12 PM
#5
Driver School Candidate
Thread Starter
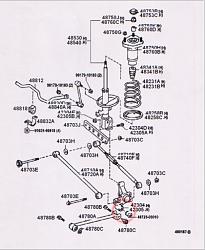
Thanks 01LEXPL. The arm will not help because the bushing I am replacing is not on the arm at all but it is on the wheel hub! I will have to take a look at the lateral arms. Thanks.
10-20-13, 12:34 PM
#6
Driver School Candidate
Thread Starter
Have questions regarding your DIY, great photos and detail.
1. What is the ID" & OD" on the PVC tube.
2. You have two photos showing different installation, can you clearify the
Photo 1 and Photo 2 on which step you use.
3. 1 PVC 1,5” coupler from hardware store $0.74
Can you clearify this are you talking about 1" and 5" PVC or just 5" PVC.
Thanks!
1. What is the ID" & OD" on the PVC tube.
2. You have two photos showing different installation, can you clearify the
Photo 1 and Photo 2 on which step you use.
3. 1 PVC 1,5” coupler from hardware store $0.74
Can you clearify this are you talking about 1" and 5" PVC or just 5" PVC.
Thanks!
http://www.homedepot.com/p/Mueller-S...specifications
2) Photo 1 is left side-driver side(proper way of doing the job). Photo 2 is showing right side(my first attempt to fix.) When I was doing photo 2 I learned that I need that 1/2" thick PVC part. If you do it like photo 2 -without the thin PVC- the bushing will NOT go thru the housing. That's what I learned!
3) See link on question 1
It is fairly easy once you are under the car. Good luck!
Trending Topics
10-20-13, 01:09 PM
#8
Driver School Candidate
Thread Starter
02-05-14, 07:24 PM
#9
Rookie
Join Date: Jan 2014
Location: GA
Posts: 53
Likes: 0
Received 0 Likes
on
0 Posts
Faydin, this is a great write up. I just bought my ES300 a few weeks ago and the first thing I noticed when I drove it home to the rough roads of my part of Atlanta was that I had this terrible mattress spring sound. Turned out to be these exact same bushings. I bought them for $13.95 a piece from Amazon and followed your write up for installing them, down to the ingenious hardware store bushing installers. Worked great! The only suggest I have is maybe relabeling this post something like "ES300 Rear Trailing Arm Bushings DIY", because right now it's really hard to find with the search feature. Thanks again.
Dan
Dan
04-21-14, 02:59 PM
#11

thank god i found this thread since i'm been looking forever for a replacement bushing for the rear carrier for my ES350 2008. I'm glad i found this because since i haven't remove the bushing yet, i can't confirm that it looks like this:
http://www.ebay.com/itm/251331808781?_trksid=p2055119.m1438.l2649&ssPageName=STRK%3AMEBIDX%3AIT
Seems like the ES350 has the same shape has the ES300. The site state that it fit my ES350 2008, i guess i have to try it out because the dealership refuse to tell me if the bushing will fit because they rather sell me the whole carrier with the bushing.
Any long term review of the durability of these aftermarket bushings, i know that it is rubber, so i don't expect it to last as long as the polymer ones.
thank you.
11-10-14, 11:41 AM
#13

Hi,
I just did this on my 98 es300 and boy was I glad the sound was gone. It had been bothering me for years. Showed it to couple of mechanics and no one could identify/fix it.
If you hear creaking noise when you go on big speed bumps, it is most likely the trailing arm bushings mentioned in this thread.
Thanks again faydin
11-10-14, 11:23 PM
#14
http://www.ebay.com/itm/360765842702?_trksid=p2060778.m1438.l2649&ssPageName=STRK%3AMEBIDX%3AIT
Has anyone used these type of bushings? Are they worth it?

Has anyone used these type of bushings? Are they worth it?
11-14-14, 03:51 PM
#15
I have not used the polyurethane bushings personally but saw on a toyota forum sometime back and someone had used them on an Avalon, which is similar to ES. So you can try them out. The polyurethane would be easier to install I think compared to the rubber bushings.
There are pros and cons for rubber vs. poly, you can google it.
There are pros and cons for rubber vs. poly, you can google it.