
How To: Repair your Radio Button Lights (3ES Pioneer)
 11-19-12, 10:01 AM
#16
Driver School Candidate

Join Date: Nov 2012
Posts: 8
Likes: 0
Received 0 Likes
on
0 Posts
[QUOTE=MrBooby;7602302]You don't want a bulb longer than 6mm, that's what I used and they were still a bit too long. The blue one that you posted is 8mm.[/QUOTE
I have come to realize that replacing the green lights is as easy as replacing the green caps on the bulbs. Do you know where I can get blue caps for the bulbs? if not maybe some kind of blue film URL's would help me tremendously. Thank you!
I have come to realize that replacing the green lights is as easy as replacing the green caps on the bulbs. Do you know where I can get blue caps for the bulbs? if not maybe some kind of blue film URL's would help me tremendously. Thank you!
 01-25-13, 10:43 PM
#18

[QUOTE=download;7220049]Great post!
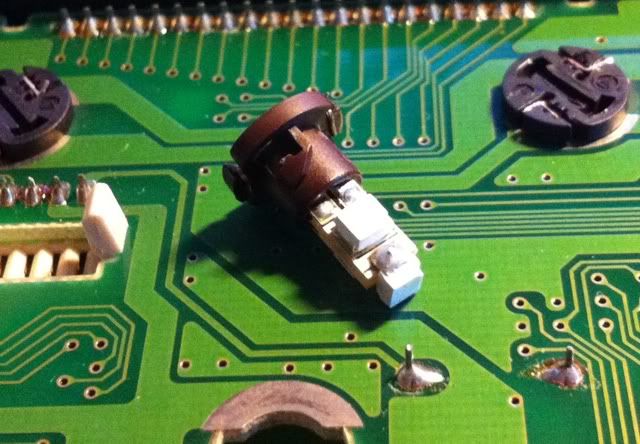
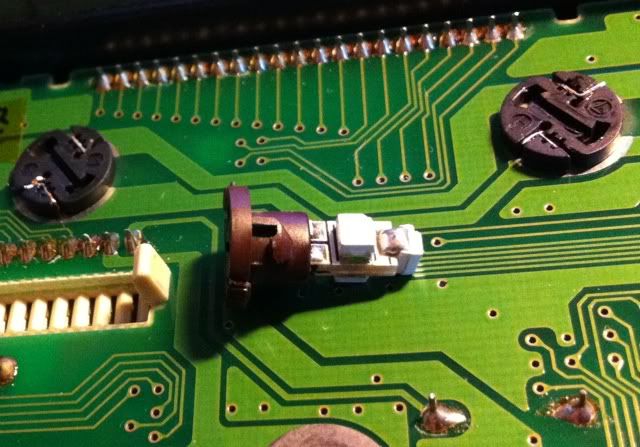
I used T5 leds, cut the legs and solder 2 wires as bulb.
But the quality of leds were not so good, 1 or 2 burned out already.
HI ...what radio is that? the one you have ? its the closest to stock design i have seen and it plays mp3?
I used T5 leds, cut the legs and solder 2 wires as bulb.
But the quality of leds were not so good, 1 or 2 burned out already.
HI ...what radio is that? the one you have ? its the closest to stock design i have seen and it plays mp3?
02-14-13, 11:13 AM
#20
Rookie

Join Date: Aug 2012
Location: CA
Posts: 71
Likes: 0
Received 0 Likes
on
0 Posts
See the reason the leds probably burned out is because you most likely didnt use a current limiting resistors. See leds need very little current compared to the original bulbs. So basically you have to put a resistor in series with the led to limit how much current will flow through those leds otherwise they will burn out alot sooner. You can google led resistor calculator but will need to know what voltage the radio supplies to those bulbs,


 10-15-14, 11:21 PM
#24
Driver School Candidate
Join Date: Sep 2014
Location: CA
Posts: 28
Likes: 0
Received 0 Likes
on
0 Posts
11-19-14, 10:44 PM
#25

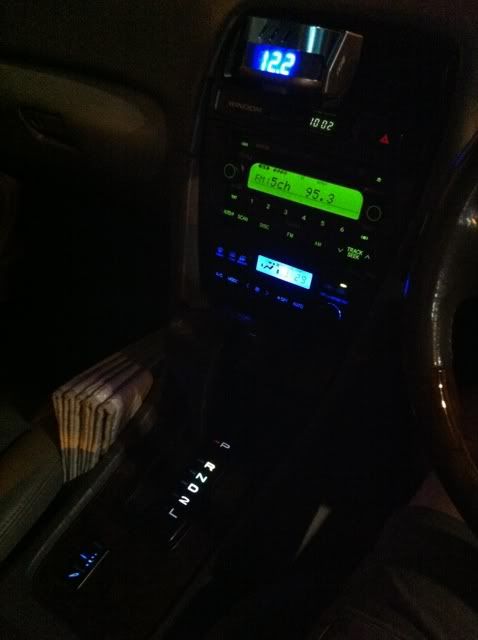
Damn dude the before and after pictures are nice lol.....I recently bought a bulb to replace the key light circle since it was out but swapped it for the glove compartment bulb which made a huge difference. I figured that's more important than the key light which is on for a second before I start the car
I need to do this for my ac controls when I put a double din in. they're very dim and its getting to me
I need to do this for my ac controls when I put a double din in. they're very dim and its getting to me
11-20-14, 10:43 AM
#26
Damn dude the before and after pictures are nice lol.....I recently bought a bulb to replace the key light circle since it was out but swapped it for the glove compartment bulb which made a huge difference. I figured that's more important than the key light which is on for a second before I start the car
I need to do this for my ac controls when I put a double din in. they're very dim and its getting to me
I need to do this for my ac controls when I put a double din in. they're very dim and its getting to me
01-10-15, 10:51 AM
#27
Driver School Candidate

Join Date: Jan 2015
Location: Illinois (IL)
Posts: 2
Likes: 0
Received 0 Likes
on
0 Posts
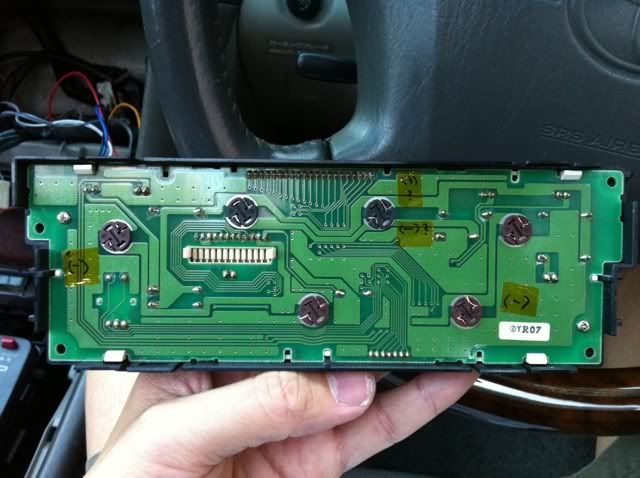
I'm installing the new bulbs now (25-995 from MCMelectronics.com and noticed on the label they are 8V. I guess they regulate the voltage down from the car's 12V or they would be burning out for people pretty quickly. I have a climate control bulb out too and will replace it with this one also. Hopefully the voltage is correct. Oh well, if it burns out early at least now I know how to do the job. By the way, there are 7 other bulbs soldered to the other side of the climate control module's board. Those would be a real pain to replace if they burn out because the display and flex cable captivate the pcb. You would have to unsolder those multi-pin connections or risk disconnecting the LED display connections to get to the bulbs.
Last edited by PennyLane; 01-10-15 at 12:52 PM.
01-10-15, 07:50 PM
#28
I'm installing the new bulbs now (25-995 from MCMelectronics.com and noticed on the label they are 8V. I guess they regulate the voltage down from the car's 12V or they would be burning out for people pretty quickly. I have a climate control bulb out too and will replace it with this one also. Hopefully the voltage is correct. Oh well, if it burns out early at least now I know how to do the job. By the way, there are 7 other bulbs soldered to the other side of the climate control module's board. Those would be a real pain to replace if they burn out because the display and flex cable captivate the pcb. You would have to unsolder those multi-pin connections or risk disconnecting the LED display connections to get to the bulbs.
What year is your ES? The 3ES has separate lights bulbs for the HVAC.
01-10-15, 08:26 PM
#29
Driver School Candidate
Join Date: Jan 2015
Location: Illinois (IL)
Posts: 2
Likes: 0
Received 0 Likes
on
0 Posts
Thanks for replying about the voltage, and thanks for the great instructions on replacing the bulbs. We have a '98 ES300, same color as yours (my wife's car). Penny Lane is our boat's name on facebook. She's happy with it and aiming for 300k miles or 20yrs, whichever comes last! I tested the old and new bulbs with 12V and the new ones are definitely brighter. Unfortunately the front and rear defrost buttons are not lit and I think those bulbs are the ones sandwiched within the climate control module boards. I'm game to fix those too, but I'd have to measure the voltage first to decide on replacements.
Last edited by PennyLane; 01-10-15 at 08:31 PM.
01-12-15, 07:32 AM
#30
Thanks for replying about the voltage, and thanks for the great instructions on replacing the bulbs. We have a '98 ES300, same color as yours (my wife's car). Penny Lane is our boat's name on facebook. She's happy with it and aiming for 300k miles or 20yrs, whichever comes last! I tested the old and new bulbs with 12V and the new ones are definitely brighter. Unfortunately the front and rear defrost buttons are not lit and I think those bulbs are the ones sandwiched within the climate control module boards. I'm game to fix those too, but I'd have to measure the voltage first to decide on replacements.
https://www.clublexus.com/forums/es3...t-problem.html