DIY - 99 ES300 - Remove/disassemble ashtray/lighter tray - replace w/GPS or scanner
 05-09-10, 09:44 PM
#1
Driver School Candidate
Thread Starter
Join Date: Jul 2008
Location: Illinois
Posts: 15
Likes: 0
Received 0 Likes
on
0 Posts
My Garmin nuvi 200w seemed to be the exact size as the facade of my ciagrette lighter tray on my 1999 ES300, so I took it out and will attempt to remount it with my GPS installed instead of the ashtray. Since the lighter assembly is already there for power, I plan to plug in my GPS charger and stash the cord behind the scenes so my GPS unit will always have power without unsightly cords all over the place.
I've seen a few threads on removing the pop-out ashtray assembly but never seen how takw apart the entire tray assembly once it's removed...to actually remove the guts of that tray to replace it with a GPS, scanner, or other aux toy.
Here is my best attempt at a picture tutorial!
------------------------------------------------
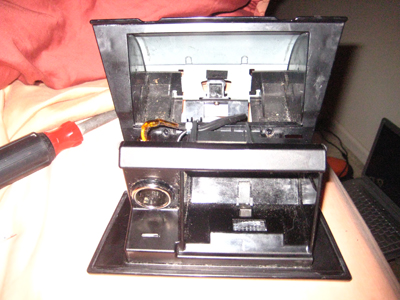
Step 1: Remove the ashtray assembly from your dash
(see https://www.clublexus.com/forums/es3...-ash-tray.html for that part)
------------------------------------------------
FRONT
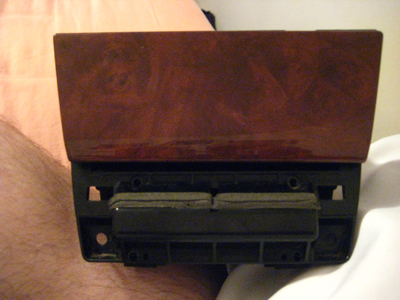
BACK
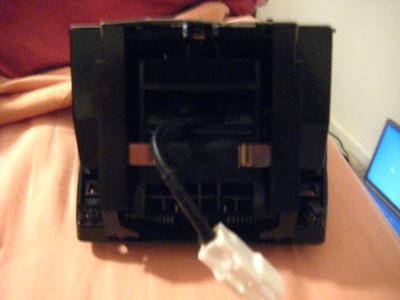
BACK2

BOTTOM
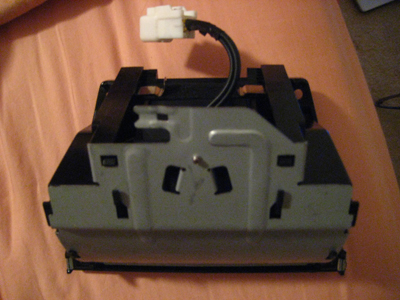
SIDE
------------------------------------------------
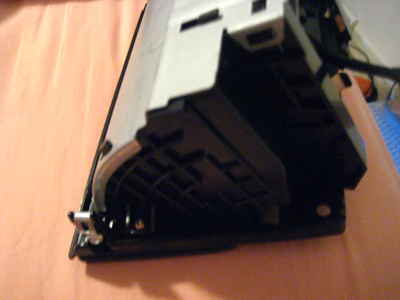
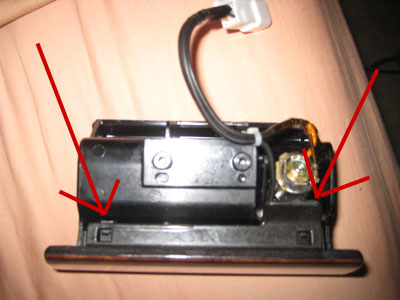
STEP 2: Remove 4 screws to disconnect ashtray and faceplate from housing.
------------------------------------------------
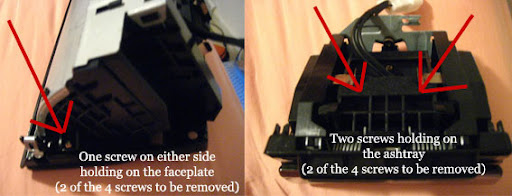
------------------------------------------------
STEP 3: Ashtray will come loose and fall out.
------------------------------------------------
However, the white power adapter plug will still be hanging out through the housing itself...
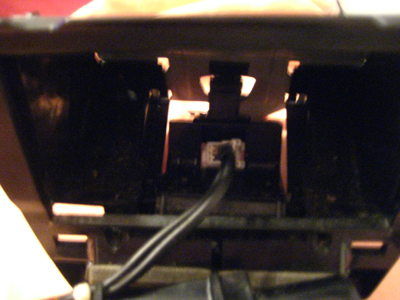
Gently pull this cable through the hole in the housing to remove the ashtray entirely....

The faceplate will basically fall off at this point...
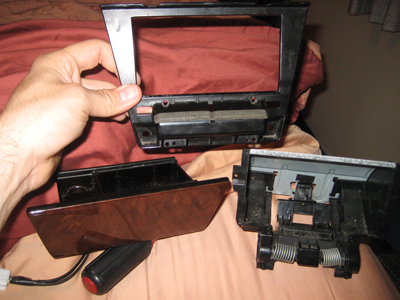
You will be left with a gutless housing that will soon be home to a new auxiliary component....

------------------------------------------------
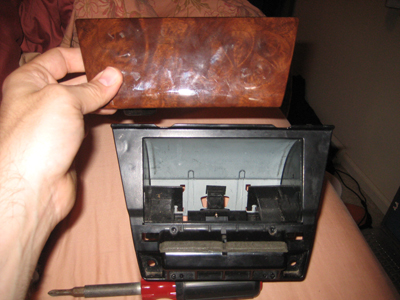
STEP 4: Remove woodgrain facade from the ashtray.
(You might want to use this in the future to cover your new gadget)
------------------------------------------------
(the clip on the right side can just be lifted up, the left side you need a flathead)
The woodgrain plate will come off, exposing the ashtray light...


------------------------------------------------
STEP 5: Re-attach the faceplate.
Rescrew the two screws you undid earlier (left side of the picture of step 2)
------------------------------------------------

------------------------------------------------
STEP 6: Replace the woodgrain facade, if needed.
------------------------------------------------
And the finished product, pre-re-installation....

A gutless ashtray compartment with the faceplate and woodgrain facade available to use for remounting your GPS, scanner, whatever. Following these instructions will also leave behind the "popper" mechanism which previously popped out your ashtray. You may consider mounting your new gadget to that for additional shock value when showing off your toy.
I am still figuring out how to actually mount my GPS snugly into the now cavernous hole in my dash that previously held my ashtray.
PS: I haven't yet figured out how to take the actual lighter assembly off of the ashtray for re-use. any tips on that would be appreciated!
I've seen a few threads on removing the pop-out ashtray assembly but never seen how takw apart the entire tray assembly once it's removed...to actually remove the guts of that tray to replace it with a GPS, scanner, or other aux toy.
Here is my best attempt at a picture tutorial!
------------------------------------------------
Step 1: Remove the ashtray assembly from your dash
(see https://www.clublexus.com/forums/es3...-ash-tray.html for that part)
------------------------------------------------
FRONT
BACK
BACK2
BOTTOM
SIDE
------------------------------------------------
STEP 2: Remove 4 screws to disconnect ashtray and faceplate from housing.
------------------------------------------------
------------------------------------------------
STEP 3: Ashtray will come loose and fall out.
------------------------------------------------
However, the white power adapter plug will still be hanging out through the housing itself...
Gently pull this cable through the hole in the housing to remove the ashtray entirely....
The faceplate will basically fall off at this point...
You will be left with a gutless housing that will soon be home to a new auxiliary component....
------------------------------------------------
STEP 4: Remove woodgrain facade from the ashtray.
(You might want to use this in the future to cover your new gadget)
------------------------------------------------
(the clip on the right side can just be lifted up, the left side you need a flathead)
The woodgrain plate will come off, exposing the ashtray light...
------------------------------------------------
STEP 5: Re-attach the faceplate.
Rescrew the two screws you undid earlier (left side of the picture of step 2)
------------------------------------------------
------------------------------------------------
STEP 6: Replace the woodgrain facade, if needed.
------------------------------------------------
And the finished product, pre-re-installation....
A gutless ashtray compartment with the faceplate and woodgrain facade available to use for remounting your GPS, scanner, whatever. Following these instructions will also leave behind the "popper" mechanism which previously popped out your ashtray. You may consider mounting your new gadget to that for additional shock value when showing off your toy.
I am still figuring out how to actually mount my GPS snugly into the now cavernous hole in my dash that previously held my ashtray.
PS: I haven't yet figured out how to take the actual lighter assembly off of the ashtray for re-use. any tips on that would be appreciated!
 05-10-10, 08:10 AM
#2
I'd grab something like this as a 'base' for the GPS to sit.
From there, i'd mock it up into the ash tray assembly and mount it permanently using some screws.
Well, i actually did do this in my car for a cell phone mount, but since the little mount broke in shipping - i am waiting on another to finalize it.
Are you going to be cutting up the wood trim? As a bezel around the GPS ?
05-10-10, 04:57 PM
#3
Driver School Candidate
Thread Starter
Join Date: Jul 2008
Location: Illinois
Posts: 15
Likes: 0
Received 0 Likes
on
0 Posts
I have the suction cup base like that I could try to use, not sure how it would mount. Ideally, I will be using the wood trim piece again, trimmed to size. Just not sure how to do it. Right now there's just a hole in my dash and i'm trying to think of ways to mount it nicely.
I'm considering using a piece of plywood, cut to size and attaching the GPS to it...and use the wood trim on either side and attaching it to the plywood.
Never done this nor am i particularly "crafty", so it's all in thought mode right now. If you have any retrofit kits in mind or instructions for something easy to build, let me know!
08-04-10, 09:00 PM
#5
Driver School Candidate
Thread Starter
Join Date: Jul 2008
Location: Illinois
Posts: 15
Likes: 0
Received 0 Likes
on
0 Posts
After thoughts of many different ways to do this, I actually ended up just placing a piece of velcro on the bottom to hold it in place...it's a really snug fit and actually ALMOST as wide as the hole created from the missing ashtray. I removed the lighter part from the ashtray frame so I could still use it to charge my GPS continually...I then stuffed the charger cord down in the lower bowels of the dash and it hides away nicely. does the trick fine for me.

08-04-10, 09:13 PM
#6
Cool! Glad to see it worked out. If you ever find a widescreen window mounted nav and seat it back further it may even look stock. Is it weird looking down there for nav routing on that size screen?

Thread
Thread Starter
Forum
Replies
Last Post
Topshop1
ES - 1st to 4th Gen (1990-2006)
2
06-25-18 04:00 AM
imjohnphan
ES - 1st to 4th Gen (1990-2006)
1
12-26-06 10:55 PM