Anyone running wheel spacers with stock wheels?


 06-02-14, 12:20 PM
#17

First I'd like to thank you guys for this thread.
I too am looking to get a set of wheel spacers using the OEM wheel size (17x7 +45), but plan to keep the front stock in the unlikely event I need to put chains on, so my concern is only for the rear.
It would seem that the easiest way to go is with an Ichiba 1-piece using the set made for the Toyota Prius (Prius 04+)
Bolt Pattern: 5x100
Center Bore: 54.1MM
Thread: 12x1.5
My question to everyone is...
#1 What is the minimum size spacer do I need to clear the factory studs without modification (no cutting), in the event I need to put a spare tire on?
#2 What is the maximum size spacer anyone has used (using stock wheel/tires) without rubbing of any kind regardless of the drop?
I'd like to go as agressive as I can, but at the same time want to be able to retain maximum load capacity without rubbing. Just as a reference, Ichiba makes spacers as high as 38mm.
So far the most agressive has been "alpha0M3G4" with 25mm spacers (20mm overall offset) for the rear, however he never reported his experience afterwards, and "nabbun" "suggested you can run as low as 0mm overall without rubbing with stock wheels.
Is this TRUE?!
06-02-14, 06:57 PM
#18

First I'd like to thank you guys for this thread.
I too am looking to get a set of wheel spacers using the OEM wheel size (17x7 +45), but plan to keep the front stock in the unlikely event I need to put chains on, so my concern is only for the rear.
It would seem that the easiest way to go is with an Ichiba 1-piece using the set made for the Toyota Prius (Prius 04+)
Bolt Pattern: 5x100
Center Bore: 54.1MM
Thread: 12x1.5
My question to everyone is...
#1 What is the minimum size spacer do I need to clear the factory studs without modification (no cutting), in the event I need to put a spare tire on?
#2 What is the maximum size spacer anyone has used (using stock wheel/tires) without rubbing of any kind regardless of the drop?
I'd like to go as agressive as I can, but at the same time want to be able to retain maximum load capacity without rubbing. Just as a reference, Ichiba makes spacers as high as 38mm.
So far the most agressive has been "alpha0M3G4" with 25mm spacers (20mm overall offset) for the rear, however he never reported his experience afterwards, and "nabbun" "suggested you can run as low as 0mm overall without rubbing with stock wheels.
Is this TRUE?!
I too am looking to get a set of wheel spacers using the OEM wheel size (17x7 +45), but plan to keep the front stock in the unlikely event I need to put chains on, so my concern is only for the rear.
It would seem that the easiest way to go is with an Ichiba 1-piece using the set made for the Toyota Prius (Prius 04+)
Bolt Pattern: 5x100
Center Bore: 54.1MM
Thread: 12x1.5
My question to everyone is...
#1 What is the minimum size spacer do I need to clear the factory studs without modification (no cutting), in the event I need to put a spare tire on?
#2 What is the maximum size spacer anyone has used (using stock wheel/tires) without rubbing of any kind regardless of the drop?
I'd like to go as agressive as I can, but at the same time want to be able to retain maximum load capacity without rubbing. Just as a reference, Ichiba makes spacers as high as 38mm.
So far the most agressive has been "alpha0M3G4" with 25mm spacers (20mm overall offset) for the rear, however he never reported his experience afterwards, and "nabbun" "suggested you can run as low as 0mm overall without rubbing with stock wheels.
Is this TRUE?!
i don't know about what size you should run, and i am not a spacer pro - but based on what I have learned from my research getting spacers on my 2014 GS 350 F-Sport w/ my stock 19" wheels is to go with a company like H&R or B2D Auto Designs. according to my spring installer the ichiba brand has had issues on several of his installs in general with that brand and would not even install them - i was not there and did not see it but took his word since he does a lot of lexus mods/installs. I showed him the ones I purchased thru B2D (a vendor on here) and he said the build quality of the spacer was top notch and was competitively priced. i think you should get in touch with B2D and talk to them and see what they recommend. http://www.b2autodesigns.com/ i am running 15mm in the front and 20mm in the rear with no issues on my car. keep us posted on what you decide and how it turns out. good luck!
06-03-14, 10:26 AM
#19
@fsportjay Thank you for the link. I'm not really too particular of brand as long as it's a 1-piece so I can remove them myself with minimal effort. Right now I'm just patiently waiting for confirmation from other users before pulling the trigger.
06-11-14, 12:01 AM
#21

Now on to the install.
Once you open the package, you'll first see a warning sticker to not exceed 80 lbs of force and that a torque wrench is recommended.

I wanted to double check my stats so I looked in the service manual to see what the OEM wheels were supposed to be set to and it stated, 76 lbs.

In fear that my torque wrench may not be 100% to spec, I set it for 78 so I can at least clear the minimum factory setting, but at the same time be below the warning sticker on the Ichiba spacers.
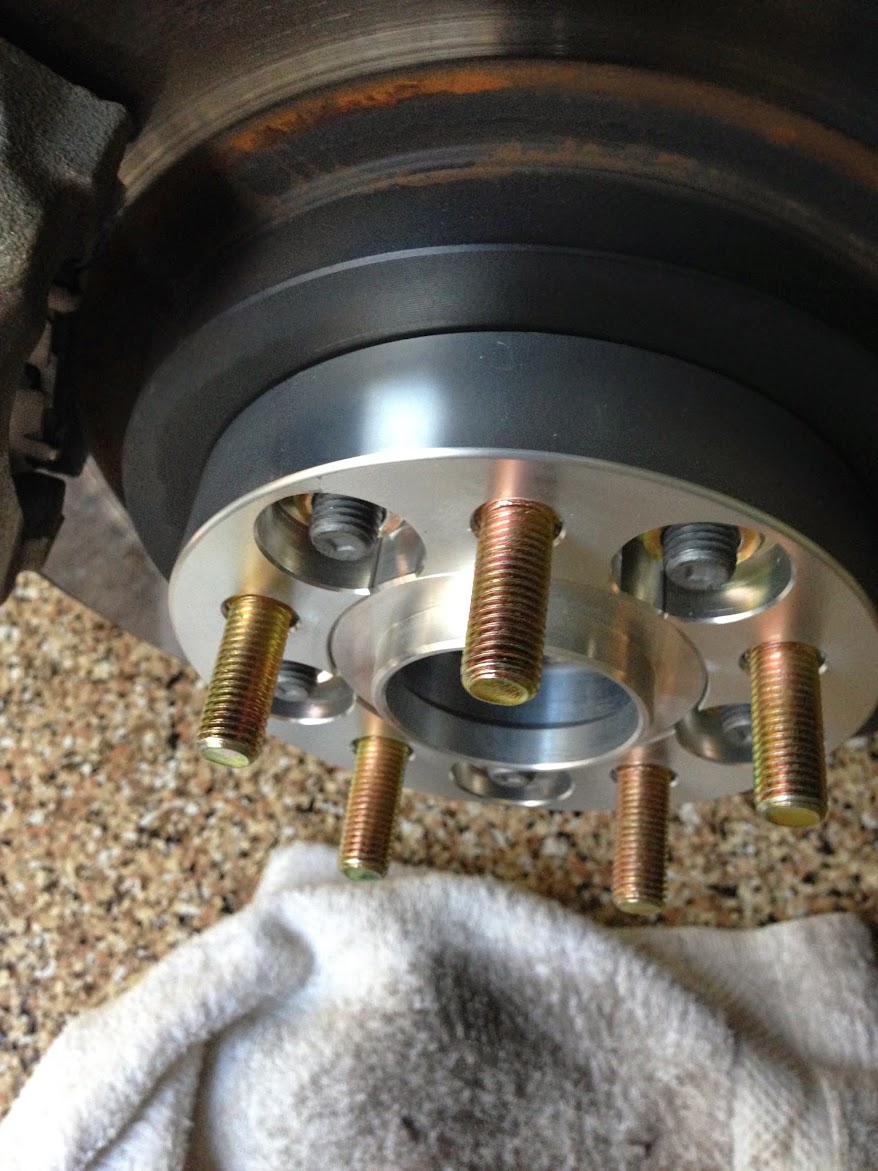
Installing the spacers to the hub was a direct fit which was flush to the existing studs.

In case you need to figure this out for another vehicle, I simply measured the size of the existing studs (in this case 15/16 inch = 0.9375 inches) which equates to 23.8 mm

Having gotten the 25mm size meant there was no exposed studs so you can at the very least use your spare tire or aftermarket wheels without issues.
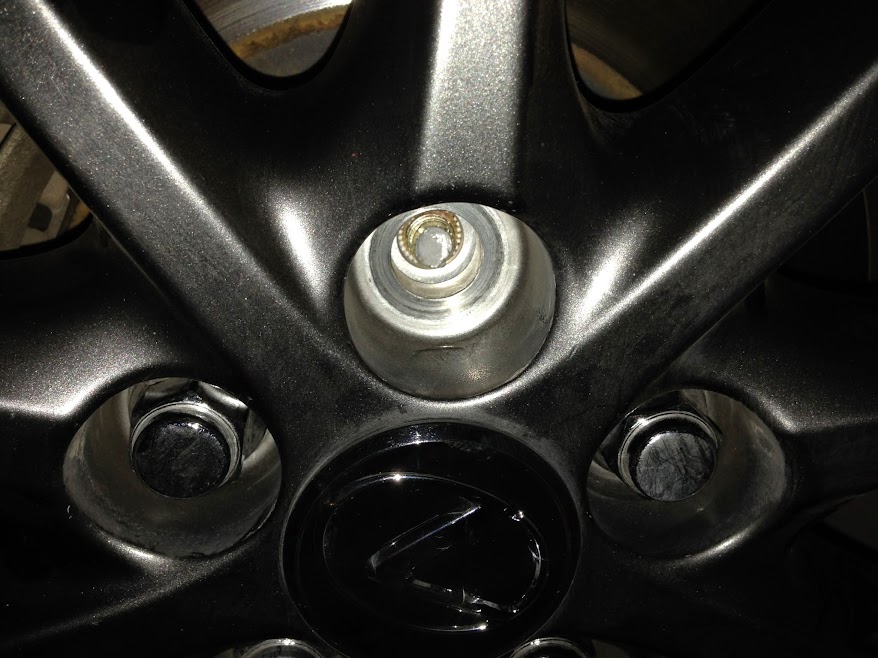
After finally setting the car down, I went around and did my final adjustments to the outside bolts, tightening each wheel in a star pattern.
At this point I was all smiles!!!

THEN THIS HAPPENED!!!

Unfortunately on the 4th bolt on the 2nd wheel, my torque wrench just kept going and going (almost felt like putty). Keep in mind I just tightened 18 bolts prior to this one (10 inside & 8 outside) without any issues so I wasn't expecting this.
At this point of the install I was forced to proceed, because the the remaining bolt was jammed inside the nut, and removing the spacers will leave me in the same boat with just 4 bolts since I've now ALSO lost a nut. Curious to see if it was my wrench, I went ahead and tightened the last remaining nut and it clicked perfectly at 78 lbs like the previous 18 bolts before it.
Has ANYONE ever experienced this? I'll be contacting B2Auto tomorrow morning to find out what my options are. However at this point, I think I need to call in a sick day so I can visit my local dealer to see if they can spare me a nut or 2 so I can remove the spacers and get back to 5 bolts ASAP, before giving the car back to the wife.
Kinda makes me wonder how close I am to the tolerance of the remaining bolts though. I just can't believe the entire lug nut came clean off without hearing as much as a click from my wrench! I guess quality control got me again (first time was interior LED lighting).

The following users liked this post:
cusco (01-18-17)
 06-11-14, 10:59 AM
#23
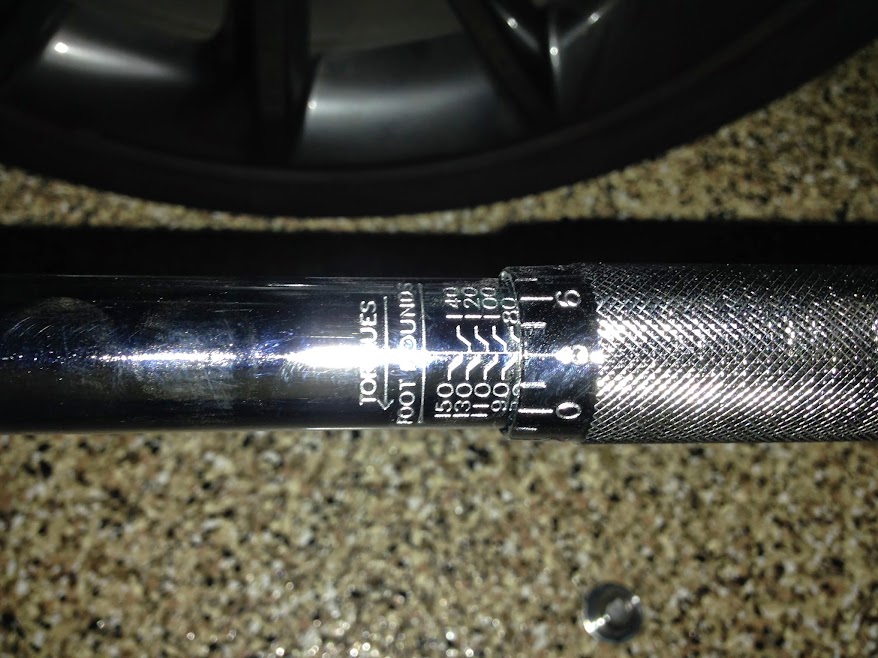
It is unfortunate I am being questioned (privately) how to read a torque wrench properly. However, in the unlikely event mine is a non-standard wrench...below are some images/examples/instructions on how to read/operate it correctly.
Below is a sample of it set to 68.

Below is a sample of it set to 88.
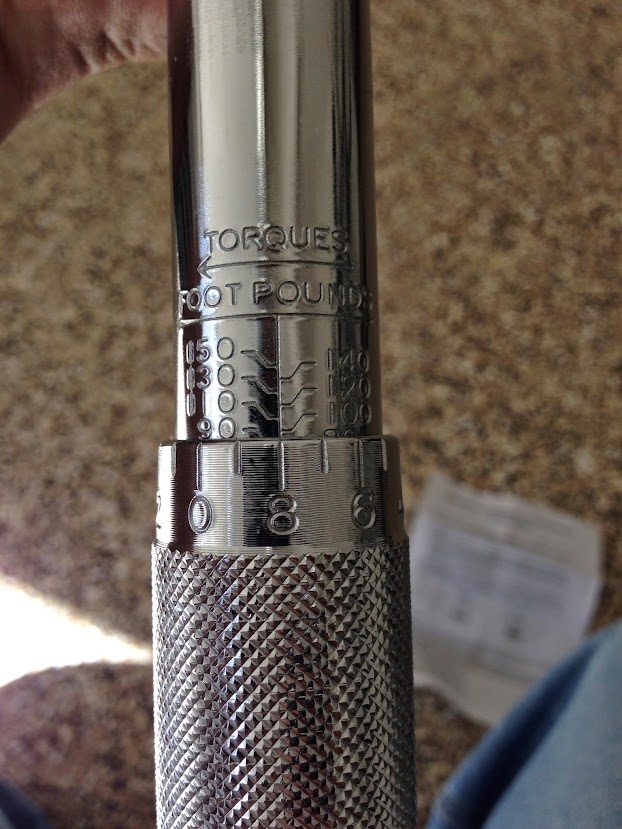
If WRITTEN proof is required...below is the instruction sheet of the wrench...

Below is a sample of it set to 68.
Below is a sample of it set to 88.
If WRITTEN proof is required...below is the instruction sheet of the wrench...
06-11-14, 11:33 AM
#24

Ok sorry, but you are reading the torque wrench wrong. The first picture the wrench is set for 78 and the second picture the wrench is set for 98. The lower mark in the middle next to the vertical line is the correct mark to read. Not the line next to the number.
Charles
Charles
06-11-14, 12:35 PM
#25
Ok sorry, but you are reading the torque wrench wrong. The first picture the wrench is set for 78 and the second picture the wrench is set for 98. The lower mark in the middle next to the vertical line is the correct mark to read. Not the line next to the number.
Charles
Charles
While it was unfortunate that 1 out of the 20 studs I tightened obviously didn't meet the same tolerance, I'd still much rather be informed of the dangers than be blissfully unaware. (this is me trying to turn a negative into a positive).
I'll be in contact with Adrian @ B2AUto to see if we can work something out. Thanks again.

 06-16-14, 04:59 PM
#29
Just to update this thread....
First a few folks to thank, my local Lexus dealer (Pleasanton) and the staff @ B2Auto (more on this later).
As I mentioned earlier, because the stud broke INTO the lock nut, it didn't matter if I removed the spacers to go back to stock that very night since I didn't have any spare nuts (plus it didn't help that I was emotionally distraught). I did however visit my local Lexus dealer the following morning to see if they can spare me some lug nuts to replace all 4 of my wheel locks (since the broken stud was inside one of them). Luckily for me, they graciously gave me 4 as courtesy saving me a few bucks (kudos on Lexus for this one).
In fear I was out of luck in regards to a warranty claim (since my previous post showed 88 lbs), I went ahead and contacted local Ichiba distributors to get opinions and to see if they had any replacements in stock. By this time, I had ZERO faith in customer service, since contacting Ichiba directly was not possible (Ichiba phone lines appeared dead), and I was under the impression B2Auto was putting the blame on me because of my misreadings earlier. After all my frivolous calls on the phone, I ended up paying a premium above what I paid B2Auto to a local distributor, since I convinced myself that I wasn't going to let this experience bring me down and give up the mod.
With a new set of spacers in hand, I went off for a 2nd night of spacer install, but this time armed with a hydrolic jack.
I started by redoing the nuts on both front wheels (since B2AUto staff pointed out I was reading my wrench wrong) by removing them, then re-installing by hand in a star pattern, then adjusted the wrench for 50 lbs, 5 clicks, 60 lbs, 5 clicks, 70 lbs, 5 clicks.
I didn't know why at the time, but I wanted to first take off the "good side".
This is where it gets interesting...
Top: 25mm Ichiba v2 spacer from local store
Bottom: 25mm Ichiba v2 spacer purchased from B2AUto (however it was directly shipped from Ichiba HQ)

Notice how much more substantial the top (matt) unit is. Look at how thick the sidewall is for the hole that goes into the OEM studs.
Here are the 2 spacers fitted on top of each other via the center hub ring.
Top = original spacer I got from Ichiba/B2Auto order.

Here is another angle.

From initial impressions, the only direct interchangeable PART these 2 have in common is the center ring. The dimension of the outer ring is different, the bolts are different, even the NUTS were different. The larger non-polished version is also heavier!!! (granted they were both 25mm in width)
It may not be directly visible in the picture above, but the writing on the bolt heads are different, as well as how much they are recessed into the outer ring. With the original polished version, the bolts are in deeper (perhaps this is also why the over all weight is less).
Below is a picture of the nuts. The lighter "polished" version has no markings (generic one on the right), while on the heftier version, each nut is inscribed with 12x1.5.

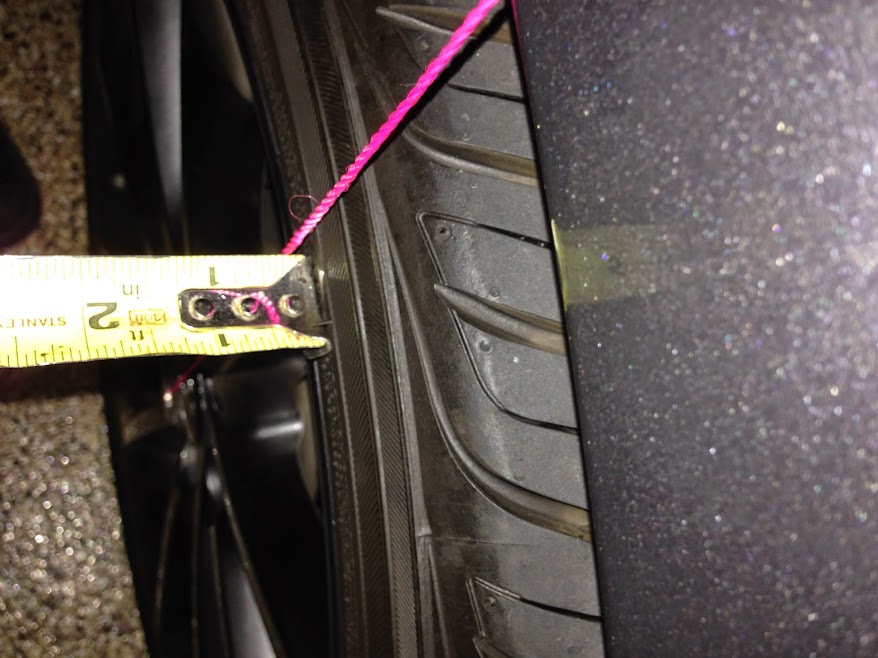
Curious to see if the extra diameter mattered, I mocked them on the rear wheels and below were my findings..
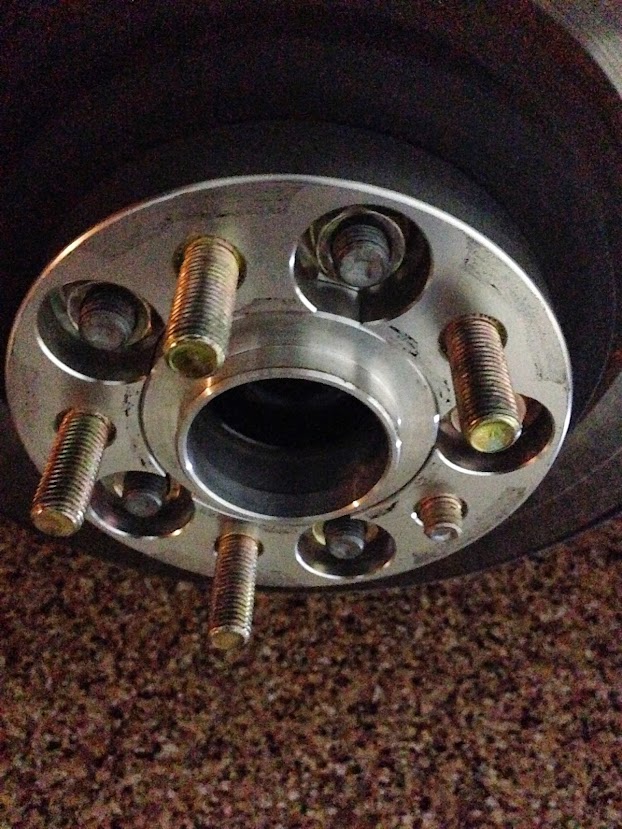
Below is the "polished" version with the deeper recessed bolts.

Notice how there is a slight lip that is exposed on the wheel.
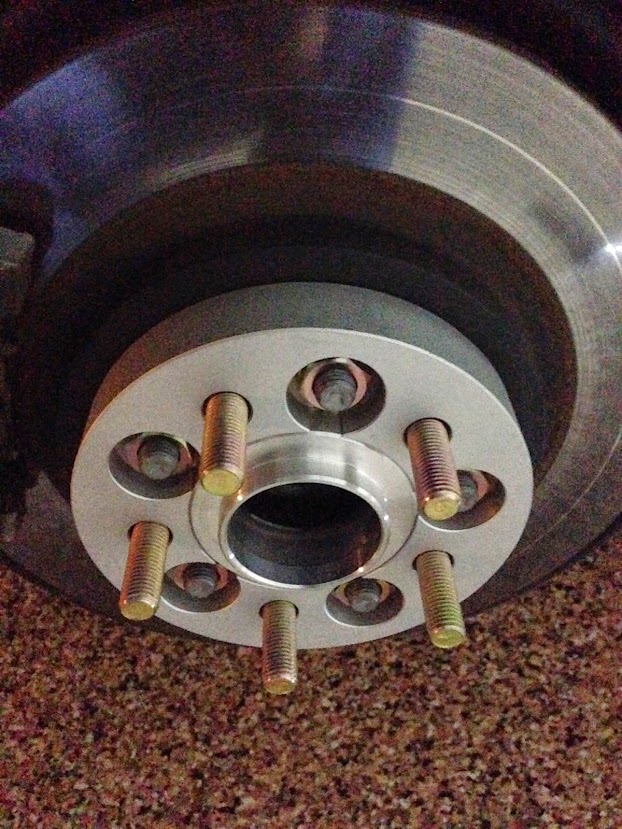
Below is the "matt" version with the different bolt heads.

Notice how they completely cover the backside surface of the OEM wheel (no "lip").
Similar to the front wheels, I tightened the inside bolts to a star pattern, first by hand, then...
60 lbs, 5 clicks, 70 lbs, 5 clicks, 80 lbs, 5 clicks. Then the outside bolts (wheel) to 50 lbs, 5 clicks, 60 lbs, 5 clicks, 70 lbs, 5 clicks.
Now to the BROKEN SIDE....
Here's another picture of the broken polished version where the stud was sheared off.

Here is a picture of the matt vesion installed. Can't really tell from the pictures, but in person the matt version clearly covers more of the brake rotor.
After setting the car down, I then set my wrench to 76lbs (as per the operators manual) and tightened all 20 wheel bolts.
NOW....why thank B2Auto?!
Because out of the blue I get an email from them stating they have contacted Ichiba on my behalf and they (Ichiba) will be sending me a replacement spacer. Then later today I get a confirmation UPS email from Ichiba that the spacer will be delivered this evening.
I was at a lost for words when I received those emails, so I figure what better way to say thanks by reporting my experience back to the community.
HOWEVER...since there is apparently at least 2 versions of V2, I wonder which one I'll get? And from a physics/structural standpoint of would it matter?
I definitely will try to make sure both sides are equal before even thinking of mounting them, but to whoever is reading this....which version of V2 do you think came out first?
My guess? The heftier matt version. The polished version seems to be a more refined piece, but because of the lack of material, it may not necessarily be an improvement.
First a few folks to thank, my local Lexus dealer (Pleasanton) and the staff @ B2Auto (more on this later).
As I mentioned earlier, because the stud broke INTO the lock nut, it didn't matter if I removed the spacers to go back to stock that very night since I didn't have any spare nuts (plus it didn't help that I was emotionally distraught). I did however visit my local Lexus dealer the following morning to see if they can spare me some lug nuts to replace all 4 of my wheel locks (since the broken stud was inside one of them). Luckily for me, they graciously gave me 4 as courtesy saving me a few bucks (kudos on Lexus for this one).
In fear I was out of luck in regards to a warranty claim (since my previous post showed 88 lbs), I went ahead and contacted local Ichiba distributors to get opinions and to see if they had any replacements in stock. By this time, I had ZERO faith in customer service, since contacting Ichiba directly was not possible (Ichiba phone lines appeared dead), and I was under the impression B2Auto was putting the blame on me because of my misreadings earlier. After all my frivolous calls on the phone, I ended up paying a premium above what I paid B2Auto to a local distributor, since I convinced myself that I wasn't going to let this experience bring me down and give up the mod.
With a new set of spacers in hand, I went off for a 2nd night of spacer install, but this time armed with a hydrolic jack.
I started by redoing the nuts on both front wheels (since B2AUto staff pointed out I was reading my wrench wrong) by removing them, then re-installing by hand in a star pattern, then adjusted the wrench for 50 lbs, 5 clicks, 60 lbs, 5 clicks, 70 lbs, 5 clicks.
I didn't know why at the time, but I wanted to first take off the "good side".
This is where it gets interesting...
Top: 25mm Ichiba v2 spacer from local store
Bottom: 25mm Ichiba v2 spacer purchased from B2AUto (however it was directly shipped from Ichiba HQ)
Notice how much more substantial the top (matt) unit is. Look at how thick the sidewall is for the hole that goes into the OEM studs.
Here are the 2 spacers fitted on top of each other via the center hub ring.
Top = original spacer I got from Ichiba/B2Auto order.
Here is another angle.
From initial impressions, the only direct interchangeable PART these 2 have in common is the center ring. The dimension of the outer ring is different, the bolts are different, even the NUTS were different. The larger non-polished version is also heavier!!! (granted they were both 25mm in width)
It may not be directly visible in the picture above, but the writing on the bolt heads are different, as well as how much they are recessed into the outer ring. With the original polished version, the bolts are in deeper (perhaps this is also why the over all weight is less).
Below is a picture of the nuts. The lighter "polished" version has no markings (generic one on the right), while on the heftier version, each nut is inscribed with 12x1.5.
Curious to see if the extra diameter mattered, I mocked them on the rear wheels and below were my findings..
Below is the "polished" version with the deeper recessed bolts.
Notice how there is a slight lip that is exposed on the wheel.
Below is the "matt" version with the different bolt heads.
Notice how they completely cover the backside surface of the OEM wheel (no "lip").
Similar to the front wheels, I tightened the inside bolts to a star pattern, first by hand, then...
60 lbs, 5 clicks, 70 lbs, 5 clicks, 80 lbs, 5 clicks. Then the outside bolts (wheel) to 50 lbs, 5 clicks, 60 lbs, 5 clicks, 70 lbs, 5 clicks.
Now to the BROKEN SIDE....
Here's another picture of the broken polished version where the stud was sheared off.
Here is a picture of the matt vesion installed. Can't really tell from the pictures, but in person the matt version clearly covers more of the brake rotor.
After setting the car down, I then set my wrench to 76lbs (as per the operators manual) and tightened all 20 wheel bolts.
NOW....why thank B2Auto?!
Because out of the blue I get an email from them stating they have contacted Ichiba on my behalf and they (Ichiba) will be sending me a replacement spacer. Then later today I get a confirmation UPS email from Ichiba that the spacer will be delivered this evening.
I was at a lost for words when I received those emails, so I figure what better way to say thanks by reporting my experience back to the community.
HOWEVER...since there is apparently at least 2 versions of V2, I wonder which one I'll get? And from a physics/structural standpoint of would it matter?
I definitely will try to make sure both sides are equal before even thinking of mounting them, but to whoever is reading this....which version of V2 do you think came out first?
My guess? The heftier matt version. The polished version seems to be a more refined piece, but because of the lack of material, it may not necessarily be an improvement.
Last edited by edgalang; 06-16-14 at 09:52 PM.
06-16-14, 09:49 PM
#30
Final Update:
I now have 3 sets Ichiba v2 spacers. 2 of which was sent from Ichiba directly and 1 was from a local store inventory. The 2 sent from Ichiba appears to be the latest versions (polished), while the store inventory may have been from a batch long ago. Regardless, Ichiba has supplied a UPS return label and I'll be returning the defective units (pair) tomorrow.
If anyone is interested in privately purchasing the replacement units, feel free to IM me. They are brand new with no marks. If not, then I suppose I can fit them on the front have have all 4 wheels +25mm.
Total spend on all 4 spacers = $250