How to install a NAV/DVD Override/Bypass Module on a 2011 Lexus CT200h
 09-14-11, 03:39 PM
#1
Sponsor
Thread Starter
How to install a NAV/DVD Bypass Module on a 2011 Lexus CT200h
Important Information:
The following instructions were created using Japanese DIY from our affiliate in Japan and translating them to English. The pictures were also flipped horizontally to mimic a left hand drive car instead of the original right hand drive car. The following pictures and information are being used with the original owner’s permission.
Disclaimer:
We are not responsible to damage, loss or injury caused from attempting or performing the DIY. Further, the navigation and DVD lock while in motion was originally installed for safety reasons. By unlocking the navigation and DVD lock, we are assuming that the navigation and DVD will be controlled and enjoyed by the passenger and not by the driver. As such, are not responsible to damage, loss or injury from using the bypass modules. Please be responsible drivers!
For additional information, contact: info@beatsonicusa.com
About the Beat-Sonic NAV/DVD Bypass Module:
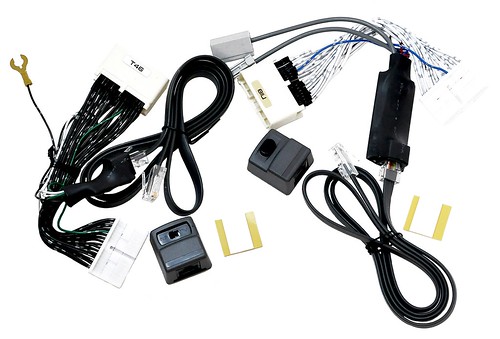
System: 100% Plug and play kit from Beat-Sonic for allowing use of factory features that would be locked out during vehicle movement.
These plug and play module kits allow override of the lock out system equipped in your factory TV or Navigation/DVD system when the vehicle is in motion. Due to the fact that no modification is needed on the factory harness and this is 100% plug and play, it is easily reversible to the original factory specs without showing any signs that this modification was ever made.
The NVK modules are equipped with manual functionality button where the override of the navigation lock out may be enabled simply by pressing the button included in with the kit. Once the button is engaged, the module tricks the factory navigation system to thinking that it is at a stop and enables the use of all the controls including the navigation address input, POI, blue-tooth contacts, mp3 music select, etc. When the button is depressed, the vehicle will return to its normal state and will take couple of seconds to refresh the correct vehicle location on the map. This module will not bypass the DVD during vehicle movement. See TVK module below for the DVD bypass:
The TVK modules are also equipped with manual functionality switch where the override of the DVD lockout may be enabled simply by toggling the switch to "TV". Once the switch is engaged, the module tricks the factory DVD system to thinking that the vehicle is in "park" with its parking brake on. The factory screen will switch to backup camera mode automatically when in R gear and will not affect any other factory controls. As such, the user have the option of enabling the DVD bypass permanently and hiding the switch behind the dash for a cleaner installation.
The NT modules kit include both NVK and TVK modules as mentioned above.
The DIY Installation Starts Here:
Tools needed: Socket wrench with a 10mm socket, panel removers, and towels
Product needed: Beat-Sonic NT4618, TVK-46 or NVK-18. Go to www.beatsonicusa.com for the product.
Step1: THE CLUSTER PANEL REMOVAL
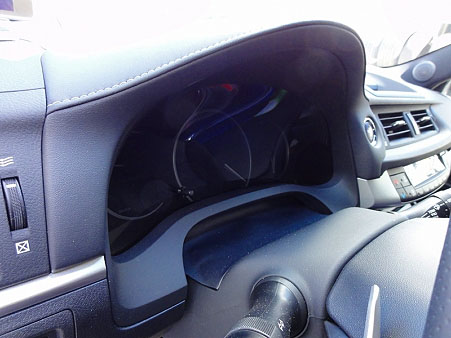
The above picture shows the cluster panel that you will be removing.
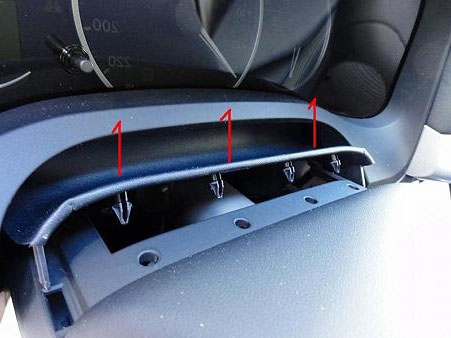
Remove the clips on the panel of the steering column as shown above. Just pull straight up as it is only being held by 4 clips.
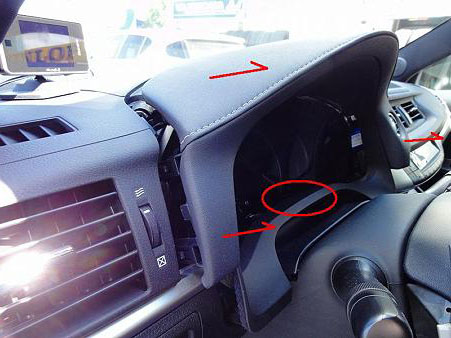
After the steering wheel column panel is loosened, pull the red circle area towards you to loosen the cluster as shown above. Once you confirm that the red circle area is loosened, pull the cluster hood toward you as shown above. Do not pull too hard as it may cause damage to the cluster cover.

Disconnect the “start” button switch and then remove the cluster cover as shown above.
Step2: THE GLOVE BOX:
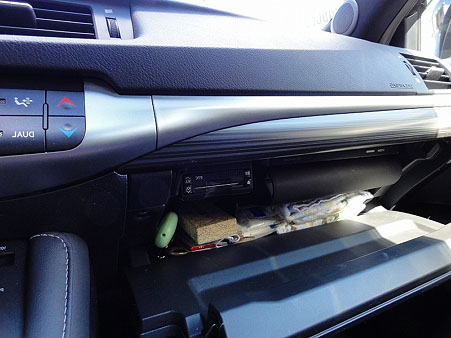
Open the glove box as shown above.

Remove the two clips as shown above. Although not required, you may remove this whole panel if necessary.
Important Information:
The following instructions were created using Japanese DIY from our affiliate in Japan and translating them to English. The pictures were also flipped horizontally to mimic a left hand drive car instead of the original right hand drive car. The following pictures and information are being used with the original owner’s permission.
Disclaimer:
We are not responsible to damage, loss or injury caused from attempting or performing the DIY. Further, the navigation and DVD lock while in motion was originally installed for safety reasons. By unlocking the navigation and DVD lock, we are assuming that the navigation and DVD will be controlled and enjoyed by the passenger and not by the driver. As such, are not responsible to damage, loss or injury from using the bypass modules. Please be responsible drivers!
For additional information, contact: info@beatsonicusa.com
About the Beat-Sonic NAV/DVD Bypass Module:
System: 100% Plug and play kit from Beat-Sonic for allowing use of factory features that would be locked out during vehicle movement.
These plug and play module kits allow override of the lock out system equipped in your factory TV or Navigation/DVD system when the vehicle is in motion. Due to the fact that no modification is needed on the factory harness and this is 100% plug and play, it is easily reversible to the original factory specs without showing any signs that this modification was ever made.
The NVK modules are equipped with manual functionality button where the override of the navigation lock out may be enabled simply by pressing the button included in with the kit. Once the button is engaged, the module tricks the factory navigation system to thinking that it is at a stop and enables the use of all the controls including the navigation address input, POI, blue-tooth contacts, mp3 music select, etc. When the button is depressed, the vehicle will return to its normal state and will take couple of seconds to refresh the correct vehicle location on the map. This module will not bypass the DVD during vehicle movement. See TVK module below for the DVD bypass:
The TVK modules are also equipped with manual functionality switch where the override of the DVD lockout may be enabled simply by toggling the switch to "TV". Once the switch is engaged, the module tricks the factory DVD system to thinking that the vehicle is in "park" with its parking brake on. The factory screen will switch to backup camera mode automatically when in R gear and will not affect any other factory controls. As such, the user have the option of enabling the DVD bypass permanently and hiding the switch behind the dash for a cleaner installation.
The NT modules kit include both NVK and TVK modules as mentioned above.
The DIY Installation Starts Here:
Tools needed: Socket wrench with a 10mm socket, panel removers, and towels
Product needed: Beat-Sonic NT4618, TVK-46 or NVK-18. Go to www.beatsonicusa.com for the product.
Step1: THE CLUSTER PANEL REMOVAL
The above picture shows the cluster panel that you will be removing.
Remove the clips on the panel of the steering column as shown above. Just pull straight up as it is only being held by 4 clips.
After the steering wheel column panel is loosened, pull the red circle area towards you to loosen the cluster as shown above. Once you confirm that the red circle area is loosened, pull the cluster hood toward you as shown above. Do not pull too hard as it may cause damage to the cluster cover.
Disconnect the “start” button switch and then remove the cluster cover as shown above.
Step2: THE GLOVE BOX:
Open the glove box as shown above.
Remove the two clips as shown above. Although not required, you may remove this whole panel if necessary.

Last edited by BeatSonic; 09-14-11 at 03:54 PM.
 09-14-11, 03:40 PM
#2
Sponsor
Thread Starter
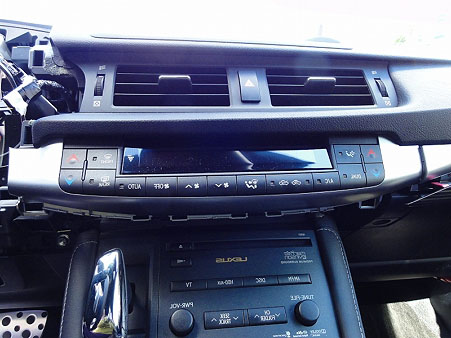
Step3: THE CENTER CONSOLE (LONG PROCESS):

Remove the plastic panel located underneath the AC controls. I apologize for the dark picture due to the shade…. You may remove this piece easily by inserting a finger into the gap you left when the glove box panel and the cluster cover was removed.

The panel is removed by pulling it towards you.
Now, we need to remove the AC control panel. Only clips are holding this piece. As such, just pull it toward you gently from one side at a time.
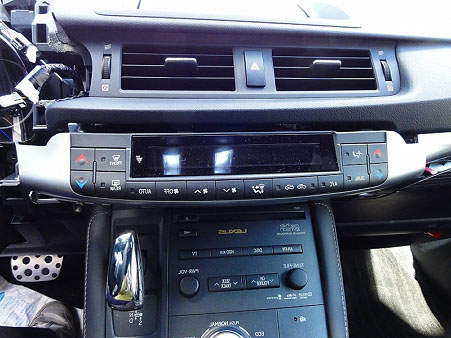
Pulled it out as shown above.
Disconnect the connector to remove the AC control panel.
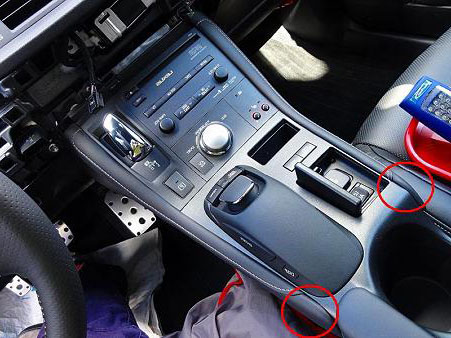
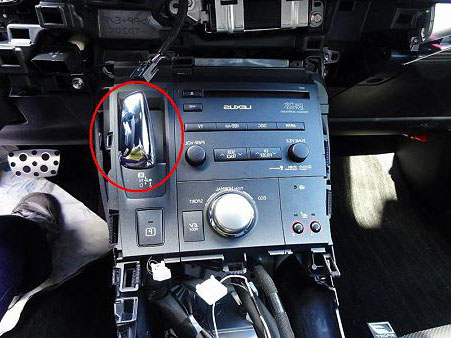
Remove the leather panels on both sides of the center console by lifting straight up. The topmost area as circled will disengage. Only clips are used to hold this together.

Above picture showing leather side panels with clips removed.
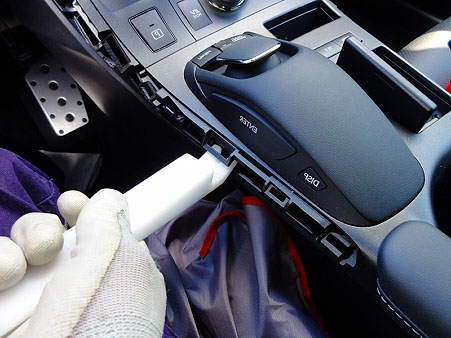
Note when the side leather panel is being removed, you must first lift and then pull back on the front side as shown in the picture above. Please take extra care as the panel may break with extra force.

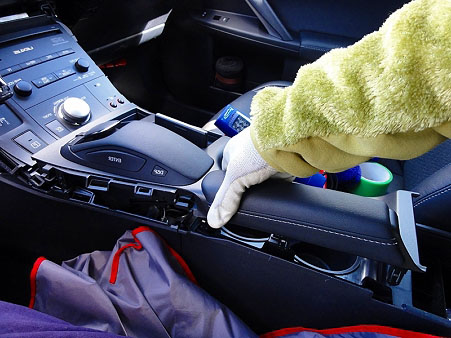
Now, we need to remove the center console.
Remove the center console by pulling up as it is only being held by clips. Not much power is needed. Using a tool such as the one above will make the removal process a lot easier.
Lift the center console and then unplug the connectors connected to the center console from the underside.

First disconnect these three connectors under the center console.
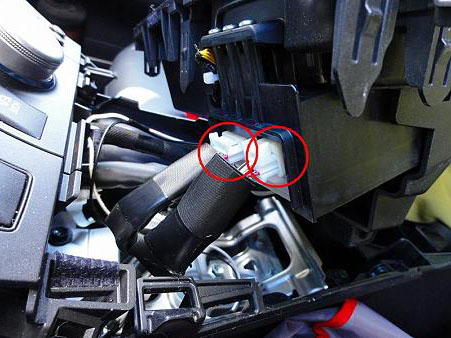
Then, disconnect the two harnesses in the front. Now, you may remove the center console.
Now, remove the shift **** by turning counter-clockwise to remove shift ****.
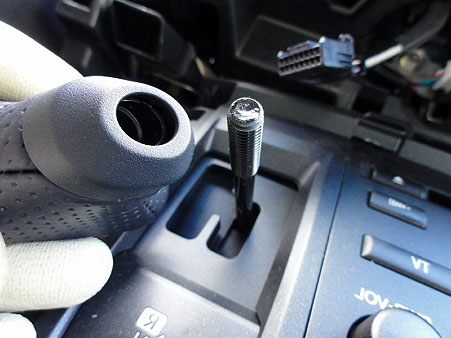
Shift **** removed as shown above.
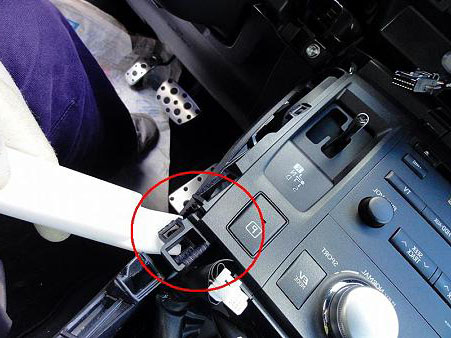
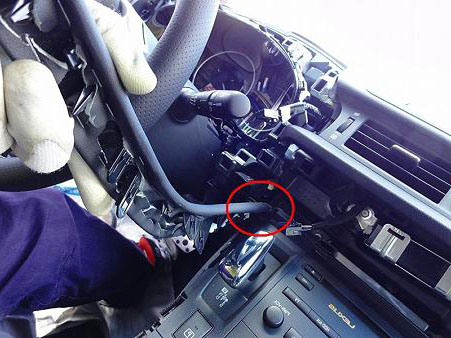
Lift straight up as shown above in that area to disengage the clip.
Lift up as shown in the picture above.

As you did for the leather side panels, while lifting up this piece pull out to make sure the clips are straight when pulling out to avoid damage to the clips.

Keep the panels to the passenger’s seat side and cover areas with a towel to prevent damage to the center console pieces.
Remove the plastic panel located underneath the AC controls. I apologize for the dark picture due to the shade…. You may remove this piece easily by inserting a finger into the gap you left when the glove box panel and the cluster cover was removed.
The panel is removed by pulling it towards you.
Now, we need to remove the AC control panel. Only clips are holding this piece. As such, just pull it toward you gently from one side at a time.
Pulled it out as shown above.
Disconnect the connector to remove the AC control panel.
Remove the leather panels on both sides of the center console by lifting straight up. The topmost area as circled will disengage. Only clips are used to hold this together.
Above picture showing leather side panels with clips removed.
Note when the side leather panel is being removed, you must first lift and then pull back on the front side as shown in the picture above. Please take extra care as the panel may break with extra force.
Now, we need to remove the center console.
Remove the center console by pulling up as it is only being held by clips. Not much power is needed. Using a tool such as the one above will make the removal process a lot easier.
Lift the center console and then unplug the connectors connected to the center console from the underside.
First disconnect these three connectors under the center console.
Then, disconnect the two harnesses in the front. Now, you may remove the center console.
Now, remove the shift **** by turning counter-clockwise to remove shift ****.
Shift **** removed as shown above.
Lift straight up as shown above in that area to disengage the clip.
Lift up as shown in the picture above.
As you did for the leather side panels, while lifting up this piece pull out to make sure the clips are straight when pulling out to avoid damage to the clips.
Keep the panels to the passenger’s seat side and cover areas with a towel to prevent damage to the center console pieces.
09-14-11, 03:40 PM
#3
Sponsor
Thread Starter
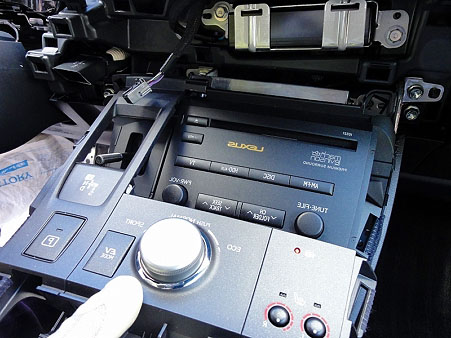
STEP 4: THE HEAD UNIT REMOVAL:

Remove the 4 bolts as circled above.

Lower bolts shown above
Upper bolts shown above
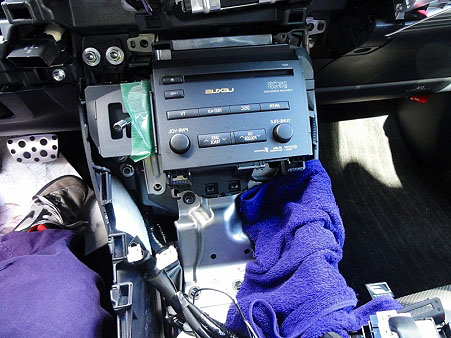
Now, pull out the head unit. Be cautious to not scratch the head unit while removal. You may cover the area between the head unit and the shift arm area with some soft cloth as a precaution to prevent scratching.
Pull the unit out as shown above.
STEP5: WIRING CONNECTORS: (Below Pictures from USA Spec CT200h)
Proceed to disconnect all the connectors behind the head unit to pull out completely.
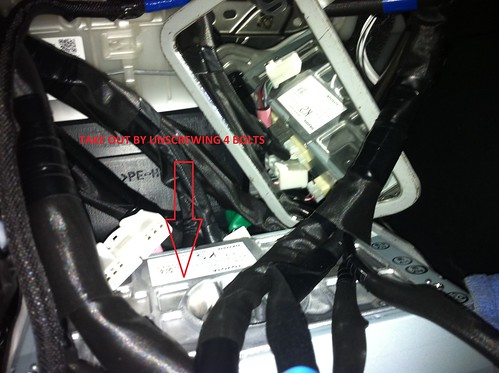
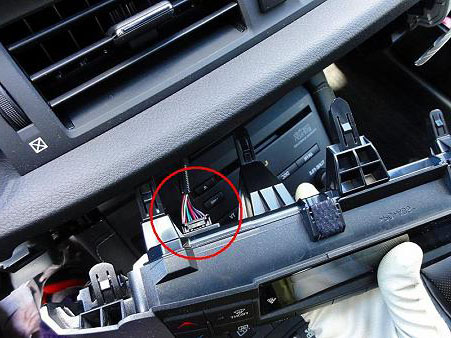
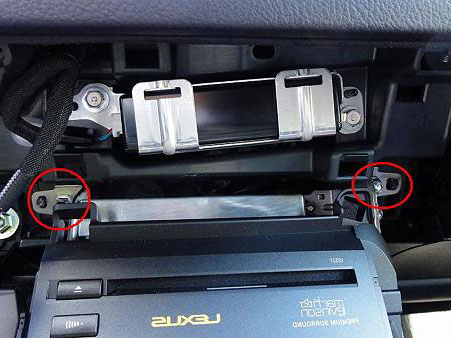
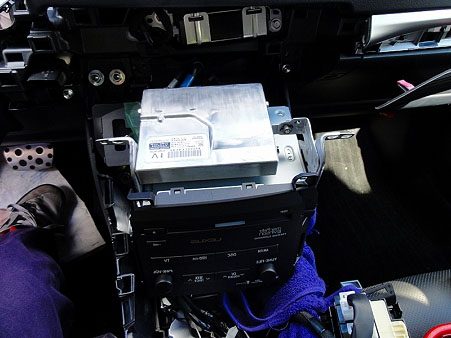
After the head unit has been pulled out all the way, remove 4 bolts on the metal box in the above picture to get to the necessary connectors.
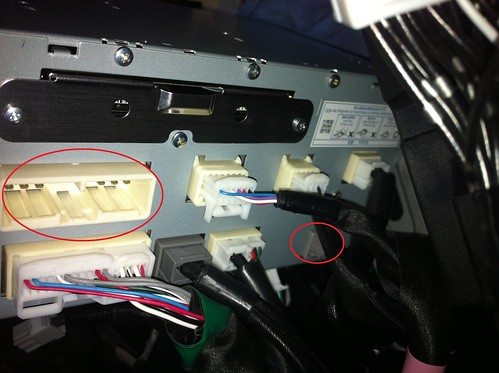
Behind the metal box are the above connectors. The 2 circled connectors are where you are going to connect the Beat-Sonic Modules. Disconnect those two connectors shown above. Note – the right GPS connector is not used for TVK-46.
Now, connect the Beat-Sonic TVK46, NVK18, or the NT4618 to the connector that you pulled out on the previous step. If connecting the NT4618, first connect the TVK-46 and NVK18 to each other and then connect to the vehicle’s harness and behind the head unit. Also, ground the harness to the vehicle’s chassis.
TEST THE UNIT AND REVERSE PROCESS:
Test the unit to make sure it is working well and then perform the above steps in reverse to put everything back to normal and you are done!
Remove the 4 bolts as circled above.
Lower bolts shown above
Upper bolts shown above
Now, pull out the head unit. Be cautious to not scratch the head unit while removal. You may cover the area between the head unit and the shift arm area with some soft cloth as a precaution to prevent scratching.
Pull the unit out as shown above.
STEP5: WIRING CONNECTORS: (Below Pictures from USA Spec CT200h)
Proceed to disconnect all the connectors behind the head unit to pull out completely.
After the head unit has been pulled out all the way, remove 4 bolts on the metal box in the above picture to get to the necessary connectors.
Behind the metal box are the above connectors. The 2 circled connectors are where you are going to connect the Beat-Sonic Modules. Disconnect those two connectors shown above. Note – the right GPS connector is not used for TVK-46.
Now, connect the Beat-Sonic TVK46, NVK18, or the NT4618 to the connector that you pulled out on the previous step. If connecting the NT4618, first connect the TVK-46 and NVK18 to each other and then connect to the vehicle’s harness and behind the head unit. Also, ground the harness to the vehicle’s chassis.
TEST THE UNIT AND REVERSE PROCESS:
Test the unit to make sure it is working well and then perform the above steps in reverse to put everything back to normal and you are done!
Last edited by BeatSonic; 09-22-11 at 02:40 PM.
09-21-11, 08:02 AM
#5
Driver
Join Date: Jun 2008
Location: OR
Posts: 161
Likes: 0
Received 0 Likes
on
0 Posts
DANG IT. You had me excited there when I saw the leather cupholder cover. Then I noticed it is flipped so this car is RHD. It drives me NUTS not having that available for us in the US.
09-22-11, 02:45 PM
#6
Sponsor
Thread Starter
Step 5 has been updated due to location difference on the connectors! Please let me know if you have any questions!

Trending Topics
09-26-11, 06:36 PM
#8
Sponsor
Thread Starter
 10-20-11, 05:17 PM
#10
Lexus Connoisseur
 10-20-11, 10:22 PM
#11
Pole Position

Join Date: Nov 2003
Location: California
Posts: 206
Likes: 0
Received 0 Likes
on
0 Posts
10-21-11, 05:49 AM
#12

An hour......how long is that - or so........ another hour.  That looks like a lot of time to bypass it. 185.00 plus two hours labor....= ouch. I guess if you can't live it .....
After seeing this I probably will live with it. But, I love to tinker.....so who knows.
...do I need a fuzzy sweater too?
That looks like a lot of time to bypass it. 185.00 plus two hours labor....= ouch. I guess if you can't live it .....After seeing this I probably will live with it. But, I love to tinker.....so who knows.
...do I need a fuzzy sweater too?
11-07-11, 01:35 AM
#13
Driver School Candidate

Join Date: Oct 2011
Location: CA
Posts: 10
Likes: 0
Received 0 Likes
on
0 Posts
Anyone know of a shop/place/person that can install it? I would do it myself, but would prefer to have someone that knows what they're doing install it since I really don't want to risk messing it up. Any help is appreciated!! Thanks!! I'm in SoCal (LA/OC) by the way.
11-07-11, 09:54 AM
#14
Pole Position
Join Date: Nov 2003
Location: California
Posts: 206
Likes: 0
Received 0 Likes
on
0 Posts
Any decent reputable stereo shop should be able to do it without any trouble.
Just go to them with the full instructions printed out, and have them give an estimate.
If you don't like the estimate or the quality of their other work, try another shop.
It won't be hard to find one at the right price for quality work.
Just go to them with the full instructions printed out, and have them give an estimate.
If you don't like the estimate or the quality of their other work, try another shop.
It won't be hard to find one at the right price for quality work.
11-07-11, 11:56 AM
#15
Sponsor
Thread Starter