@reddotracing GS300 Build! manual swap, battle version,vertex
 06-20-16, 07:52 PM
#1
So after about 10 years or so of building race cars for other people in various forms of Motorsport I finally decided to build something for my self once again. Had a hard time deciding what to build, but after a few short talks with my good friends Alex and Taka they convinced me to build a four door. Once that was decided, well the only option for me was to go with a second gen GS since I've always liked the look and yet to see many people really shred in those stateside.
I found a clean body, all stock gs with with awesome interior and a blown head gasket for a decent price and decided that this will be my start( sorry i forgot to take stock photos). I already have quite a few things planned for this. Vertex aero, serial nine overs, some custom ARP splitters, Battle version all things I can, 350z manual conversion , custom megan coil overs , kazz etc. As the next few months go on I will be posting photos and some install wright ups of things I do to the car in hopes that I might be able to help at least once person out by doing so. I'll do my best to keep it entertaining but honestly I think there is still a lot to do this chassis before I really get to any of the fun stuff. You can also check out my instagram from time to time @reddotracing, might be somethings I forgot to post on here you might not want to miss.
HERE WE GO:
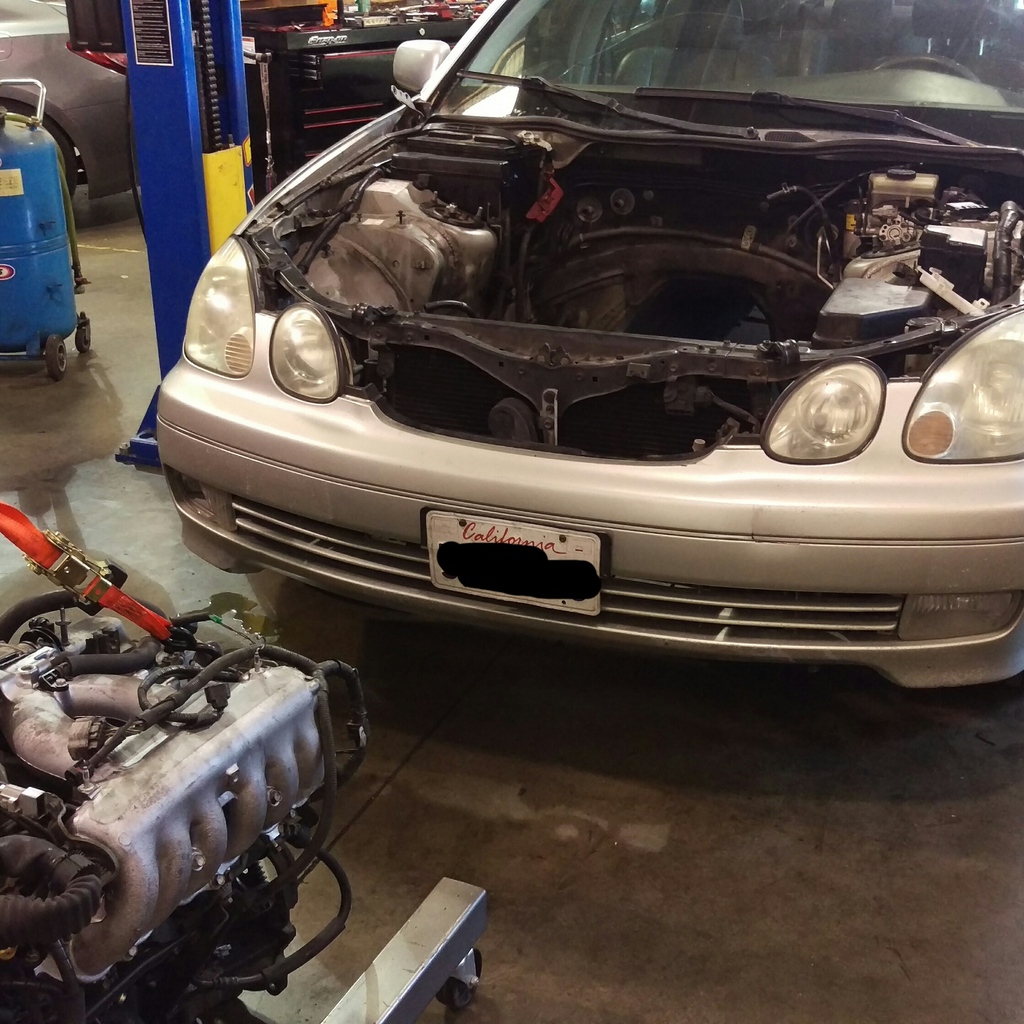
On 6/3/2016 I found a clean body car, picked it up and took it back to Megan Racing. Having a great relationship with them they agreed to let me store the car there until I could get an engine back in there. I was eager to get it started but fortunately the following week I had to make the trip out to Formula Drift Orlando to spot for a friend of mine. Since we were flying out the following Monday, I was only able to get as far as pulling the engine and trans out. Probably one of the easiest things I've ever worked on, look at all that space!
I found a clean body, all stock gs with with awesome interior and a blown head gasket for a decent price and decided that this will be my start( sorry i forgot to take stock photos). I already have quite a few things planned for this. Vertex aero, serial nine overs, some custom ARP splitters, Battle version all things I can, 350z manual conversion , custom megan coil overs , kazz etc. As the next few months go on I will be posting photos and some install wright ups of things I do to the car in hopes that I might be able to help at least once person out by doing so. I'll do my best to keep it entertaining but honestly I think there is still a lot to do this chassis before I really get to any of the fun stuff. You can also check out my instagram from time to time @reddotracing, might be somethings I forgot to post on here you might not want to miss.
HERE WE GO:
On 6/3/2016 I found a clean body car, picked it up and took it back to Megan Racing. Having a great relationship with them they agreed to let me store the car there until I could get an engine back in there. I was eager to get it started but fortunately the following week I had to make the trip out to Formula Drift Orlando to spot for a friend of mine. Since we were flying out the following Monday, I was only able to get as far as pulling the engine and trans out. Probably one of the easiest things I've ever worked on, look at all that space!

Last edited by Fcdrifter2; 07-22-16 at 02:54 PM.
 06-20-16, 08:12 PM
#2
After getting back from Orlando it was time to Find another engine with less miles. I stopped by to visit Andrew over at Animal Auto and he had just what I needed, a low milage 2j ready to go in.
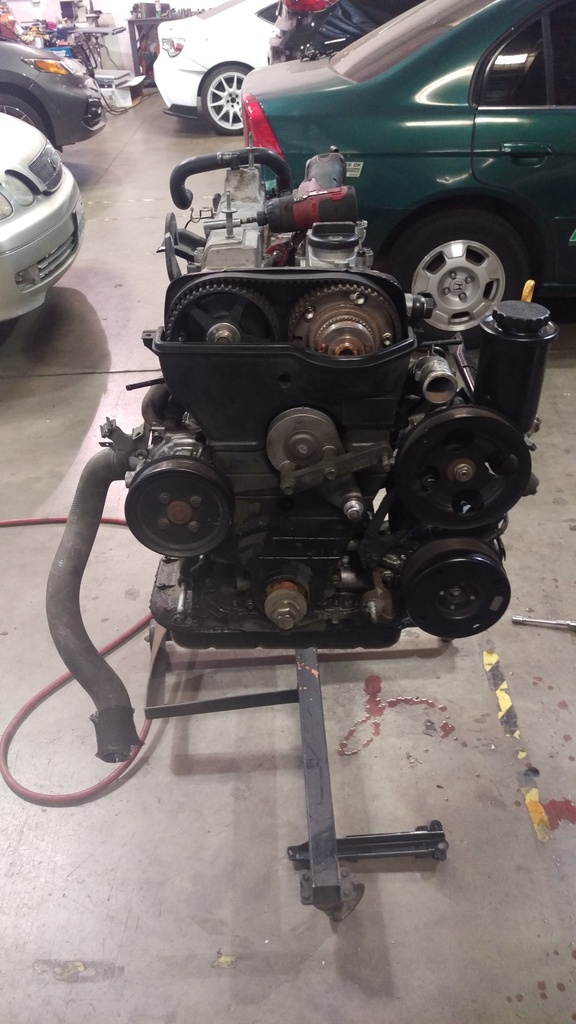
Even though I could have just thrown that thing right in I decided to do some maintenance. This brought me over to Aaron and the awesome staff over at Drift Motion. These guys have pretty much anything anyone will ever need for a 2j, and YES! He keeps most of it in stock. Below you will find a list of what went in, in addition I also took the time to go ahead and re seal both lower and upper oil pans.
Timing belt
water pump
front main seal
rear main seal
water pump front half
timing tensioner
timing tensioner pulley
serpentine belt tensioner bearing replacement
oil pump
crank pulley
serpentine belt
I wont bore you all with photos and installs of these things as there are already a thousand write ups on this. instead here is a photo of everything all back in and pretty.
I also found a small crack in the radiator prior to start up so I went online and found a place in San bernadino that had a brand new replacement for 70$ CHINA FOR THE WIN!! Picked it up installed it fired up and everything ran beautifully. Since I was anxious to drive it I ended up just re installing the auto trans and take the car for a test drive. I should have the adapter kit and flywheel for the 350z trans shipped out to me with in the next few days. Once that gets here the real fun can begin.

Even though I could have just thrown that thing right in I decided to do some maintenance. This brought me over to Aaron and the awesome staff over at Drift Motion. These guys have pretty much anything anyone will ever need for a 2j, and YES! He keeps most of it in stock. Below you will find a list of what went in, in addition I also took the time to go ahead and re seal both lower and upper oil pans.
Timing belt
water pump
front main seal
rear main seal
water pump front half
timing tensioner
timing tensioner pulley
serpentine belt tensioner bearing replacement
oil pump
crank pulley
serpentine belt
I wont bore you all with photos and installs of these things as there are already a thousand write ups on this. instead here is a photo of everything all back in and pretty.

I also found a small crack in the radiator prior to start up so I went online and found a place in San bernadino that had a brand new replacement for 70$ CHINA FOR THE WIN!! Picked it up installed it fired up and everything ran beautifully. Since I was anxious to drive it I ended up just re installing the auto trans and take the car for a test drive. I should have the adapter kit and flywheel for the 350z trans shipped out to me with in the next few days. Once that gets here the real fun can begin.
Last edited by Fcdrifter2; 06-20-16 at 08:41 PM.
06-20-16, 08:35 PM
#3
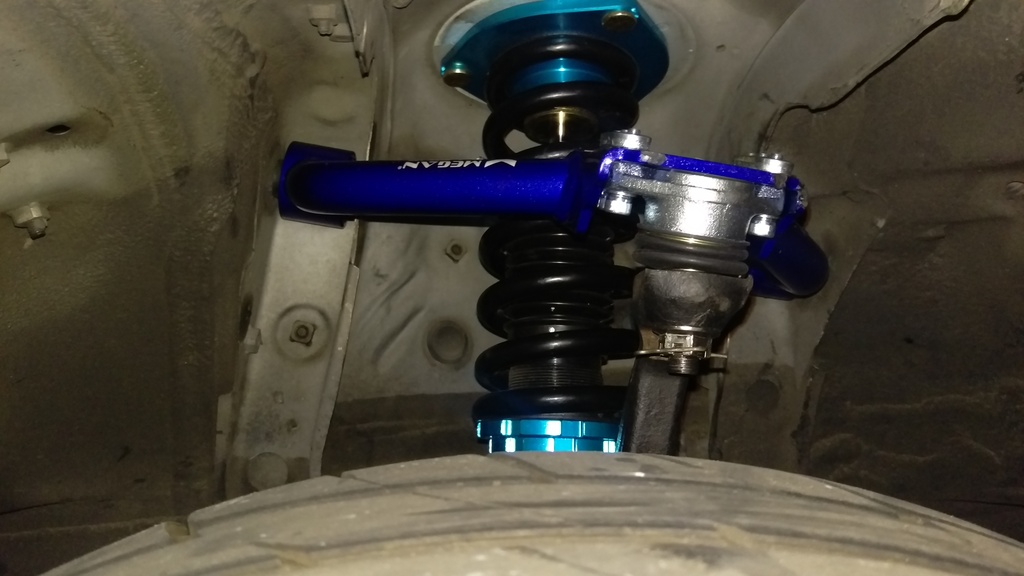
Since the car was already over at Megan Racing we went ahead and installed a set of Megan Racing EZII on the gs. Out of the box these are 15 way adjustable and come with 10kg front and 8kg rear spring rates.
http://www.meganracing.com/product_d...1057&catid=106
I will be taking them back after the manual swap for a re valve and spring rate swap in order to gain a more desirable track set up. My first impression of these is that they are a bit soft and I found that riding them at anything less than full stiff is just too soft for me. I also found that they go a lot lower than I would ever need them to but that may be a plus for others. With a 899$ retail though this is a great way to lower your car, get rid of your stock 20 year old shocks, and cut some weight on this heavy pig. Defiantly a good bang for your buck scenario.
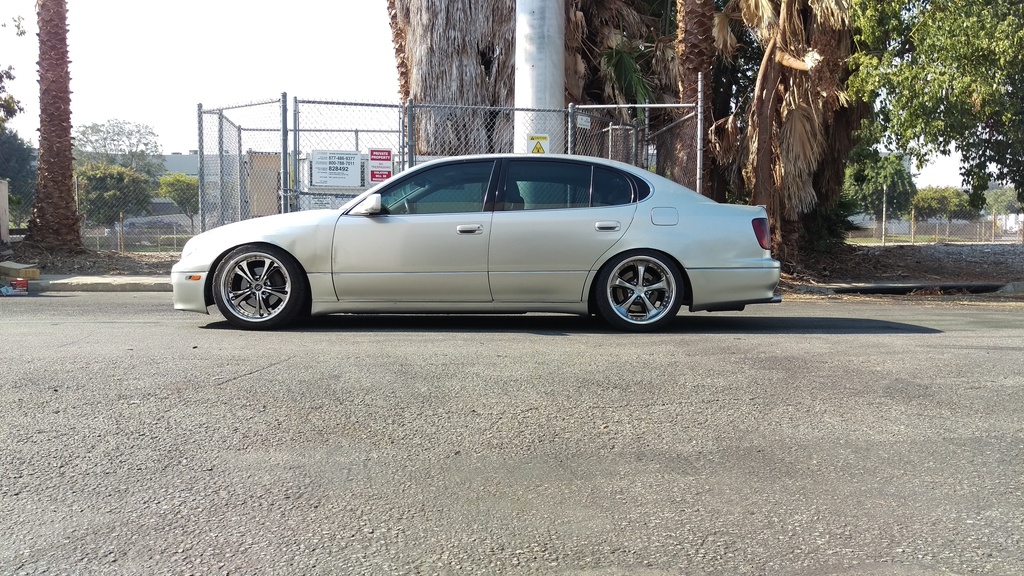
Lastly, you can't go low on stock wheels, that's just sacrilegious!! SO here is a photo of the car as it sits. Aside from a bad 02 sensor, the 3/6 return p/s hose, needing to be replaced, oh and a faulty alternator the car runs great!!!! A/c blows could, ride is comfortable, and the car looks good....for now
Next up I'll be paying a visit to my good friends over at Battle Version to get all the arms and bushings I need in order to replace all the old, stock poop I'm riding on now. Full install write ups of every part they sell for the gs, and even of some cool stuff that is still in the prototype phase. CANT WAIT!
http://www.meganracing.com/product_d...1057&catid=106
I will be taking them back after the manual swap for a re valve and spring rate swap in order to gain a more desirable track set up. My first impression of these is that they are a bit soft and I found that riding them at anything less than full stiff is just too soft for me. I also found that they go a lot lower than I would ever need them to but that may be a plus for others. With a 899$ retail though this is a great way to lower your car, get rid of your stock 20 year old shocks, and cut some weight on this heavy pig. Defiantly a good bang for your buck scenario.
Lastly, you can't go low on stock wheels, that's just sacrilegious!! SO here is a photo of the car as it sits. Aside from a bad 02 sensor, the 3/6 return p/s hose, needing to be replaced, oh and a faulty alternator the car runs great!!!! A/c blows could, ride is comfortable, and the car looks good....for now

Next up I'll be paying a visit to my good friends over at Battle Version to get all the arms and bushings I need in order to replace all the old, stock poop I'm riding on now. Full install write ups of every part they sell for the gs, and even of some cool stuff that is still in the prototype phase. CANT WAIT!
Trending Topics
06-27-16, 12:13 PM
#8
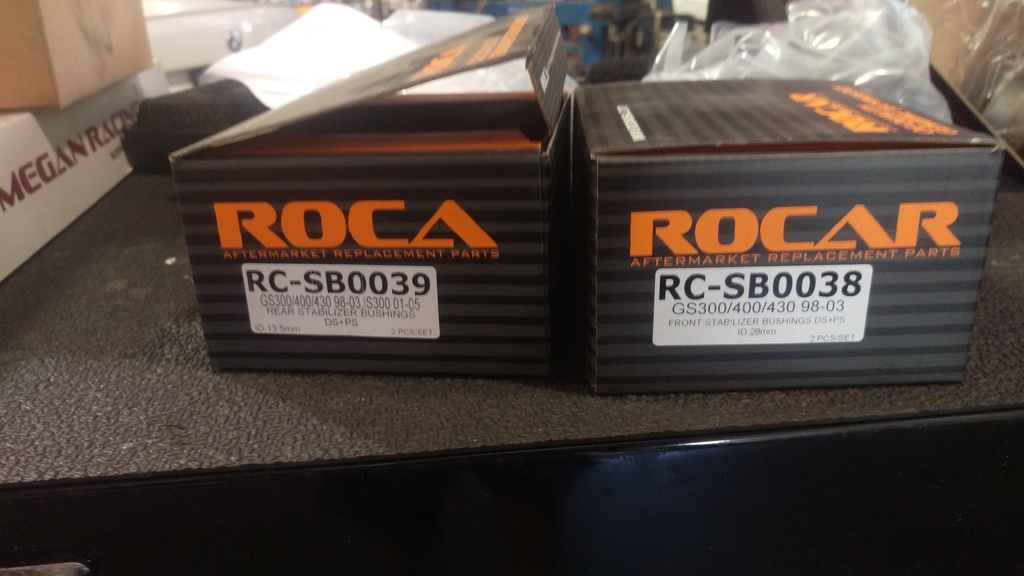
My front end has been clunking a bit so I decided its time to change all the front end bushing out with some fresh rubber. Megan Racing has a sub line called ROCA-USA which sells nothing but oe replacement bushings, control arms, engine mounts, ball joints etc. Pricing is good and the quality seems pretty good so I decided to run these, unfortunately they do not car any of the ball joints for the gs so just bushings for now.
http://rocar-usa.com/
I went ahead and got the lower arm, and caster bushings, front sway bar bushings, rear sway bar bushings and opted not to get the front upper arm bushings since I'm going to be swapping out both front upper arms.
I started with the front sway bar bushing which is about a 10 minute job in total. Just remove 4 bolts let the sway bar hang, remove old bushings, install new ones then back up it goes. Rear is equally as easy.
I unfortunately found that my driver side sway bar bracket is bent and that's the reason for that bushing wearing out. Now I'm going to have to find a parts car I can snag those off of.
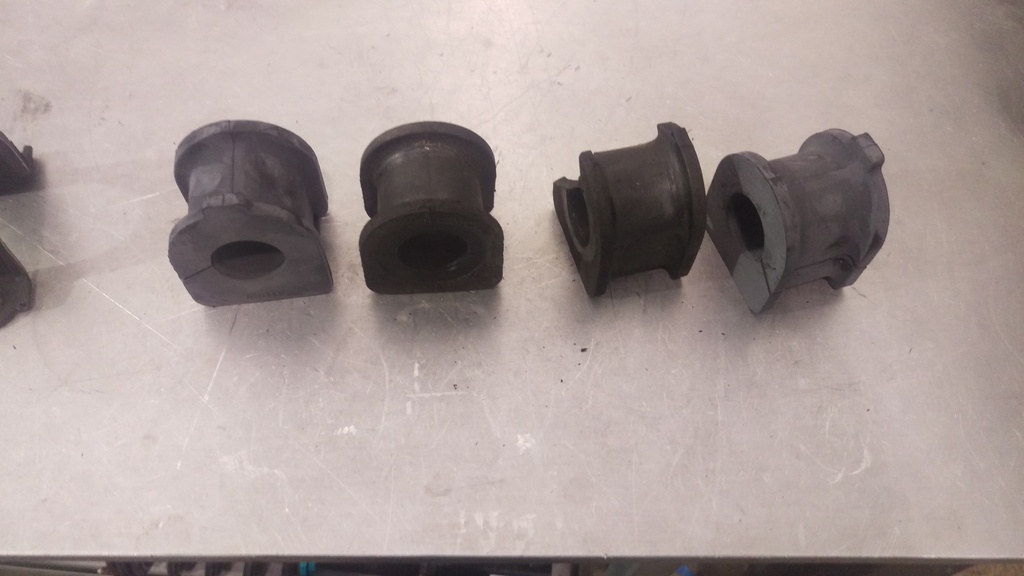

out with the old in with the new
next up control arm and caster bushings along with front upper arm swap.
06-27-16, 03:40 PM
#9
Driver School Candidate

Keep up the good work nice to see someone really dedicated to the gs00, I love mine kid hit a wall as far as mods I have lowered it changed most if not all major replacement parts running 75 shot nos beat my brothers BMW 325i(manuel) by the way and he has a chip bigger injectors ,intake bigger coils intake ha ha beat by a big heavy fat boy lol.
06-27-16, 09:08 PM
#10
Keep up the good work nice to see someone really dedicated to the gs00, I love mine kid hit a wall as far as mods I have lowered it changed most if not all major replacement parts running 75 shot nos beat my brothers BMW 325i(manuel) by the way and he has a chip bigger injectors ,intake bigger coils intake ha ha beat by a big heavy fat boy lol.
06-30-16, 07:15 PM
#11
So I decided to get rid of most of the slop and clunking in the front end yesterday. This is definitely not a task you want to take on unless you have a decent mechanical background and some decent tools and equipment. I have a shop, lots of tools and some good equipment and this took me the better part of the day. Given, I currently have one working hand and a bum foot do to a motorcycle a few months back.
Again, I went overt to Megan Racing to pick up some oe emplacement bushings from their ROCA line. I was able to get the front lower arm bushings, front caster bushings, front end links. I was going to swap out the ball joints and upper arm bushings but I figured since Battle Version does not currently make a front upper arm from the GS and I was already at Megan, I would just install a set of adjustable front uppers from them.
Why not change put the tie inner and outer tie rods, and front lower ball joints you might ask, I mean I'm already taking most of the front end apart. Simple, I will be making the run up to norcal this weekend to stop by Battle version to pick those up along with all the rear arms, solid rack, subframe and diff spacers. Stay posted for that as I will be installing some new parts they have just released and some that they still haven't.
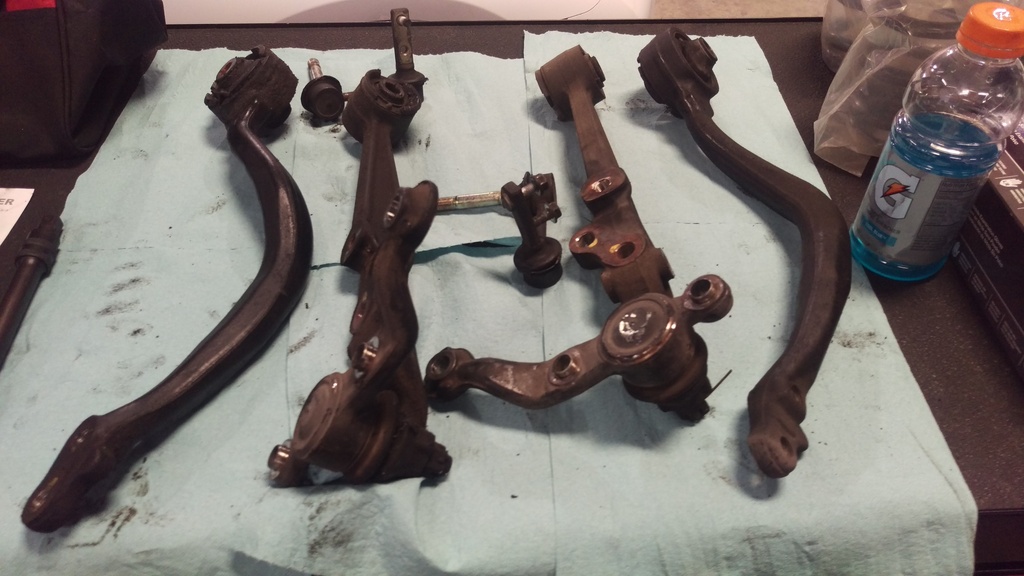
All the old poop off next stop is my press to get the old rubber out. The bushings were all pretty jacked.
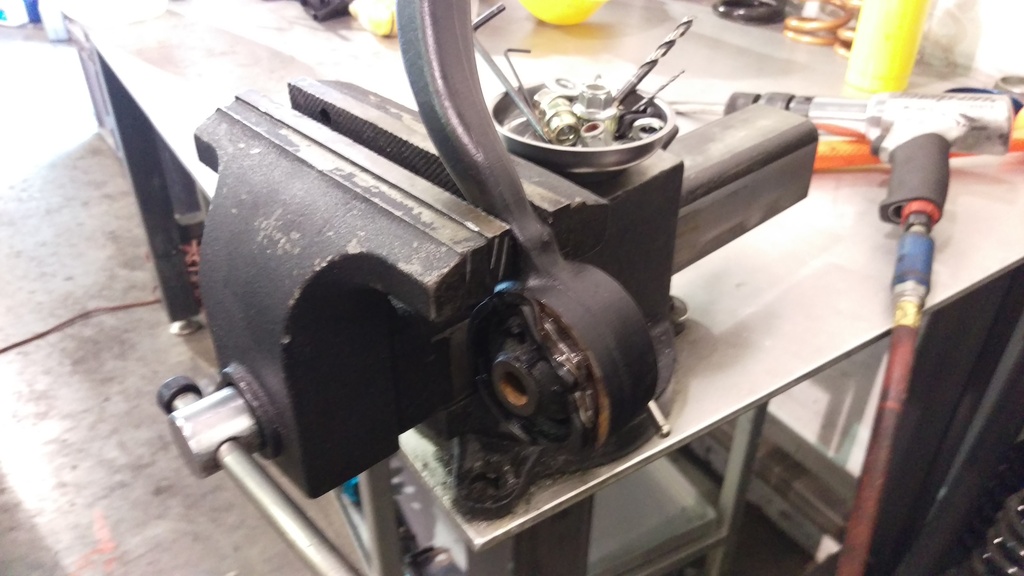
Everyone of my bushing removal cups were either just a tad too big or a tad too small to press them out. Ended up having to pull out my air hammer and VERY CAREFULLY punch them out.
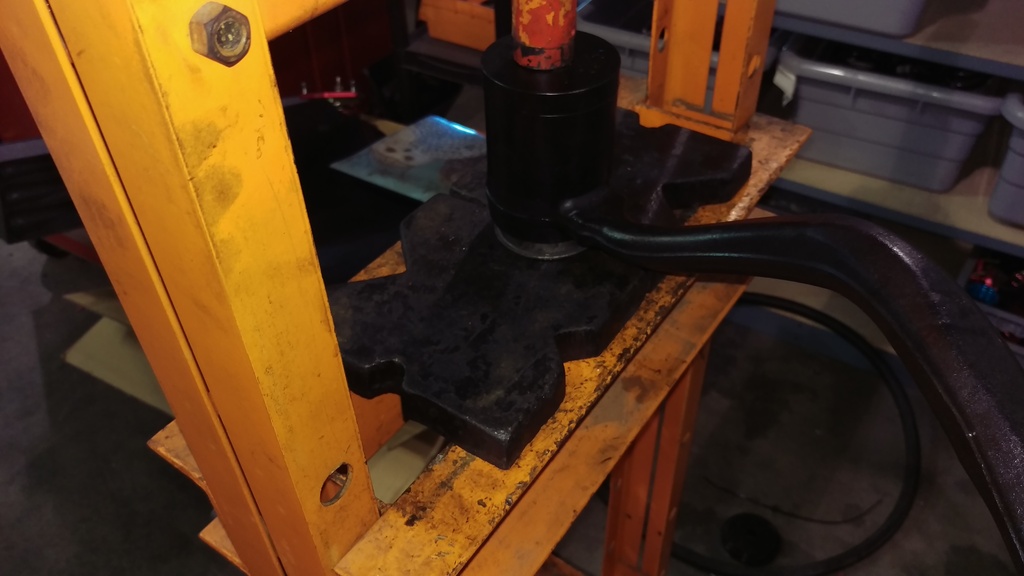
once the old bushings were out from the caster and lower arms it was time to press some fresh rubber in.
Ready to go back on the car, fresh ball joints/ angle getters will go on next week.
Front end links were also all play so they had to go!
once all the lower stuff was back on and double checked, all that was left was the front uppers.
Last thing for today, Megan Racing front upper control arms. (I hate lining up the holes for these.
Can't wait till next week to get everything finished up and aligned. Gonna be STUNTIN'!!
Again, I went overt to Megan Racing to pick up some oe emplacement bushings from their ROCA line. I was able to get the front lower arm bushings, front caster bushings, front end links. I was going to swap out the ball joints and upper arm bushings but I figured since Battle Version does not currently make a front upper arm from the GS and I was already at Megan, I would just install a set of adjustable front uppers from them.
Why not change put the tie inner and outer tie rods, and front lower ball joints you might ask, I mean I'm already taking most of the front end apart. Simple, I will be making the run up to norcal this weekend to stop by Battle version to pick those up along with all the rear arms, solid rack, subframe and diff spacers. Stay posted for that as I will be installing some new parts they have just released and some that they still haven't.

All the old poop off next stop is my press to get the old rubber out. The bushings were all pretty jacked.

Everyone of my bushing removal cups were either just a tad too big or a tad too small to press them out. Ended up having to pull out my air hammer and VERY CAREFULLY punch them out.

once the old bushings were out from the caster and lower arms it was time to press some fresh rubber in.

Ready to go back on the car, fresh ball joints/ angle getters will go on next week.

Front end links were also all play so they had to go!

once all the lower stuff was back on and double checked, all that was left was the front uppers.

Last thing for today, Megan Racing front upper control arms. (I hate lining up the holes for these.
Can't wait till next week to get everything finished up and aligned. Gonna be STUNTIN'!!
07-22-16, 02:37 PM
#12
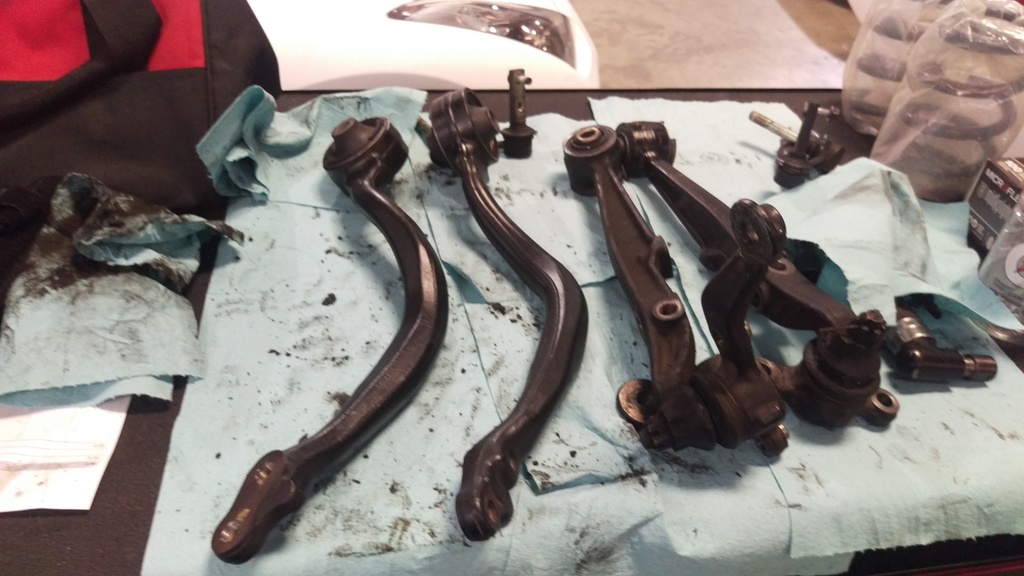
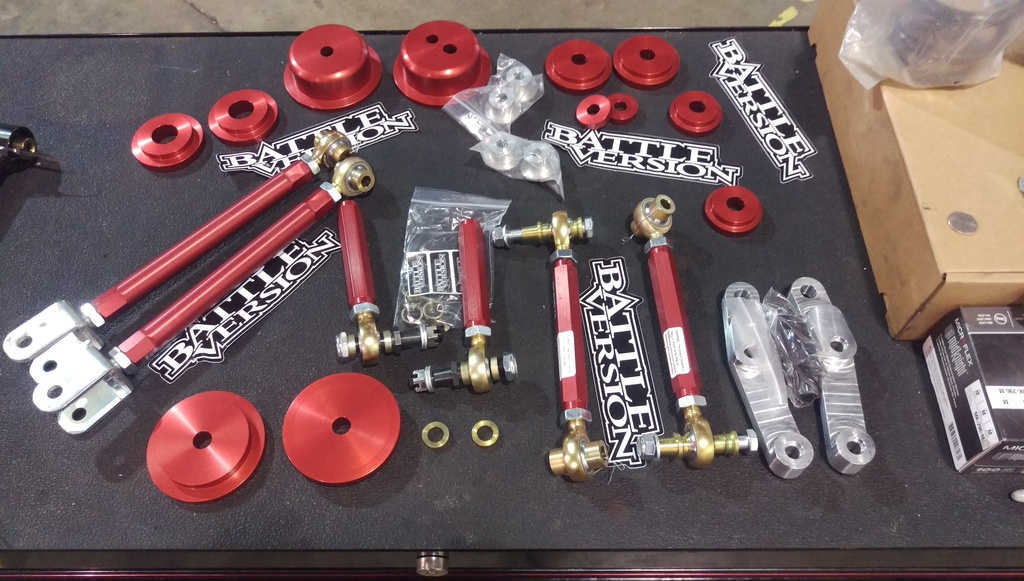
I haven't had a chance to post for a bit, been really busy with physical therapy and getting things set before I go for my next surgery this coming week. During the 4th of July weekend I had a chance to head up to Norcal to stop by and visit my friends over at Battle Version. I was able to pick up everything they make for the gs300/400  . There are a few things just out of frame you can't quite see but as soon as testing is finished I will post those up.
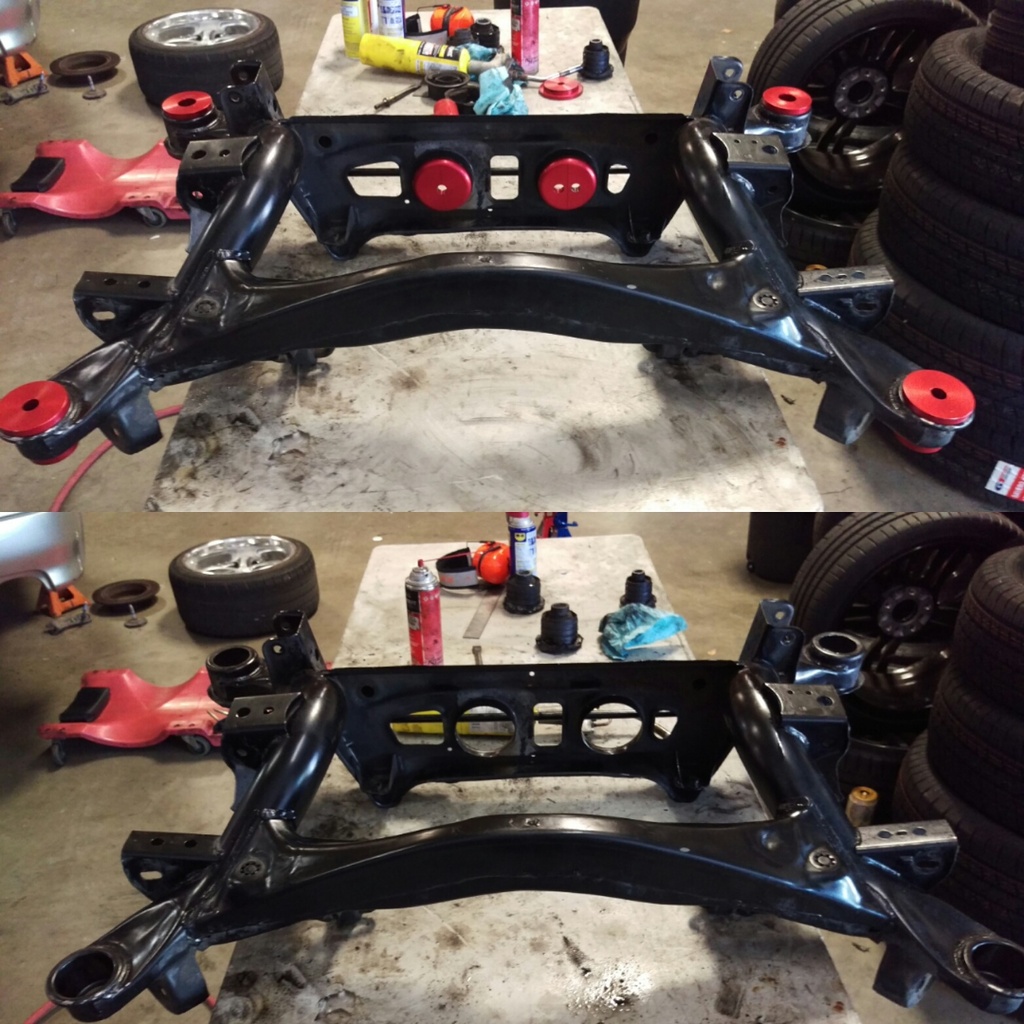
This last weekend I finally got a chance to get to it. I had intended on doing a full write up of the rear sub frame and diff spacer install, unfortunately most of the pictures I took of the install are now gone since I ended up dropping that phone in the water . If there is anyone who wants to have the solid subframe and diff spacers installed please let me know, I can cut you a sweet deal on the parts and labor so that I can take photos of the install again and get that write up done.
Here is what it looked liked before it got resembled and put back in.
 .
.
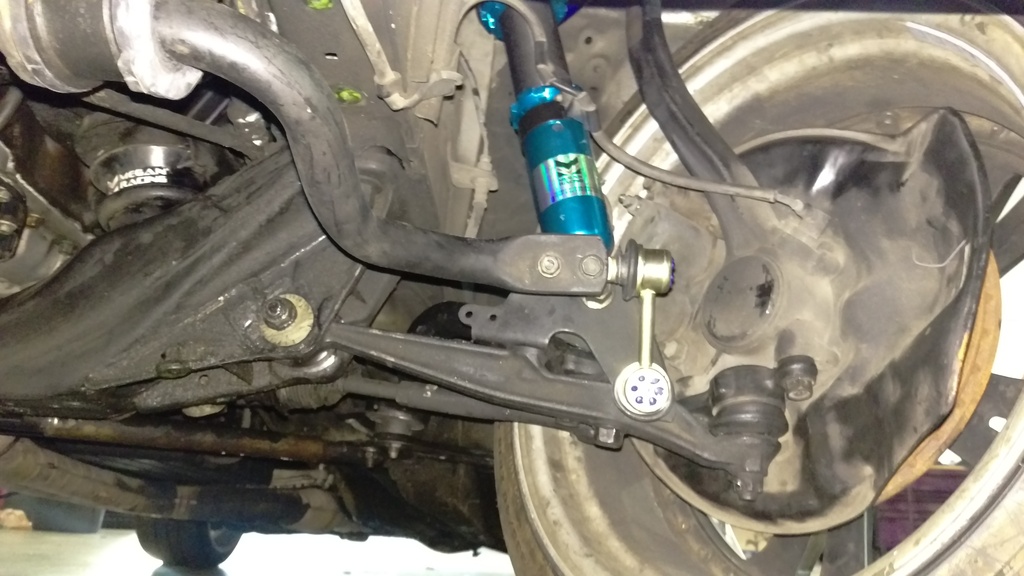
With all my fresh Battle Version parts installed, rear solid diff spacers, solid subframe spacers, toe arms, traction rods, and rear upper control arms the rear end is COMPLETE! Now time to move on to the finishing up the last few things on my front end. Incredibly happy with the progress on my car!
. There are a few things just out of frame you can't quite see but as soon as testing is finished I will post those up.
This last weekend I finally got a chance to get to it. I had intended on doing a full write up of the rear sub frame and diff spacer install, unfortunately most of the pictures I took of the install are now gone since I ended up dropping that phone in the water
. If there is anyone who wants to have the solid subframe and diff spacers installed please let me know, I can cut you a sweet deal on the parts and labor so that I can take photos of the install again and get that write up done.Here is what it looked liked before it got resembled and put back in.
 .
.With all my fresh Battle Version parts installed, rear solid diff spacers, solid subframe spacers, toe arms, traction rods, and rear upper control arms the rear end is COMPLETE! Now time to move on to the finishing up the last few things on my front end. Incredibly happy with the progress on my car!
Last edited by Fcdrifter2; 07-22-16 at 02:59 PM.
07-22-16, 02:49 PM
#13
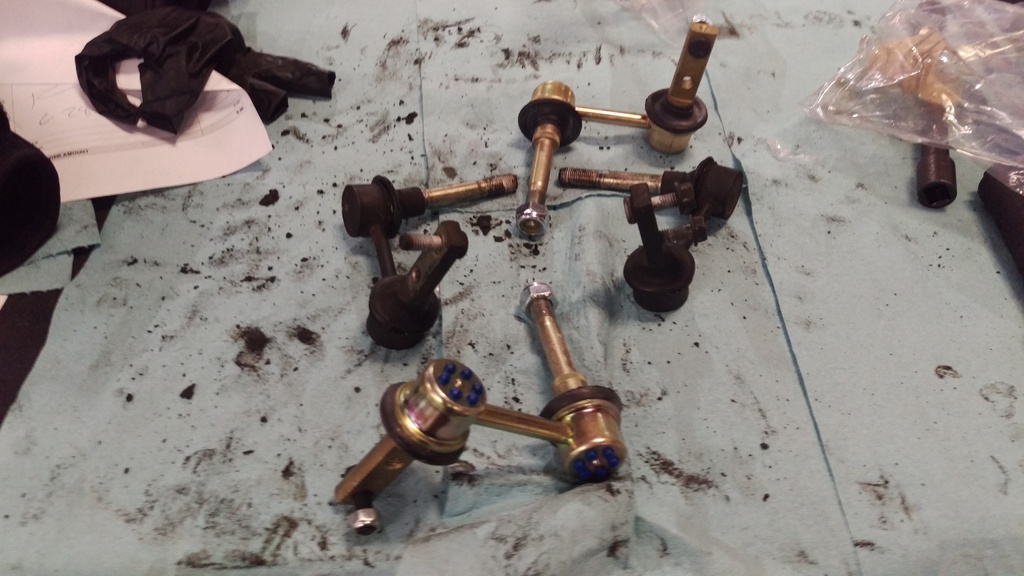
Earlier this week I finally got a chance to finish off the rest of my front end. Tie rods, inner and outer,5mm tie rod spacers, solid rack spacers, new boots, and fresh ball joints, rca block. The solid rack spacer install is probably one of the best investments you can make. They will make your steering feel 1000x better by getting rid of all that front end slop in those stock bushings. At 40$ and maybe about half an hour of your day this is one of the easiest things you can do to improve your ride! I will make a separate post with a full write up on these so make sure to check it out.

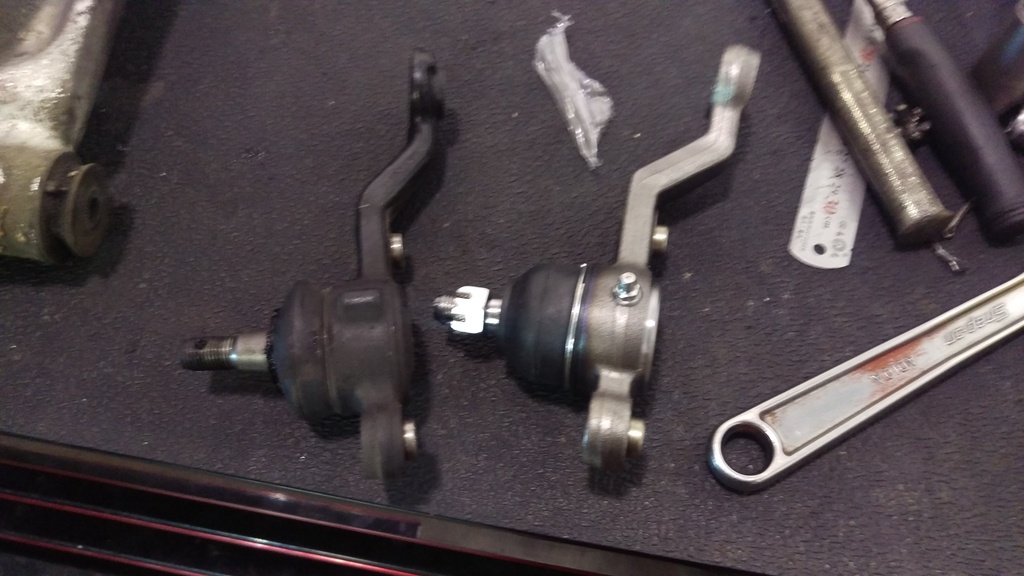
With these things in my front end is finally complete. This along with the solid rear spacers and all the stock arms being replaced with Battle Version adjustable, the car feels amazing. Very last thing needed is to have the coil overs revalved for me. I will be dropping the car off at Megan Racing the day before my surgery so that the guys over there have plenty of time to work on it before I recover. Oh and I was not able to install the rca block just yet, my wheel offset is a bit to aggressive and would hit the tension arm at full lock so I will have to resize them before I toss those back on.
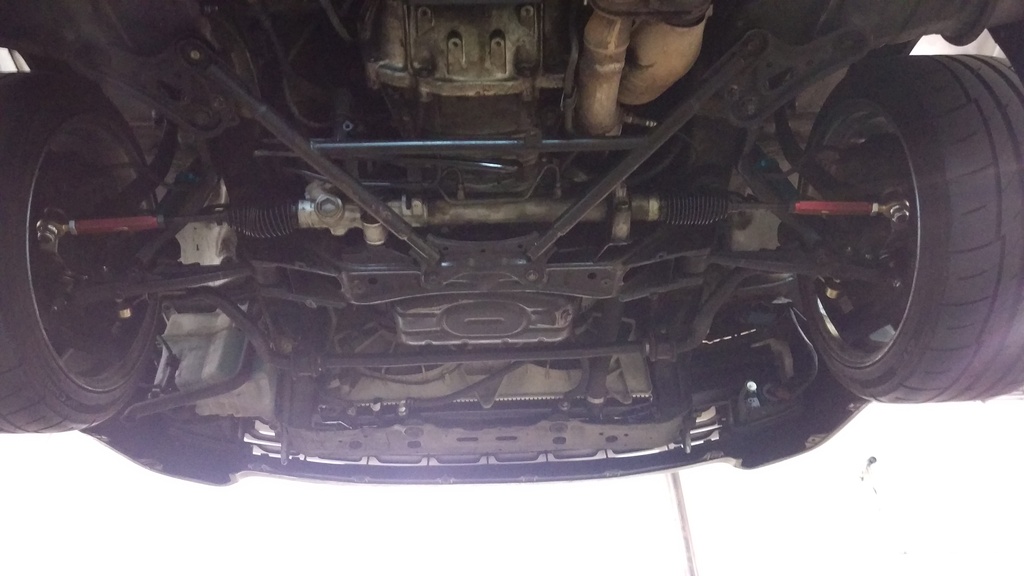


With these things in my front end is finally complete. This along with the solid rear spacers and all the stock arms being replaced with Battle Version adjustable, the car feels amazing. Very last thing needed is to have the coil overs revalved for me. I will be dropping the car off at Megan Racing the day before my surgery so that the guys over there have plenty of time to work on it before I recover. Oh and I was not able to install the rca block just yet, my wheel offset is a bit to aggressive and would hit the tension arm at full lock so I will have to resize them before I toss those back on.

