When you click on links to various merchants on this site and make a purchase, this can result in this site earning a commission. Affiliate programs and affiliations include, but are not limited to, the eBay Partner Network.
whatever route you go be sure to use oil and go very slowly. the intake is that cast aluminum stuff.
the sender will typically be steel and hence the problem of it ripping out the threads if someone is not carefull, aluminum takes patience. lots of guys rip out the spark plug holes for similar reasons, to this date never had one go out on me, just take your time and give it the respect tightening something into aluminum deserves. not something I would decide to mutl-task with, it takes like 5x as long to repair the mistake than to not make it =)
^^ Thank you, I plan to be careful if I can in fact use the tap(s) you mentioned. Better than locating another USDM manifold entirely over some threads :/
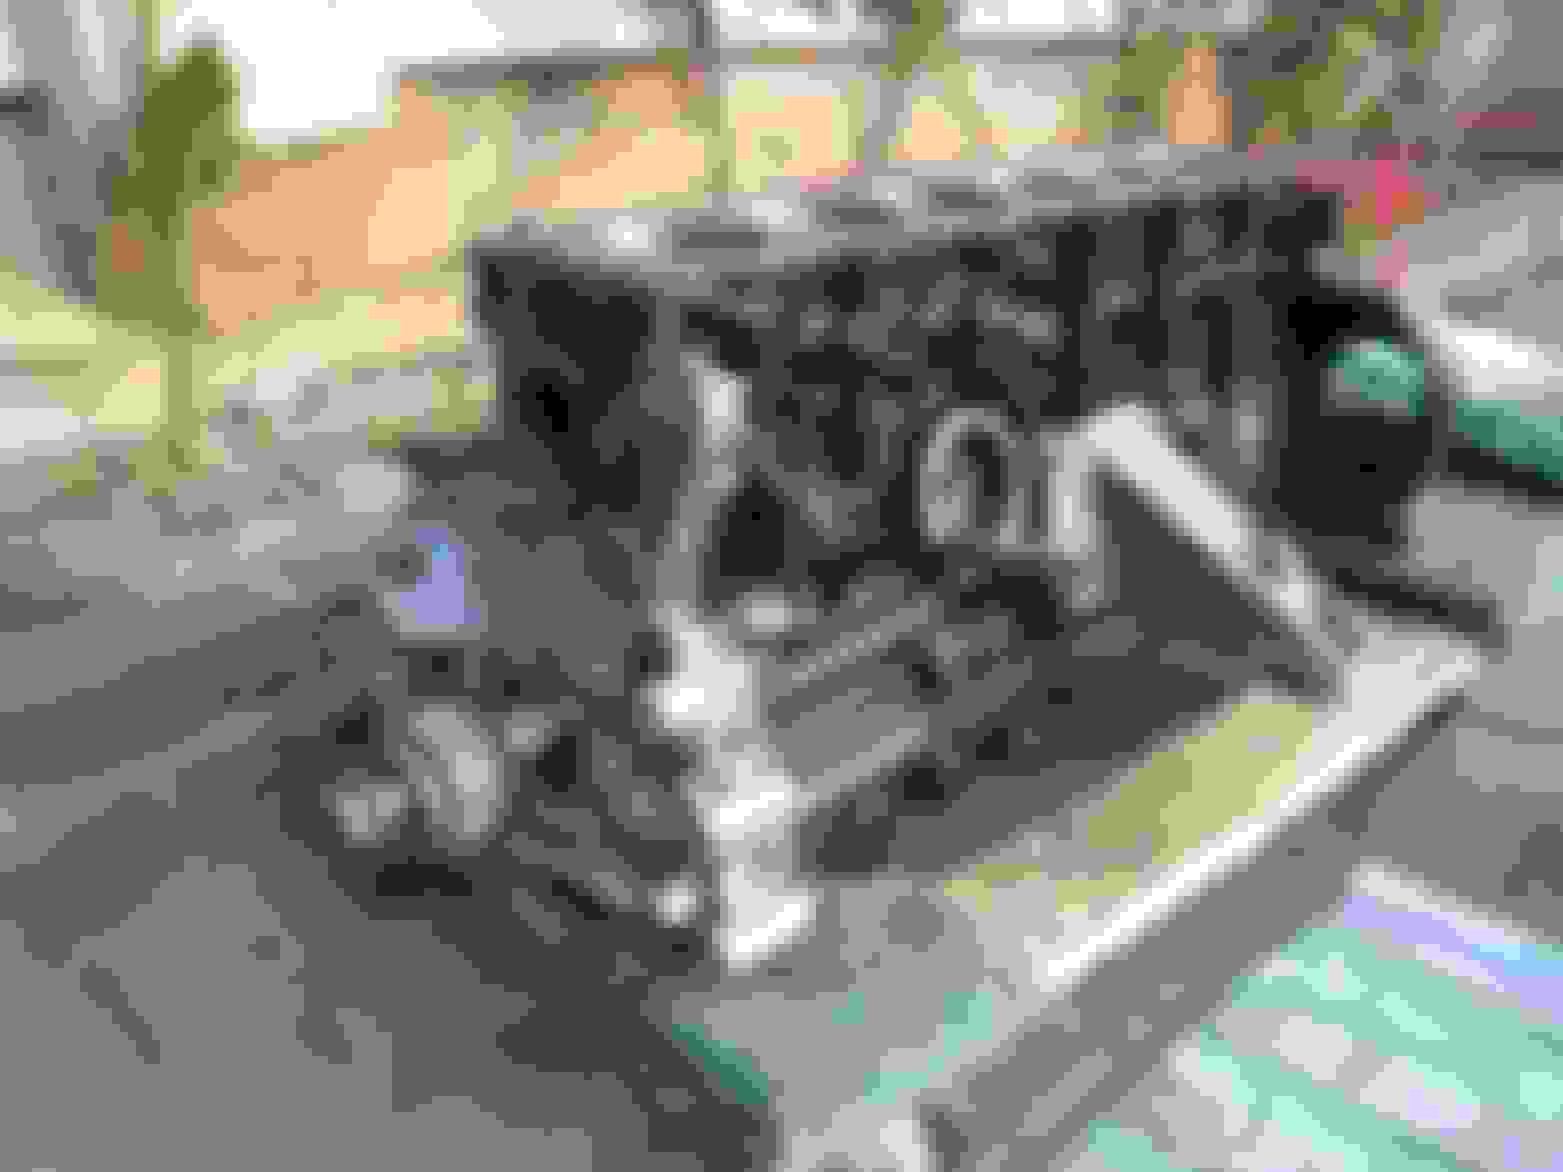
Ali, I've run into another issue that I need your advice on. Today the 2JZ-GE VVT-i oil pump came in. Everything looked great but when I went to test fit the 24-tooth 2JZGTE crankshaft gear I realized it did not fit into the grooves of the new oil pump. I think this means the pump's groove surfaces are probably set up for a 36-tooth crank gear.
So now I know I can't use one or the other but I am confused as to which part needs to go: either I now have to use a 2JZ-GTE non-vvt oil pump, or I do need to use a 36-tooth crank gear after all.
I am going to check SupraTico's thread again because I am pretty sure he used the GE VVT-i oil pump with a USDM TT ECU. But I now have to check to be sure he wasn't using an aftermarket ECU that could have changed to either 24 tooth or 36 tooth trigger.
What do you think? :/
Edit: I have been mistaken. After looking at the picture below of the 24-tooth gear mounted on the crank and a 2JZ rebuild DVD I have... I can see it is supposed to fit in *front* of the oil pump. So the inner gear teeth of the pump must instead interface with the crankshaft itself... correct?
False alarm.
*Note: picture is an example located on Google, and not of my engine.
Last edited by KahnBB6; 04-29-15 at 01:21 PM.
Reason: Learning process
looks like you got it on and figured out. yeah its really a 12 tooth wheel as you can see in your picture, its just the crank does 2 full revolutions so yeah it works out to the 24 total teeth for a combustion cycle. def sits in front of the oil pump.
^^ Part of the fun is learning And I did not know that about the "star" teeth on the gear taking two revolutions per cycle.
Actually that was just a sample picture I added here to best illustrate my mistaken initial post. Not my engine yet, sadly. I looked at the oil pump assembly section of my 2JZ rebuild DVD and it's pretty obvious it has to be done on a stand.
But now at least I have all the oiling system conversion parts. I just need to follow up on your notes for the oil feed line coming from the driver's side union bolt location and make sure I have the right bits to connect to the oil feed area on my USDM twins.
The needed parts list is slowly dwindling. When that's all done I want to tackle the swap harness first thing but I probably should focus on getting the head inspected.
sounds like a good plan, thought it was your motor for some reason not sure why, i did notice the motor mount looked a little long for a SC or Supra. yeah I want to say the oil pan has to come off to change the pump, I dunno I haven't changed out the pump yet they last forever it seems unless you need to change styles or go for a version with more pressure version for some reason.
yeah after you stare at enough gte and ge cam and crank sensor setups you start to figure out the little bits that make it run. also it helps you not make mistakes, for example when you are setting the motor to TDC, for example when tearing it down or doing timing belts etc... you always do that before dismantling anything. if you look in the manual it says set crank to zero, then check that cam marks are aligned. if it is you are at TDC, if the cam marks are not aligned, its telling you that the crank is only half way through the cycle (360 degrees out of 720 total), so you turn the crank one more time where the crank reads zero again, only this time the cam marks will line up indicating the cycle is complete and starting over again.
knowing the crank turns twice is just one of those things that helps you be methodical about not letting the crank get out of position, as once the timing belt is off and someone spins the crank, there are only a handfull of ways to verify that you are at the start of the cycle again. the easiest way is to look at pison 1 and see where it is, but that only works if you remove the head =) the remaining ways are all much more of a pain if you were not planning on pulling the head. you will be removing the head so for all intensive purposes even if you mess it up you will still know how to put it back together. it more applies to just normal timing belt jobs where you would not want to violate the sanctity of leaving the engine at TDC for the whole process.
also the 2jz is well designed to be non-interference with the stock cams, so generally speaking even if you put it back on wrong you wouldn't hurt anything, but it wouldn't run either.
sounds like a good plan, thought it was your motor for some reason not sure why, i did notice the motor mount looked a little long for a SC or Supra. yeah I want to say the oil pan has to come off to change the pump, I dunno I haven't changed out the pump yet they last forever it seems unless you need to change styles or go for a version with more pressure version for some reason.
Thanks! Yes, this is what seems to be the most sensible way to do it, however time consuming. I've also yet to hear of JZ oil pump issues being anything other than extremely rare anomalies. Nonetheless, either the car sees some downtime for this or I build another block.
I'm leaving that decision for last, until just before getting the turbos rebuilt. But after seeing the rebuild video, in no way does it make sense to do the oil pump and pan drain tap with the block in the vehicle.
Originally Posted by Ali SC3
yeah after you stare at enough gte and ge cam and crank sensor setups you start to figure out the little bits that make it run. also it helps you not make mistakes, for example when you are setting the motor to TDC, for example when tearing it down or doing timing belts etc... you always do that before dismantling anything. if you look in the manual it says set crank to zero, then check that cam marks are aligned. if it is you are at TDC, if the cam marks are not aligned, its telling you that the crank is only half way through the cycle (360 degrees out of 720 total), so you turn the crank one more time where the crank reads zero again, only this time the cam marks will line up indicating the cycle is complete and starting over again.
^^ THIS is gold. Thank you. I never realized before this that 720 degrees made up a full rotation. This has de-mystified the timing belt process for me. Looked at in this way, it's not a stressful proposition at all. Makes me wonder how a Honda technician once got a new T-belt aligned one tooth off on my Prelude... if he were checking everything properly. It was completely redone free of charge but the car ran like crap before it was resolved.
Originally Posted by Ali SC3
knowing the crank turns twice is just one of those things that helps you be methodical about not letting the crank get out of position, as once the timing belt is off and someone spins the crank, there are only a handfull of ways to verify that you are at the start of the cycle again. the easiest way is to look at pison 1 and see where it is, but that only works if you remove the head =) the remaining ways are all much more of a pain if you were not planning on pulling the head. you will be removing the head so for all intensive purposes even if you mess it up you will still know how to put it back together. it more applies to just normal timing belt jobs where you would not want to violate the sanctity of leaving the engine at TDC for the whole process.
Again, thank you Ali for taking the time to explain this. What I do have knowledge about regarding this platform I am confident in, but in so far as the tasks I haven't yet done at least once I am still learning. More than likely I'll be able to use the piston #1 trick above, yes.
In the past, the most intensive work I have done with a car *engine* (other than basic plugs and top-level service, etc) is getting down to the valve cover gaskets in a 2JZ... and completely replacing the (extremely simple) carburetor and intake manifold on a 302 Ford V8. I've studied a LOT of TSRMs and build threads but being confident about how to do this right the first time is paramount in my mind.
Originally Posted by Ali SC3
also the 2jz is well designed to be non-interference with the stock cams, so generally speaking even if you put it back on wrong you wouldn't hurt anything, but it wouldn't run either.
I figured this. At current time I don't see myself using more than stock USDM TT cams either. Once the car is fully converted, it doesn't seem to be nearly as crazy to upgrade those in the future if I wished... compared to doing this entire swap.
........
Really minor updates:
The SC got new BFGoodrich Comp2's on the front, a new modified Lance four-wheel alignment and new Redline MT-90 trans fluid for the R154. Still can't figure out if the rear diff fluid needs changing every 15K or every 30K. It's not apparent in the owner's manual or TSRM. Anyone know for sure? If it's 15K rather than 30K intervals I need to schedule that soon.
Next up, finally, is having my A/C evaporator core and thermal expansion valve replaced very soon, as it's only getting warmer here in L.A. I'm driving around with half the passenger dash side pulled out to remind myself
After that... changing the 600/325 Hypercoil springs to 500/250 springs to finish fine tuning the suspension once and for all.
Small tinkering projects for the moment are: installing the good condition used driver's side front seatbelt with the one I just got from Aliga (thanks!) to replace my frayed factory belt... and locating the source of a low-to-high pitched buzzing noise from my rear speakers (bad factory amplifier?) that is independent of engine RPM.
Last edited by KahnBB6; 05-10-15 at 01:26 AM.
Reason: Grammatical correction
yeah some people just cant line up the belts, or they notice its off but can't be bothered to remove it and try again, its unfortunate that people rush these jobs, I must have spent like 15 minutes just eyeballing it to make sure it was perfect. you get better at it once you do start doing it, I had no experience with these things at first either I think the most advanced thing I had done before all this turbo stuff was my brake pads, oil changes, and of course valve cover gaskets when do those things not leak =)
just have the manual, go slowly, when in doubt stop and ask cause its faster than breaking it and waiting for the new part to come in 99% of the time, you will want 2 torque wrenches to work on your engine properly, a ft/lb that most of us have but you will also want a in/lb for all the small stuff, you can even do the headbolts with the in/lb its arguably more accurate than the ft/lb wrench but harder to torque cause its shorter.
now that I think of it again I am not sure if you can use piston 1 to see if you are half way through the cycle or not, cause piston 6 will be at the same place piston 1 is, both are flush with the deck at TDC 1 and TDC 6.
I think when you are starting from scratch with the head off, the block just needs to be at a TDC and the head and timing belt have to be put on like its at TDC 1 and it should be all ok. Still I would just set the motor to TDC 1 with the cam marks lined up before removing the belt where you can confirm it still, and then leave it like that through the installation process. that is what I personally do cause it avoids all the guesswork.
^^ Yes, and this is yet another reason why I am strongly considering finding a second 2JZ-GE shortblock (or a 2JZ-GTE shortblock). I'm not there yet and I'd prefer to keep my car's original engine block but with all of the assembly required and the possibility I've missed a few random small hoses or so that would need to be ordered on the day of installation... I want to take each of these steps slowly and carefully.
In the case of the timing belt... I have about 15K left on my current one before it needs changing. I have the whole kit and a new GE water pump on standby. Seems like a waste to do that and turn around in probably 20K miles to do it all over again with the new head.
As for current sidetracked progress: A new Denso A/C evap core, OEM thermal expansion valve (old one was jammed closed) and Denso Drier have gone in. My high pressure metal line to the evap core was contaminated and had to be blown out (that was the cause of my high pressure issue... factory freon pressure is 250psi while I was pushing 350psi and overworking the A/C with very little flow). It's buttoned up but not recharged while I wait for a new Denso condenser assembly to come in. My old one was OK but at 23 years of age and the likelihood of even some residual contamination, I figure that replacing it now to have a totally fresh system is worth it.
Pricey PITA to fix, though... since 2013 the A/C system has seen the following:
Compressor replaced (Driftmotion reman)
Rubber high pressure line replaced (OEM)
Rubber low pressure line replaced (OEM)
Evaporator core replaced (Denso)
Thermal expansion valve w/integrated sensor replaced (OEM)
Drier replaced for the second time (Denso)
Metal high pressure line to evap core fully cleaned (but a replacement line would have been $500-$800 from Lexus)
Condenser replaced (Denso, very soon)
And I'm replacing my cracked/damaged pass side and center vents with better used examples.
I'll be glad for the A/C saga to be over with. Side note: I found it very odd that there wasn't a clearly marked fuse under the hood or dash to disable the A/C compressor temporarily. The high pressure line sensor technically does that if it detects no freon but still... odd that there was a fuse for the heater but not the compressor.
Next up is installing the new factory HCV assembly I have coming in from Japan soon. Turns out the knockoff four seasons valve only lasted a year or so before it started with minor leaking. Still glad I used it though, and I'd have put the same FS valve in again if I hadn't found a good price on an OEM HCV.
The A/C system has finally been repaired and recharged and holy cow it has never been so quiet, efficient and COLD as it is now! I'm very happy to have that one solved, finally. I'm replacing a broken vent and cracked trim piece before reassembly of the lower passenger dash.
Next: putting in a new factory HCV assembly this week and things are back on track.
Yesterday I put a better condition center vent into the dash and reassembled everything on the passenger side. Everything looks great now other than that now my far passenger side vent has cracked all its mounting points. Have to source another one of those now.
Then I got into replacing the HCV assembly:
My old one with the Four Seasons #74636 valve was giving me a slow leak so I found a new OEM HCV. It cured the actual valve leak all right but now the lower hose is from the heater core to the valve is proving to be an issue by leaking coolant no matter how tight I make the clamp.
A new hose and some new factory clamps were already on the way. I just didn't think I'd need them so soon. Oh well. She'll sit until it comes in on Monday.
Edit: I trekked up to a local Autozone and bought a pair of screw-clamps for $3.00. That cured everything-- zero leaks now. Now I understand what I was told about how Toyota factory coolant hose clamps lose their tension over time.
Last edited by KahnBB6; 05-18-15 at 08:54 AM.
Reason: Grammatical correction
It's all in the heat cool cycles that weakens the SPRING in the clamp metal. I wish there was an AFFORDABLE aircraft style clamp ( similar to what Nissan uses for their fuel line clamps ) ..... but thet is a good fix...
KEEP GOING KAHN !
depends on the nissan =) the older ones had better clamps. I prefer the worm gear ones that you can tighten, don't like the oem's that you just use pliers to take on and off, after enough times removing and reinstalling they will leak.
^^ Ali, I completely believe it. Before Carlos Ghosn and Renault, Nissan overbuilt in their own way in the 90's. They aren't the same standard of company any longer. Perhaps the overbuilt R35 is the sole exception to that.
I might order brand new factory clamps just to keep things more OEM but you and Mike are right. The worm gear clamps are definitely superior. 99% of my car's cooling system still has factory clamps.
Some research into factory Soarer intercooler shrouds today, since I am planning to stay with either the 214cfm metal end tank Soarer SMIC or MKIV 305(?)cfm SMIC. Or later a Garage Whifbitz or other custom made replacement SMIC.
To use one properly you NEED the accompanying ducting shroud. I have the MKIV shroud and it does fit... if it were not for the 1997+ foglamp in my newer bumper blocking easy fitment. I'd need to cut and modify that with a molded internal "bump" for clearance and the mouth edges still wouldn't completely flush with the bumper opening for the duct.
So I've sourced one from a wrecking/importing yard in Australia specified from a 1996.4 Soarer 2.5 GT VVT-i.
The owner was very kind to offer some additional details on fitment and changes. It turns out that Toyota DID in fact revise the early factory SMIC shrouds and even the SMICs between the 1991-1996(early) and 1996(late)-2000 VVT-i Soarers. This changeover corresponds to when the Soarers got the late model bumpers (IE: USDM 1997+) and the revised 1JZ-GTE engines.
Here are his notes if it helps anyone else going to the same lengths I am:
"There are few small differences between the Intercoolers and Shrouds between the 91 - 96.3 Models, and the 96.4 and 00 Models.
Differences between the two, the VVT-i model has a shorter duct length, no mesh grill and cutouts for the revised bumper and fogs.
Early model Non-VVT-i incorporates the mesh grill, and a longer duct.
Bolt spacing between the two is 'almost' identical, if you are fitting up a VVT-i shroud to a non VVT-i cooler than only slight modification will need to be made to one of the mounting points to get it to fit up.
If attempting to fit a non VVT-i Shroud to a VVT-i intercooler some additional modifications may be required to either the cooler housing, or the shroud."
 04-28-15, 09:39 AM


 And I did not know that about the "star" teeth on the gear taking two revolutions per cycle.