My 13 Year OCD Build in the pursuit of perfection - GS300

 12-31-14, 06:33 AM
#122
Lexus Champion
Thread Starter

Thank you. Appreciate it. It gets better... hopefully
Alright, it seems like i've only been back from SEMA for a few weeks - but its been two months ! holy moses. Work has demanded my attn out of town, but thankfully thats coming to a close and I should be able to really dig in again.
I updated Post#1 with my mod list to generate some more interest
A few photos from SEMA also - My favorite high dollar ride was the Ring Brothers Chevelle "Recoil" I only have up-close detailed photos.
I actually like the self-built cars that are outside as well.
Here's the fast and loud C-10. It looked better in person than I expected

The kindig it designs futureliner, also a million times better than expected. Phenomenal actually

The liberty walk 458 before it got smashed by the jeep - lol

Alright, it seems like i've only been back from SEMA for a few weeks - but its been two months ! holy moses. Work has demanded my attn out of town, but thankfully thats coming to a close and I should be able to really dig in again.
I updated Post#1 with my mod list to generate some more interest
A few photos from SEMA also - My favorite high dollar ride was the Ring Brothers Chevelle "Recoil" I only have up-close detailed photos.
I actually like the self-built cars that are outside as well.
Here's the fast and loud C-10. It looked better in person than I expected
The kindig it designs futureliner, also a million times better than expected. Phenomenal actually
The liberty walk 458 before it got smashed by the jeep - lol
Last edited by twojayzee; 12-31-14 at 06:40 AM.
12-31-14, 06:35 AM
#123
Lexus Champion
Thread Starter
Since I posted the mod list on page one - I'll start uploading the photos of the wiring and assembly.
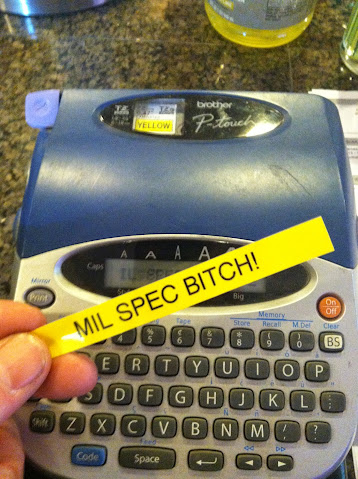
Decided to go with some Cannon plugs aka mil-spec connectors


Some of the male pins
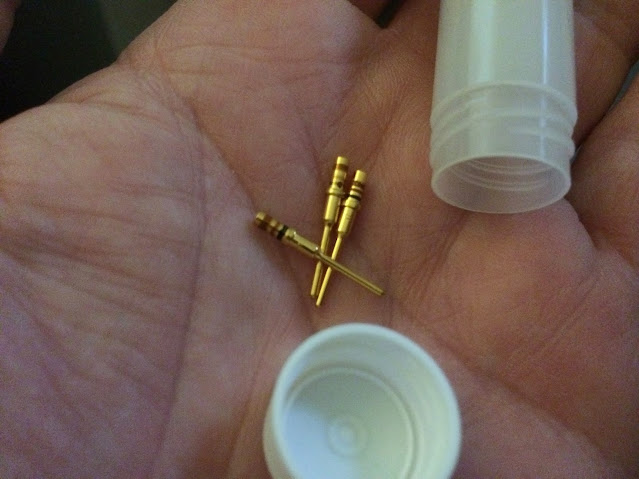
Female pins

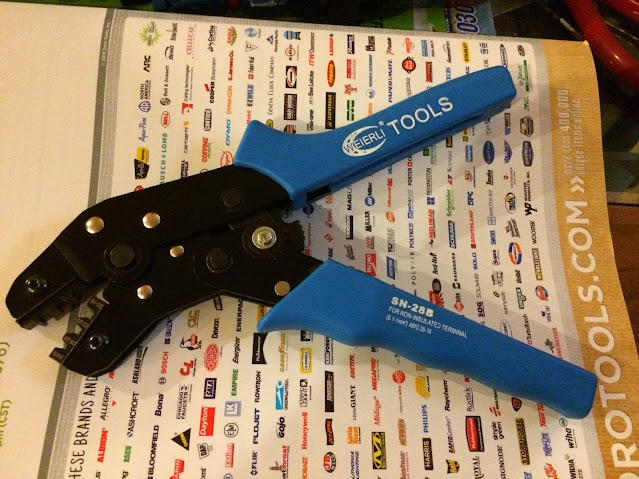
Picked up this $300+DMC crimp tool on fleebay for $19.99 as "broken" When i got it, all of the grub screws were sitting in a bag.
I reassembled it and used a friends "go no-go" tool to test it. Still tests awesome. I'm sure its out of certification for aerospace work, does fine for me.

Decided to go with some Cannon plugs aka mil-spec connectors
Some of the male pins
Female pins
Picked up this $300+DMC crimp tool on fleebay for $19.99 as "broken" When i got it, all of the grub screws were sitting in a bag.
I reassembled it and used a friends "go no-go" tool to test it. Still tests awesome. I'm sure its out of certification for aerospace work, does fine for me.
12-31-14, 06:36 AM
#124
Lexus Champion
Thread Starter
Same deal for the molex connectors for the infinity. No soldering on these babys if you want them to fit in the connector.
I couldnt find the tool for a reasonable price so I got one of the generic china ratchet style for the correct size pins. They work awesome after a little practice, since I've never used anything like them before.

First crimp - BAD

Next crimps - BAD
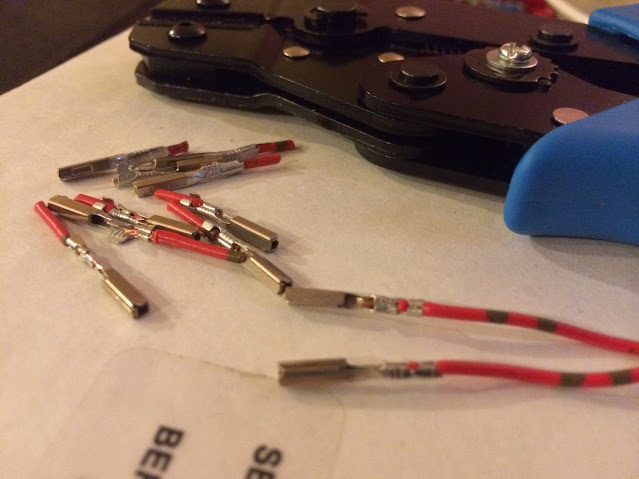
Finally figured it out

I couldnt find the tool for a reasonable price so I got one of the generic china ratchet style for the correct size pins. They work awesome after a little practice, since I've never used anything like them before.
First crimp - BAD
Next crimps - BAD
Finally figured it out
 01-06-15, 06:24 AM
#126
Lexus Champion
Thread Starter
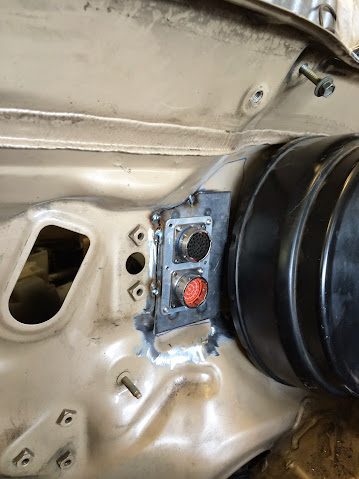
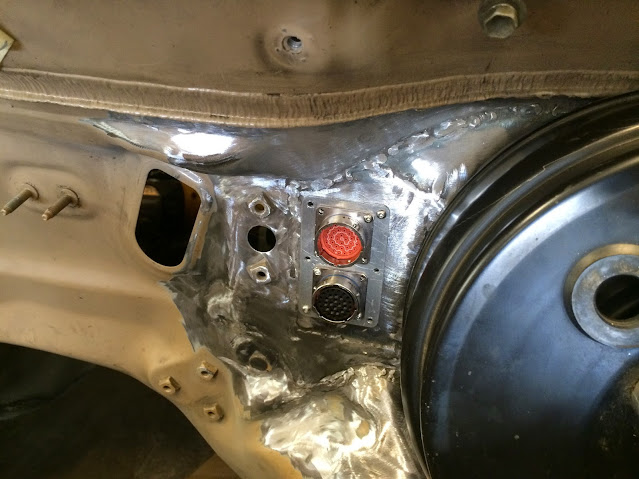
MORNING UPDATE
There's nowhere flat on my firewall, in the vicinity that I wanted to mount these connectors.
So I made my own area.
This is the patch panel/plate I made for the firewall


And the panel that mounts to it


Also decided to make a backing plate and tap it for the fasteners so I wouldnt have to remove the whole dash for access if I need to remove the connectors

The area with the nut on it, I was checking to make sure I didnt need those. I also decided to add two fasteners in the middle.
To make sure the plate sits flat when tightened down.


 01-06-15, 06:25 AM
#128
Lexus Champion
Thread Starter
Picked up some harnesses from a friend that works at a body shop. When they get in accidents and sever the harness, they replace with new instead of patching old.
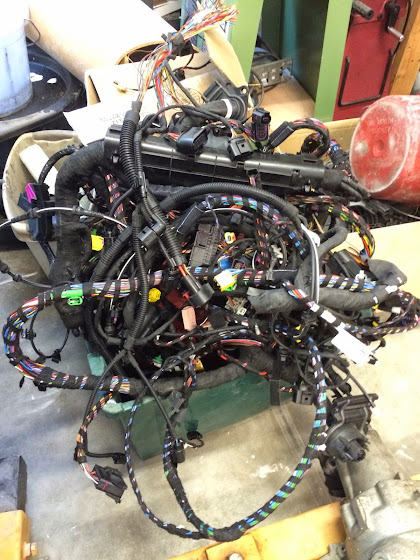
Stripped those suckers down into usable lengths

Got the harnesses routed to the trunk

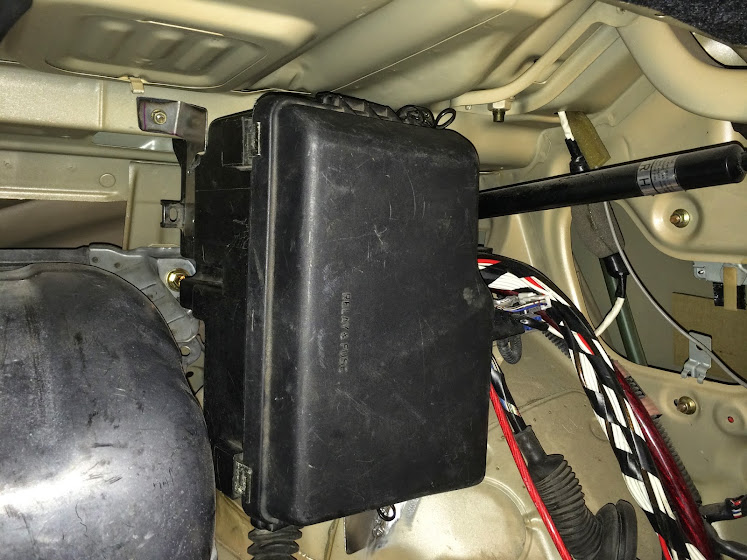
Make use of the factory fuse box that was once under the hood

My dream mounting spot

Figured out a way to mount it with a bracket I made, and pop rivet it direct to the box like some of the other fasteners.
The inside of the box is covered with rubber isolation pads in this area.


Mount the box

Test fit all the harnesses into the box with the fuse block reinstalled
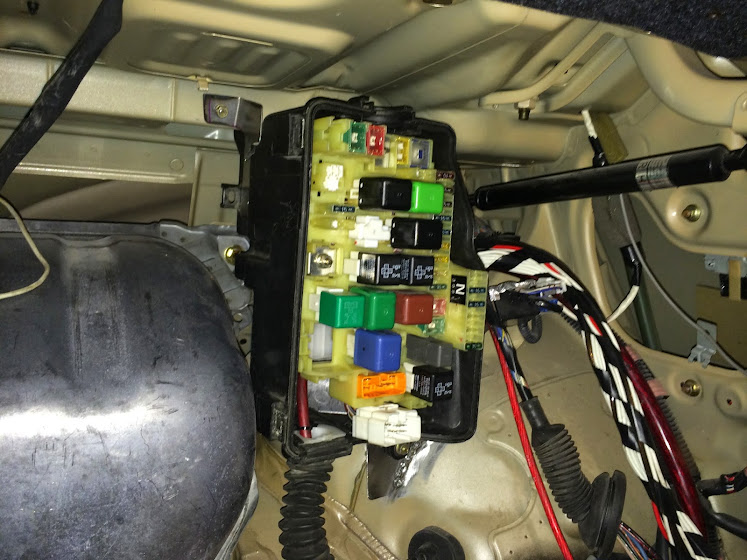
Voila
Stripped those suckers down into usable lengths
Got the harnesses routed to the trunk
Make use of the factory fuse box that was once under the hood
My dream mounting spot
Figured out a way to mount it with a bracket I made, and pop rivet it direct to the box like some of the other fasteners.
The inside of the box is covered with rubber isolation pads in this area.
Mount the box
Test fit all the harnesses into the box with the fuse block reinstalled
Voila
 01-09-15, 06:55 AM
#131
Lexus Champion
Thread Starter
01-09-15, 06:56 AM
#132
Lexus Champion
Thread Starter
Picked up this marine fuse block for the trunk. It comes with Silver labels that are meant for sharpies.
I had some clear tape for the label maker, that worked perfectly on top of the silver.

Got the car powered up electrically for the first time in 3years. It was a great feeling to see lights on in the dash and be able to move the seats and roll the windows up and down

I had some clear tape for the label maker, that worked perfectly on top of the silver.
Got the car powered up electrically for the first time in 3years. It was a great feeling to see lights on in the dash and be able to move the seats and roll the windows up and down
01-09-15, 07:34 AM
#133
Lexus Champion
Thread Starter
DO NOT ATTEMPT TO REPRODUCE ANYTHING IM DOING RELATED TO THIS WORK.
IM NOT A TRAINED PROFESSIONAL AND THIS COULD RESULT IN SERIOUS INJURY.
THIS IS FOR EDUCATIONAL PURPOSES ONLY
If you don't like what I do on this part, no need to comment
IM NOT A TRAINED PROFESSIONAL AND THIS COULD RESULT IN SERIOUS INJURY.
THIS IS FOR EDUCATIONAL PURPOSES ONLY
If you don't like what I do on this part, no need to comment
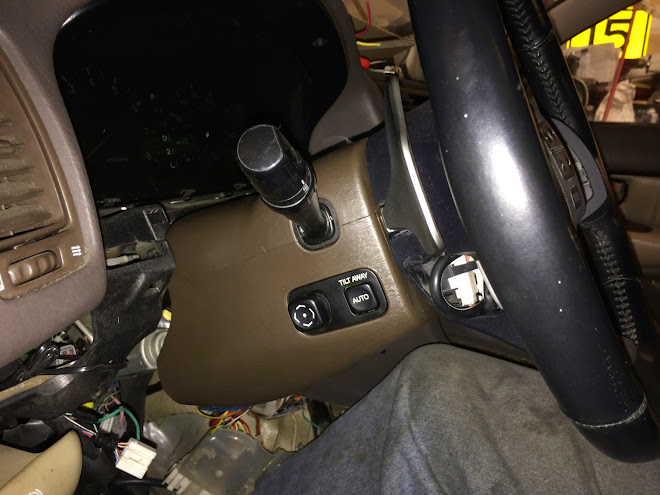
Before I ripped the dash apart, to finish the wiring I decided it was time to start fitting the IS350 steering wheel in place.
I'm doing this so I can have controls for the radio, and the paddles for the TCI transmission controller.
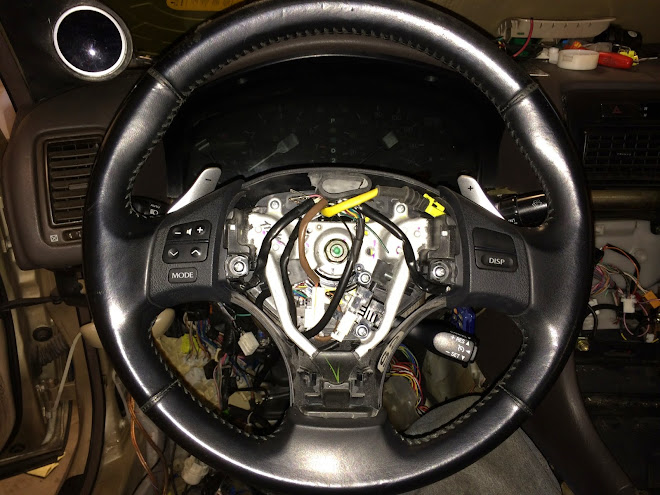
With the stock clock spring, I had 7 pins. One for the horn, 2 for the airbag, 3 for the shifter (common ground and 1 pin for up shift request and 1 pin for down shift request)
That only left 1 pin, and I wanted cruise...
That left only one option, try to use the ISX50 clockspring. I purchased a steering column and wheel complete minus airbag from a local wrecking yard. I would have tried the entire IS column, but didnt want to go thru that much effort since the newer cars have a bunch of snap together crap that has nowhere to bolt to.
The clock spring was bad, so I dismantled it to learn about the connections...

The IS clock spring wouldnt fit, so I was on the hunt for a new toyota that would - The one I ended up with fits the Avalon/Tundra/Sierra. Fits with a few small modifications.
Heres the connections

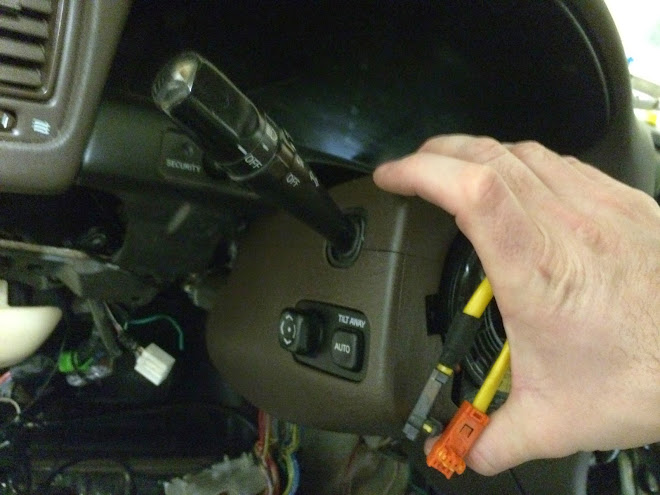
Now to get that part ^ - bolted to this part >

The little plastic part that cancels the turn signals required trimming an 1/8" notch


The new clock spring in place of the old one. 3 of the 4 screws line up for mounting.
The other is a very small amount out. I trimmed and used a washer to secure it in place.

The connectors for the clock spring are around $10.00 but the pins were something like $7.00/ea with the 6" pigtail. I found out theres an aftermarket adapter harness that is made to tie aftermarket stereos into the factory wheel. The whole connector was $11.00
And then you have left over pins. I picked up two of these, one for the clock spring, and one for the stereo.


I plan to use an IS350 air bag, but with the single stage detonator from an IS300. I've seen several people do it that way.
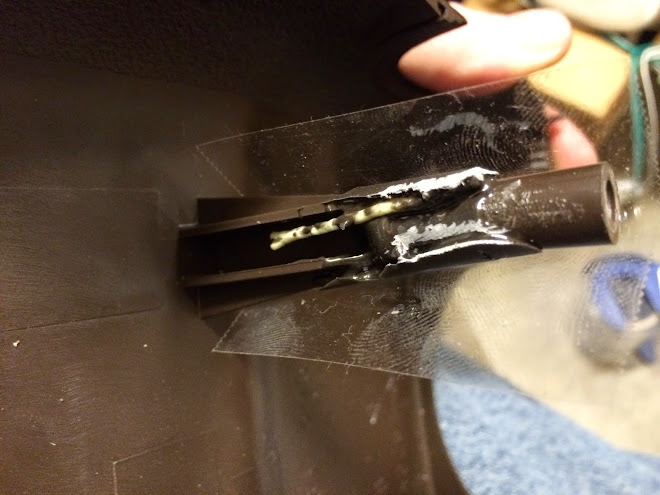
Here's the mod with the column covers on, before I capped off the second stage of the air bag plug. Keeping all the factory tilt column and oem goodness.

The column covers in the older toyotas get really brittle as they age.
I put mine back together with ABS glue and paper clips.
Phase 1

Phase 2
VOILA
 01-13-15, 07:05 AM
#135
Lexus Champion
Thread Starter
ow that the steering wheel had been test fit, it was time to gut the car and go for it

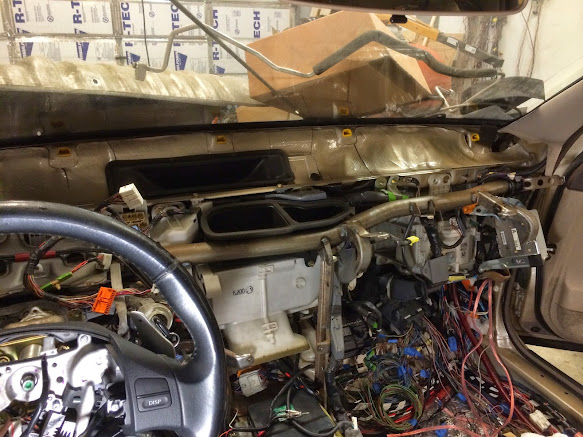
This is during the dismantle process. I was thinking - wtf am I doing here, this was originally going to be a pnp swap with a fcd !

With everything out of the way - this is where the infinity will reside, in the factory location

Clearancing the factory cover a bit. I plan to use some HDPE material to go over the top of the whole area to conceal the molex connectors

This is during the dismantle process. I was thinking - wtf am I doing here, this was originally going to be a pnp swap with a fcd !
With everything out of the way - this is where the infinity will reside, in the factory location
Clearancing the factory cover a bit. I plan to use some HDPE material to go over the top of the whole area to conceal the molex connectors