Sc0pe's '99 LS400 - Baggin' on a Budget
 07-10-14, 12:28 AM
#1
I think it's safe to say I'm in the final stages of my bag setup, as far as parts go, so I'm just going to make this thread now.
As far as this whole air suspension thing goes, I think I'm making good progress, considering I installed my Double DIN back in October. Now for starts, I decided to make the jump to air, instead of starting off with coilovers, simply because I didn't want to deal with the usual "low car struggles." This car is my daily, and I can't really afford to replace parts due to damage from being low, as the roads here are terrible (anyone who tells you FL roads are good is more than likely lying, or kidding themselves). The main goal of this build was to put together a COMPLETE air ride system on a $1500 budget. Needless to say, I've exceeded that budget, but only because I opted for independent wheel control. If you don't mind running front/rear, then you'll be within that budget.
I'm going to add in progress pics later tomorrow, because I have to study for a math test
Stage 1: Onboard Air
So here is how I essentially wanted everything to sit in my car:

As far as wood goes, I snagged a nice 2'x4'x3/4" sheet of sanded plywood (~$20 at Home Depot) and hauled it over to my friend's house to have his dad cut. The fact this thing actually fit still amazes me...

Eventually we ended up with this. Honestly, I could have fit a bigger piece in if I didn't opt to retain the factory carpet, but that would mean that I would have to create a false floor for my trunk (which I have to do anyways) and I didn't feel like it at that moment in time.

Anyway, we finished mounting up my compressor, as well (ended up having to use completely different mounting hardware, because the included hardware was too short) so I brought it home, and started to get my wiring on (my favorite part, honestly).
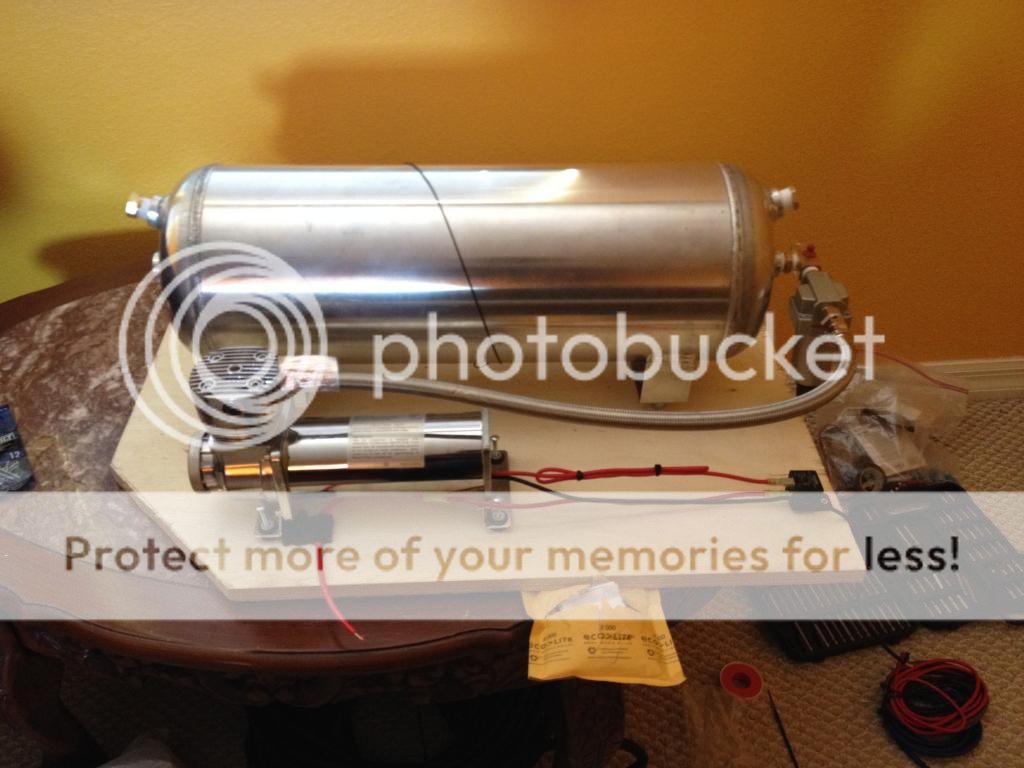
Shortly afterwards, I loomed up all of the exposed wire with 3/8" loom, and added in my 10 AWG waterproof ATC fuse holder (the Viair 480C has a maximum amperage rating of 23A, but I fused it at 30A)

Wiring in the trunk was pretty simple, since I opted to reuse the wiring from installing my amplifier. I simply added a distribution block to the power, and ground, cable. Keep in mind that I did all the calculation for how much amperage would be on the wires beforehand, so this is all reasonably safe, I assure you (Knukonceptz Kolossus 4 AWG OFC cable has a maximum amperage rating of 150A per 20 feet of cable). Assuming I was running my subwoofer, and compressor, at full tilt, (not happening) I would see a combined load of 60A on the wire (which itself is 17 feet long).

And back in the trunk:

And lastly, here's how it sits now:

What I need to work on now is running my supply, and fill lines, to whichever side of the car they need to be on, and so ends the trunk work. I plan on redoing the trunk completely with a pair of smaller tanks, because this 5 gallon BARELY fits in the spare well, and I can't reuse my OEM carpet over top of it, lest a giant hump forms, and nothing is stable. Also going to do a false floor with some hardwood as well, because this just looks terrible.
As far as this whole air suspension thing goes, I think I'm making good progress, considering I installed my Double DIN back in October. Now for starts, I decided to make the jump to air, instead of starting off with coilovers, simply because I didn't want to deal with the usual "low car struggles." This car is my daily, and I can't really afford to replace parts due to damage from being low, as the roads here are terrible (anyone who tells you FL roads are good is more than likely lying, or kidding themselves). The main goal of this build was to put together a COMPLETE air ride system on a $1500 budget. Needless to say, I've exceeded that budget, but only because I opted for independent wheel control. If you don't mind running front/rear, then you'll be within that budget.
I'm going to add in progress pics later tomorrow, because I have to study for a math test
Stage 1: Onboard Air
So here is how I essentially wanted everything to sit in my car:
As far as wood goes, I snagged a nice 2'x4'x3/4" sheet of sanded plywood (~$20 at Home Depot) and hauled it over to my friend's house to have his dad cut. The fact this thing actually fit still amazes me...
Eventually we ended up with this. Honestly, I could have fit a bigger piece in if I didn't opt to retain the factory carpet, but that would mean that I would have to create a false floor for my trunk (which I have to do anyways) and I didn't feel like it at that moment in time.
Anyway, we finished mounting up my compressor, as well (ended up having to use completely different mounting hardware, because the included hardware was too short) so I brought it home, and started to get my wiring on (my favorite part, honestly).
Shortly afterwards, I loomed up all of the exposed wire with 3/8" loom, and added in my 10 AWG waterproof ATC fuse holder (the Viair 480C has a maximum amperage rating of 23A, but I fused it at 30A)
Wiring in the trunk was pretty simple, since I opted to reuse the wiring from installing my amplifier. I simply added a distribution block to the power, and ground, cable. Keep in mind that I did all the calculation for how much amperage would be on the wires beforehand, so this is all reasonably safe, I assure you (Knukonceptz Kolossus 4 AWG OFC cable has a maximum amperage rating of 150A per 20 feet of cable). Assuming I was running my subwoofer, and compressor, at full tilt, (not happening) I would see a combined load of 60A on the wire (which itself is 17 feet long).
And back in the trunk:
And lastly, here's how it sits now:
What I need to work on now is running my supply, and fill lines, to whichever side of the car they need to be on, and so ends the trunk work. I plan on redoing the trunk completely with a pair of smaller tanks, because this 5 gallon BARELY fits in the spare well, and I can't reuse my OEM carpet over top of it, lest a giant hump forms, and nothing is stable. Also going to do a false floor with some hardwood as well, because this just looks terrible.
Last edited by Sc0pe; 07-16-14 at 05:27 AM.
 07-10-14, 12:29 AM
#2
Stage 2: Management
To start off, here are some "concept art" renderings of my management layout, so you can get an idea of how it evolved to the state where it is now (these are available for anyone to use):
The Original 4-Valve - So I wanted to originally run this layout of valves. The panel itself is a 1/8" thick ABS plastic panel, cut to 7"x3.5" to leave a 1/4" lip all around. This would cover the edges of the stock ash tray, which I had removed to do this.

8-Valve Evolution - After doing a good amount of reading, I learned that running a 4-valve might not be ideal for my aggressive style of driving, so I further stepped my game up to these.


The first piece would sit over top of the OEM ash tray position. The second piece would fill up single DIN slot left over from installing a single DIN radio. (2"x9" to leave a 1" lip on both sides for mounting purposes)
8-Valve FINAL FORM - So this particular evolution of my management panels includes a third gauge to read tank pressure (I get way too sketched out about having a pressure switch malfunction). The other 4 green switches are just a test to make sure it would fit in with the overall setup. These panels are about as to-scale as Photoshop gets.
So without further ado...


And, after some cutting with a scroll saw, followed by a 2 inch hole saw, we end with this:
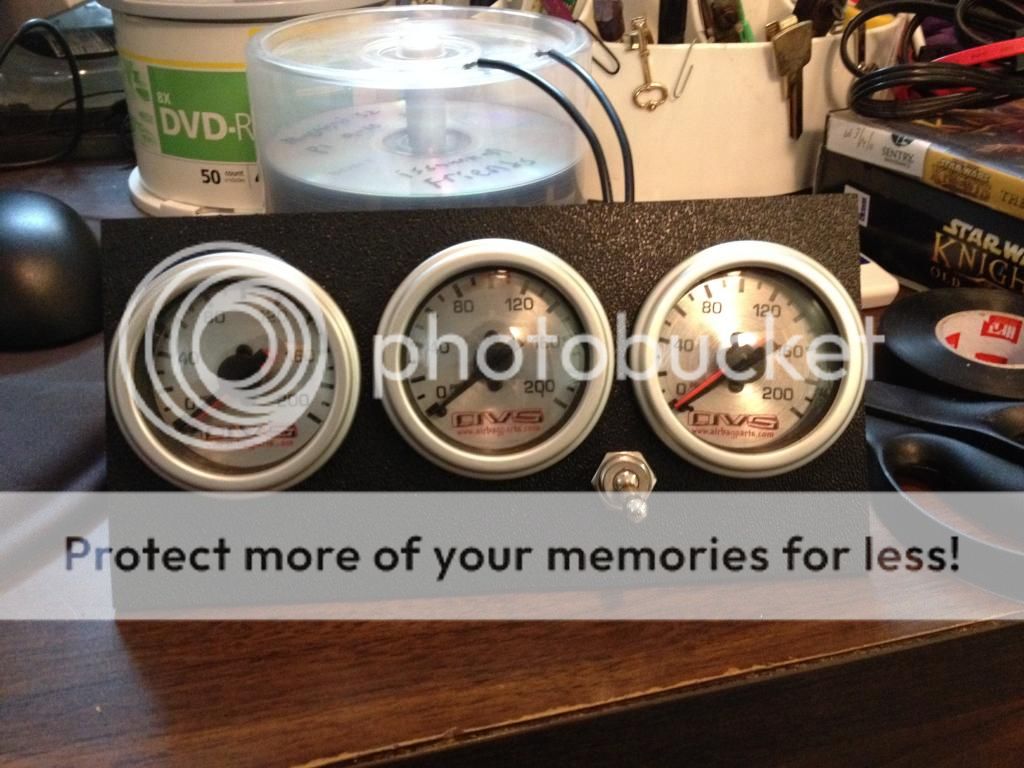
And to finish off, here is how my current management panel sits:

It needs a little filing on some edges, but other than that, it's perfect. Stay tuned for the remaining panel that will fill the space below my (new) head unit!
To start off, here are some "concept art" renderings of my management layout, so you can get an idea of how it evolved to the state where it is now (these are available for anyone to use):
The Original 4-Valve - So I wanted to originally run this layout of valves. The panel itself is a 1/8" thick ABS plastic panel, cut to 7"x3.5" to leave a 1/4" lip all around. This would cover the edges of the stock ash tray, which I had removed to do this.
8-Valve Evolution - After doing a good amount of reading, I learned that running a 4-valve might not be ideal for my aggressive style of driving, so I further stepped my game up to these.
The first piece would sit over top of the OEM ash tray position. The second piece would fill up single DIN slot left over from installing a single DIN radio. (2"x9" to leave a 1" lip on both sides for mounting purposes)
8-Valve FINAL FORM - So this particular evolution of my management panels includes a third gauge to read tank pressure (I get way too sketched out about having a pressure switch malfunction). The other 4 green switches are just a test to make sure it would fit in with the overall setup. These panels are about as to-scale as Photoshop gets.
So without further ado...
And, after some cutting with a scroll saw, followed by a 2 inch hole saw, we end with this:
And to finish off, here is how my current management panel sits:
It needs a little filing on some edges, but other than that, it's perfect. Stay tuned for the remaining panel that will fill the space below my (new) head unit!
Last edited by Sc0pe; 07-16-14 at 05:30 AM.


Trending Topics


 07-10-14, 05:38 PM
#12
I never knew people wanted build pics this bad lol. Guess everyone's been waiting for this one for awhile haha. Also, pics should be working now  I'll be gradually adding more, since I have to essentially comb through my phone to find the few actual build pics I took lol
I'll be gradually adding more, since I have to essentially comb through my phone to find the few actual build pics I took lol
Last edited by Sc0pe; 07-10-14 at 05:57 PM.
07-16-14, 05:39 AM
#13
Welp, updated the first post, and going to get at that third post tomorrow. My build is currently postponed due to school things, and the fact that the coilovers I'm using are stuck (lower shock body/lower collar refuses to move, so I can't extend/shrink them, and I don't have the tools to get them unstuck. I got some PB Blaster, but really, if someone could suggest a place to take them to, where they might be able to get them unstuck, I'm all ears.)
Also, I probably should have reserved a 4th post for the install, but oh well. I'll organize this thing like a madman once everything is finished.
Also, I probably should have reserved a 4th post for the install, but oh well. I'll organize this thing like a madman once everything is finished.
07-17-14, 05:27 PM
#14
build threads are always fun to see, and with all the teasers you put on FB it's better just to combine, show, and document your progress in a build thread here. glad you're doing this man!
as for the stuck coilover, you need to get your hands on the spanner wrenches. they are the only ones that can safely unlock them without damage. you can put them in a vice and see if you can turn them but you still need a spanner to grab a collar or two. PB blaster works great if you let it sit for a bit so soak that stuff in!
as for the stuck coilover, you need to get your hands on the spanner wrenches. they are the only ones that can safely unlock them without damage. you can put them in a vice and see if you can turn them but you still need a spanner to grab a collar or two. PB blaster works great if you let it sit for a bit so soak that stuff in!
07-17-14, 07:18 PM
#15
Go get a metal brush, small propane torch, the right spanner wrenches, a bfh and your PB Blaster.
Scrub down all the threads and surfaces with the metal brush to remove any debris and crap off the threads. Drench everything and let sit overnight.
The next day hit the collar with light and even heat, use the spanner wrenches to grab the collars and then use the BFH to strike one of the collars to loosen it. Make sure you knock the shock body to lower mount collar off first before the try and knock the spring collars off.
You might need to use the PB and heat a couple times depending on how stuck they are.
Just be sure you don't get greedy and force anything once it's moving. Move it back and forth other any rough areas.