When you click on links to various merchants on this site and make a purchase, this can result in this site earning a commission. Affiliate programs and affiliations include, but are not limited to, the eBay Partner Network.
Well everyone.. Comptuer broken or not, I got the Lexus started tonight. No lies he sounds NASTY!! Totally different, got base timing set at 8� and man does it sound healthy.. I can't wait to get my computer back and start posting all of this stuff lol.. Im super excited to post the gauge cluster write-up
Oh that's funny. I JUST did a write up on the tach fix and put it in the ECU mod main thread and my build thread. I should have guessed you'd have done it and just waited for you.
So another little post before working on this thing tomorrow.
I ran into a hicup when I attempted to drive the car for the first time. It runs fine and all funtions are working to my knowledge except the car keeps blowing the 30 amp EFI Fuse when I turn the steering wheel. If anyone is interested in taking a stab at it before I figure it out, I posted a few pretty detailed things in the TT ECU Mod thread on page 174..
I think I may have it narrowed down to a few little things to check but I just need the time to do it now.
I have some good news .. The computer will be fixed tomorrow and picked up Thursday. So only a few more days before the posting commences.
And yeah SCereal, I wish I would have seen that post before throwing mine up lol.. I am actually doing the TAC mod tomorrow as well as figuring out the little eclectrical issue.
Towards the fuse I don't think anything is grounding out against each other. When one turns the wheel the sensor ups the RPMs to keep from stalling the motor. Gotta me something when the RPMs go up that draws more current and causing it to blow. Something sounds like it may be loose electrical wise.
It's good to be back on top again lol.. I finally got my computer back today and I am so excited that I can finally bring you guys all this awesome info, write ups, and pics again.. so lets start.
Last time I had just got the manifold and all and it is time to show you guys some fitment of this new style kit.. I only ran into 2 problems when mounting the turbo.
The first is that one of the rear bolts that hold the turbo to the manifold was not able to fit due to how the casting was on the exhaust housing. I had to hack-saw off about 6-8 threads at lightly tap it into the turbo before screwing it into the manifold. I will put a little description in the picture to help give you guys an idea of what and where this is located
The second problem is that the supplied coolant lines only worked on one side of the turbo, I had to go and buy a custom fitting from NAPA Auto Parts that had a barbed fitting on one end and threads on the other end, screwed it into the turbo and placed heat wrap/tape good for 2500 degrees over the hose and had a hell of a time getting it all clamped
So as you can see here the turbo fits pretty snug. The entire kit is very well designed in the aspect of everything is tight but nothing touches anything it shouldn't
Here is a close up of the compressor housing to IC clearance. This gap is actually only about a fingers width apart. So for any of you wanting this intercooler kit keep that in mind if you are running a big turbo.
Here we have a quick side shot of the turbo and IC piping for referance
In this picture you can get an idea of where the bolt is that needed to be modified to get the turbo bolted down onto the manifold. The bolt that is nearest the cylinder head, and closest to the firewall is the bolt that needed modified, it is not pictured but you get the idea.
Also pictured you can see one of the supplied coolant lines installed on the right side of the turbo. I used the factory coolant hose that ran to the throttle-body and ran a new hose on the other side from the turbo back to the throttle-body.. I may change the location of where the coolant hose tap is because I am debating on how safe it is to run that hot of coolant into the throttle-body
So I know a few pages back I posted a little teaser pic of the gauge pods and where they were going to be mounted..
To start off I wanted to say, some people really questioned my mounting location, but I chose it because of one reason.. I HATE PILLAR PODS!! ... IMO i think they look tacky and slightly ricey..
SO now !! it is finally time to show off all that hard work, and I hope you guys like them as much as I do..
So here is how I spent and entire weekend with this little guy..the harness I made was all color coded to make the install as easy as possible
Behind the cluster I had a little fun running wires and hiding the boxes for the A/F-R stuff..
And the rats nest continues lol.. finally got the gauges in their pods and wires ran through and started to get them all hooked up.. what a process this was
So here we are.. I ran a corrugated loom from the Driver Side A-Pillar over to the gauges. This loom houses ONLY the power and ground wires.. All of the sensor wires/boost hose are ran to the right side of the dash..So in the picture you can see the EGT Sensor wire, Trans Temp. Sensor wire, Boost vacuum hose, and A/F-R wires are all being tapped and tucked, see the hand pushing them in lol..
Once all tapped up, I pushed the loom between the dash and the windshield using the eraser end of a No. 2 Pencil and started to tap for power, ground, 12V switched and all that good stuff.. surprisingly enough, all of the sources I needed were all available to tap into behind the cluster.. so this made wiring up the power wires fairly easy.. witch I needed after all the headache of running all the wires lol
So I know a lot of people thought this was a very BOLD mounting location for the gauges, but IMHO .. it turned out BAD *** !!
And the final test is to turn those babies on and enjoy all your hard work.. now lets get this Lexus started and watch them do something lol !
So just behind the EVAP Canister on the passenger side, I drieend an hole and installed a grommet to help seal it and ran all the sensor wires and boost vacuum hose through. after completely being hooked up I put Polly-Beutal tape around all of this to prevent any water from entering the cabin and causing corrosion or water damage of any type
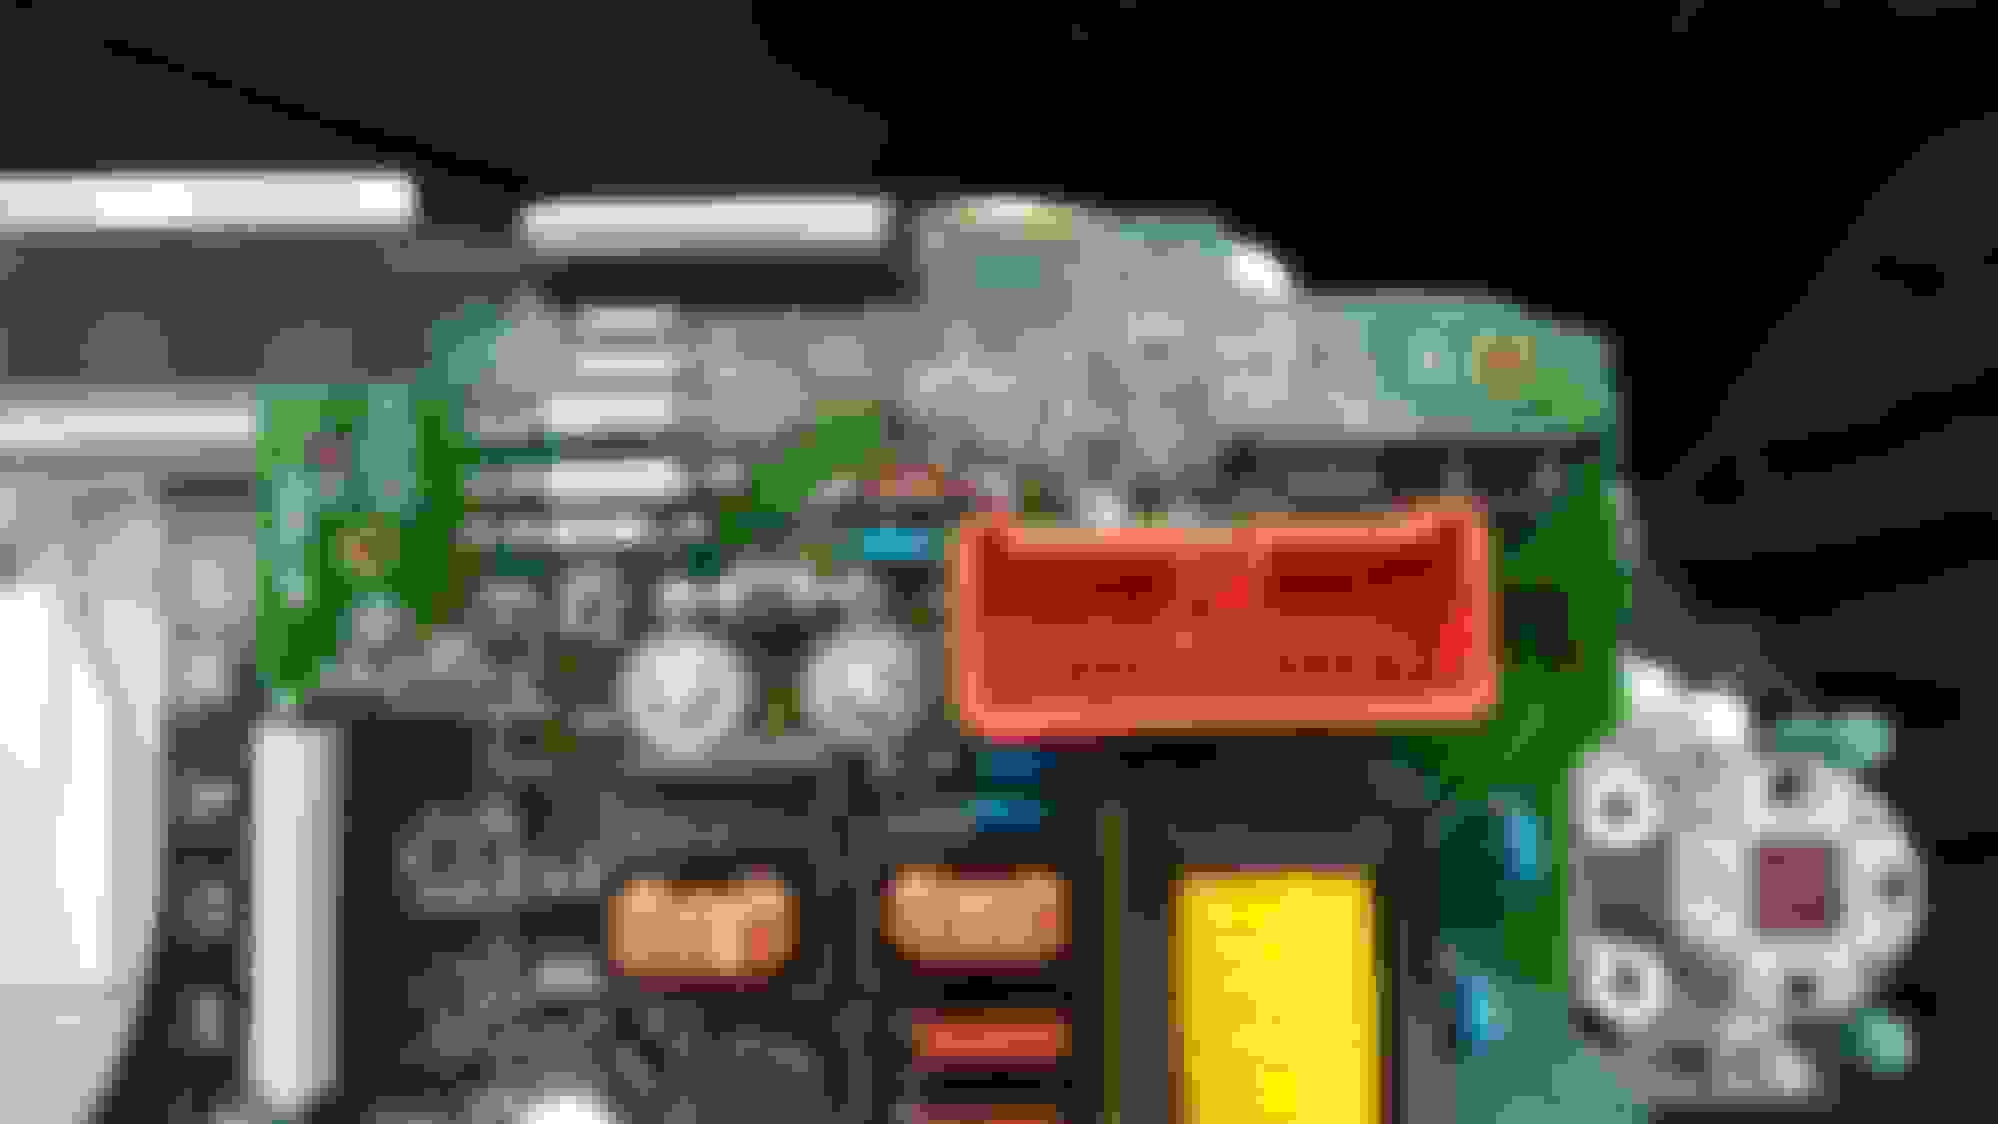
Before installing the Instrument Cluster assembly I went ahead and did the Tac mod for the 97 Cluster.. It is very hard to find any info on this mod and me and one other member just happened to do w rite up the exact same day but my computer was broken so you finally see it now lol
Here you can clearly see an up close pic of the R2 Resistor the had been jumper wired and soldered to make the TAC work
here is what it would look like from far away when you have the back panel of the cluster removed
Back to the top again, and it is nice to be back might I add! Boy do I have news for my thread followers.
So the car has been seeing positive boost for just over 2000 miles now. The first 1000 miles I left the car at 10psi because I didn't want to "hurt" anything, and wow was this thing a little rocket. Then comes the crazy part. I started doing research on our factory auto transmissions to see WHAT HP DO THEY ACTUALLY FAIL AT!!!
SO in turn I bumped my boost up to 16 psi..
Turns out if you actually take the time to do your build right and get a great trans cooler.. NOT JUST A GOOD ONE.. A GREAT ONE. These puppies hold up pretty well. I have the other 1000 miles on it at 16 psi and not one issue yet. Keep in mind my transmission is the factory A340E that came in the car and has 198xxx miles on it. It has just been maintained very well and the trans cooler added for the build.
So to say the least they are a lot stronger then some of the forum hoppers have given them credit for, and trust me, I have not been nice to it at all. I have floored it in 1st, 2nd, 3rd, and 4th.. so far so good, no slipping, and no grenades yet lol.
So with that being said, I hope some of the people on here enjoy their car as much as I have and take the risk to try out the factory auto, cause DAMN IS IT FUN. the thing still drives like a Lexus and comes alive like a single turbocharged Supra!!!
I don't have Dyno numbers yet as the car is put away for winter but if I was to guess I would shoot for around 410 - 440 WHP.. Hope to be back soon since it is winter and I finally have time to upload some pics and videos again.
Thanx for tuning in again guys, we all know the project is never finished !!!!
How's the ecu controlling the trans? Any issue there? Torque converter lock up n stuff?
How's the ecu controlling the trans? Any issue there? Torque converter lock up n stuff?
To be comletley honest the Aristo ECU controls all functions of the transmission just fine except TCC Lock-up. You get the anoying flashing O/D Light because of it, but nothing else.
I was also told that on a boosted SC running a factory auto you should manually shift it when beating it up, cause they will last longer; and normal driving should still be done in "D". Basically, when you manually shift the trans. the line pressures are slightly higher from the trans. pump allowing for more clamping force of the clutch packs. This will save the trans. from slipping a lot longer.
Thanks for the reply? Does not having TCC Lock-up affect freeway cruising RPM? I do like to take the car on long road trip you know.
Thanks for the reply? Does not having TCC Lock-up affect freeway cruising RPM? I do like to take the car on long road trip you know.
I have taken my car with this set up I have over 120 miles in one day.. 60 miles of consecutive highway driving with the ocassional foot down fun time, and the remaining 60 I was very agressively racing the car. It has no issues that night or the next day.
There is one down side to having a JDM Aristo ECU.. The speed limit cut. Apparently JDM ECU's cut right around 120mph.. I have tested and tested tons of times and it is an identical repetitive issue every time. I am currently looking into the ability to open source tune the JDM ECU but have yet to find any info.
I also have a 6 speed trans that will be swapped in, and if I don't have the ECU figured out by then I will let you know if it does the same this with a manual.
it will speed cut when the speed signal to the ecu is over 110-120mph. when you are manual I think you can disconnect that wire to disable speed cut or they also make this circuit that cuts the speed signal to the ecu in half, both work I think.
But If you are auto I think the ecu needs that wire to shift so it has to stay connected.
I have taken my car with this set up I have over 120 miles in one day.. 60 miles of consecutive highway driving with the ocassional foot down fun time, and the remaining 60 I was very agressively racing the car. It has no issues that night or the next day.
There is one down side to having a JDM Aristo ECU.. The speed limit cut. Apparently JDM ECU's cut right around 120mph.. I have tested and tested tons of times and it is an identical repetitive issue every time. I am currently looking into the ability to open source tune the JDM ECU but have yet to find any info.
I also have a 6 speed trans that will be swapped in, and if I don't have the ECU figured out by then I will let you know if it does the same this with a manual.
Does the ECU still have two shift tables for when you put ECT to PWR or NORM?
Also, would you be able to read the diagnostic code for the flashing O/D OFF light please?

 05-27-15, 06:23 PM