w58 to 1uz sc400 swap about ready


 03-14-14, 09:03 PM
#18
Pole Position
Thread Starter

Since I was thinking about I ran and got the cut off wheels so will cut it off tommorow... ok so I have the whole parts list I will be starting on this swap sunday... I might be able to start tommorow night we will see how it goes
Last edited by kolessc400; 03-19-14 at 10:13 PM.
 03-23-14, 07:50 PM
#21
Pole Position
Thread Starter
Ok so there are probaby diffrences with our sc400s I have no exhaust in my way of trans but will post the procedure for stock removal also the stock 92 sc300 mount bolted up to the 92 sc300 w58 and the stock holes on sc400 frame the trans removal will take sockets renches ans swivles sizes 8mm, 10mm, 12mm,13mm,14mm,16mm, 17mm, 18mm. .. so start by
1) remove exhaust
(just unbolt it from the headers and take the full thing down from the rubber pieces and use lots of pb blaster or wd-40 and remove the trans to exhaust cross member)
2) disconect kick down cable from throttle body to auto trans
( dont forget to do this its a cable that is a pain if you forget it its just on the throttle body an comes off easy)
3) remove the exhaust heat shield from between trans and the exhaust
( 4 nuts its easy)
4) remove driveshaft break away bar
( this is on the tail end of driveshaft 4 bolts easy)
5) remove drive shaft
( remove the 2 bolts in center shaft, then trans side of drive shaft
6) unplug trans plugs
( these are easy just start at the tailshaft and start unpluging and hang the harness outof the way easy just push B in the pins on all the plugs)
7) remove auto trans cooler lines and dipstick tube
(remove the dipstick tube with one bolt and slide it off, the cooler lines i just cut them all out withsome tin snips and bolt cutters)
8) remove shift linkage
( so just pull the pin on the linkage going to the shifter it will fall apartno prob,)
9) remove inspection plate for torque converter bolts and bolts for torquconverter
( there are 2 bolts this I had to use a wrench because its the cover for the to tork converter bolts and its a tighr squeeze between the frame and the bolts, then i had to use a 1/2 in drive with a shorter socket to get the torqu converter boltw with someone on the crank with a breaker bar so you can get all the bolts on the torquconverter)
10) remove fluid
( drain with drain bolt no prob)
11) remove belhousing bolts
( there are 4 on the top that are realy hare expecially if the trans has never been out because the anti sease from factory, need a swivel and extensions for this be ready to crack your knuckles thats the sucky part If you have an impact use it much better)
12) remove trans mount
( have a jack under the trans and be prepaired but easy)
13) remove trans
(pry apart with screwdriver and bring the jack down with it)
14)remove flywheel and spacers
( use impact if possible or wedge it to where it dont move)
15) remove auto shifter
( need to take out the center consel just like takeing out a radio plus a few mor bolts the 2 screws on the bottom of the shifter you have to unclip the plastiv on the vottom and push the plastic cover down, then pull up on the auto bezel and it will come apart no prob just a few bolts on the shifter assembly and plugs and leave it all apart till the new one is almost in so you can cut out the tunal)
16) remove break pedal
(take cover off and the 2 moduals there and zip tie them up they wont go back in the same way because the 400 neverhad a manual so they put the mouduals there where the clutch pedal goes)
Now for the fun stuff the install
1)drill holes for master cylinder
( when you get the moduals out of the way you can get a drill in there under the dash and they were kind enough to have a spots circled where it needs drilled)
2)install adapter plates, bellhousing you must notch a piece out because of abolt on the w58, and t56 slave cylinder
(the bell housing needs knoched where it seats to trans where a bolt is on the trans, easy and when you have the lines on the t56 where the bellhousing is you need to noch a piece where the lines sit on the bellhousing be cairful when seating the t56 and thefittings peices where they sit)
3)install pilot bearing
( in the crankshaft just flush with the edge use a brass hammer or a piece of wood)
4) install flywheel
( only one way it goes on no wories on marking holes, or side)
5)install clutch disk and pressure plate(use alignment tool)I ended up going with clutch master I have one act and one clutch master
(you can get a universal alighnment tool rent out or use sc300 one, the bolts did notwork from the torqu converter just went to o'rilies and they had some on the shelf)
6) drill holes for clutch lines in bellhousing
( easy just pre measure with t56 mark and drill get it far twards where it bolts to trans side)
7)install the lines on the slave cylinder befor installing the slave and rought them out the bellhousing
8) install break pedal and clutch pedal
(this part sucks be readyto be upside down and uncomfterbul, take the seat out much easyer, and you need a big bolt for the bracket I had one in a bolt bucket)
9) install trans and cut out tunnal, and install shifter
(since the center console is still apart use a jack to hold trans up and put a bolt in the trans, mark tunal and cut out where needed, then install the bellhousing bolts and sc300 trans mount, then install shifter and centerconsal and shifter with shifter besel and shift handle.)
10) install driveshaft
(Its easy just slide uper portion of shaft in and bolter up)
11) install clutch line to master cylinder and install master cylinder
12) instal driveshaft breakaway bar
13) wire it up to your specs NSS and so on
14) install the heat shield
15) install exhaust
16) bleed clutch
(The exciting part)
17) drive
(The fun part)
Last edited by kolessc400; 04-13-14 at 05:43 PM.
03-23-14, 08:16 PM
#22
Pole Position
Thread Starter
Pics are not uploading tonight guys it just wont take them for some reason I will try agin in the morning I have not finished but all thats left is putting the driveshaft in and clutch pedal with the master cylinder they bolt together wireing it up and adding fluid to the trans witch I will do first thing in the morning so not too much considering I pulled the auto and more than half way done putting the manual in im happy.
Last edited by kolessc400; 03-27-14 at 01:01 AM.
03-24-14, 09:39 PM
#23
Pole Position
Thread Starter
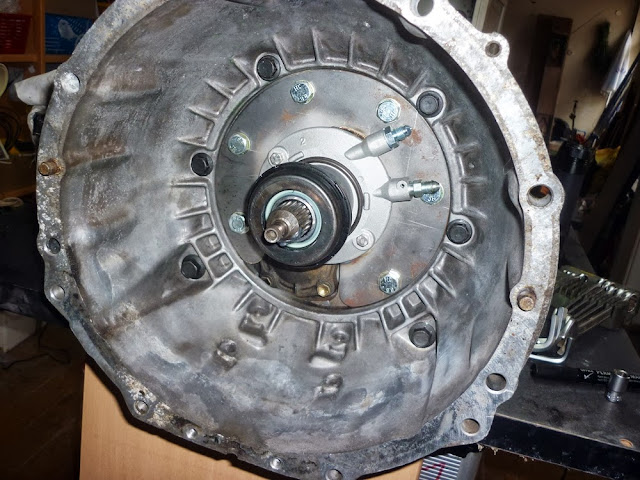
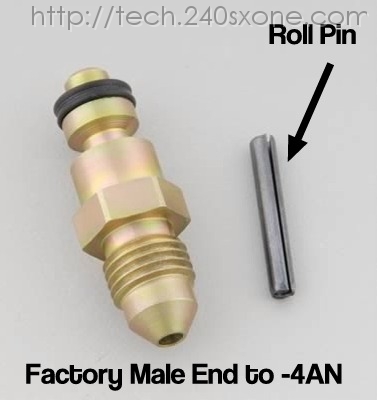
Ok so I had it all together when I went to bleed the clutch itmwas leaking out of the bell housing pulled the transmission out and the pin side on the fittings was leaking from the throuought bearing I pinched the pin out went to pull out the fitting and only half the fitting came out and the other half staued in so it was that the fitting was cracked so Im trying to get ahold of toyotav8.com guys to get another one o ya I had to move it so I just glided gears and started in first but it deffinatly gained alot torque
 03-25-14, 07:48 AM
#25
Pole Position
Thread Starter
Yes that one exactly that one... I found them in a set of 2 from russell parts part number 641001 and I have an extra one if any one needs
Last edited by kolessc400; 03-25-14 at 09:56 AM.
 03-26-14, 03:20 PM
#27
Pole Position
Thread Starter
Ya but I foundit already and put a part number down..... but now I got it all together again and now the clu4ch pedal swings to the floor and I have to manually pull it back up and im getting fluid out the end of the bleader and the clutch wont work like it wont disingage the clutch... do you have to use a spacer on the flywheel to bring it out does any one know
Last edited by kolessc400; 03-26-14 at 03:59 PM.
03-26-14, 09:35 PM
#28
Pole Position
Thread Starter
So I have eliminated flywheel spacer the guy at toyotav8.com said no spacer.... also air in the lines I vacume bled the lines... now I have another master cylinder on the way.... of that dont work then I am doing the slave... I still dont know about how springy the pedal is eitherway from about half way down
03-26-14, 11:23 PM
#29
Pole Position
Thread Starter
THE WIREING(in progress)
These should be same spot for all sc400s posibly diffrent colors
1) The BLACK and the BLACK/WHITE one in neutral to start the car(to start switch) this two just has to be touching and the car will start and bypass neutral/park only nessicary one
2)LIGHT BLUE and theYELLOW reverse lights (to the 2 wires and plug on the manual the reverse switch) this is just nice to have for... well backing up(-:
working on DRIVE gear
Last edited by kolessc400; 03-26-14 at 11:47 PM.
03-28-14, 09:42 PM
#30
Pole Position
Thread Starter
Wow... these guys are slacking I wont get my new master cylinder till thursday as soon as that comes in ill be buckelling down on the wireing just need it to run first