When you click on links to various merchants on this site and make a purchase, this can result in this site earning a commission. Affiliate programs and affiliations include, but are not limited to, the eBay Partner Network.
Just a minor update. It's so hot now I don't get much done but slowly eeking out a little progress.
Got the O2 sensor repinned so that's working now. Still have to jumper the sub throttle. Dynamatted up the drivers door so I can put the door card back together. Couldn't find my spray adhesive so wrap the carpet section in suede so didn't get that far. Should have pics of that on my next update once i find the adhesive. Got the bumper back on and just need to find all the screws and plugs to secure it properly.
outer skin has a layer then i did the inner skin and sealed it all up. Yes that's an OLD school nakamichi component system in there. Sounds better than the Focals in my truck.
This pic made me chuckle. IC peeking through but the way it turned out reminds me of my wife's mini.
And another shot of the bumper. can't wait to get this out and get some detailing going on.
Finally got around to getting the driver door finished up. Few pics
Took the panel all apart to dye with the SEM color coat since I couldnt find oem black in as good condition as mine are. I also wrapped the carpet portion in suede to match my headliner and rear deck.
and all assembled
and installed. with the dynamat behind it gives a nice thwump sound.
Here's a shot of the massage controller. Wife is jealous i didn't install one in the passenger seat so I may have to try to track this down and order another setup.
And finally proof it moves under its own power. Took it for a spin and made a few psi of boost so I finally got to see positive manifold pressure!! Didn't have a good stretch of road to get going too much but started building boost at about 3200rpm. Didn't get much past 4k and about 4psi but that seems pretty respectable for a big 76mm and an intake that flows like mad.
Wired in the relay for the AC fix and it blows nice and cold. My gated shifter is doing the funky lock out cant put it back into Park without the bypass thing so probably just going to disable that. i know the VSS is working because my nav unit is reading and they're tapped off the same wire.
I put them in when I re-skinned my seats like 5 years ago but I did manage to find an email i had. It's Relaxor RC64H. What I did was cut out the holes for the motors in the foam and then put a layer of like 1/4 or 3/8" foam over that. The wiring was fairly straight forward to the control boxes then just +12v and ground.
So after my fuel line rupture I've decided to rip it all out and build the big fuel system. A laundry list of parts will be arriving later this week but the sum it up:
Dual walbro 416 e85 pumps (one for now, two when i get a ProEFI and can stage them)
dual 8 feeds to a single 10 with an AEM high flow filter that splits back out to 8s at the rail
6 return through fuelab FPR and return to the tank.
this should support my all my fueling needs for the foreseeable future. Worst case is i have to add a third pump. It's all fragola PTFE line and fittings. Found quite a bit of it on amazon prime much cheaper than Summit.
I've pulled tank out to have the OEM feed and return sealed up. I'm debating welding vs just plugging with a solid bolt and OEM banjo. probably keep the OEM vent setup and run that to a filter since the charcoal canister is long gone.
Ill have some pics later once all the stuff shows up and I get to plumbing.
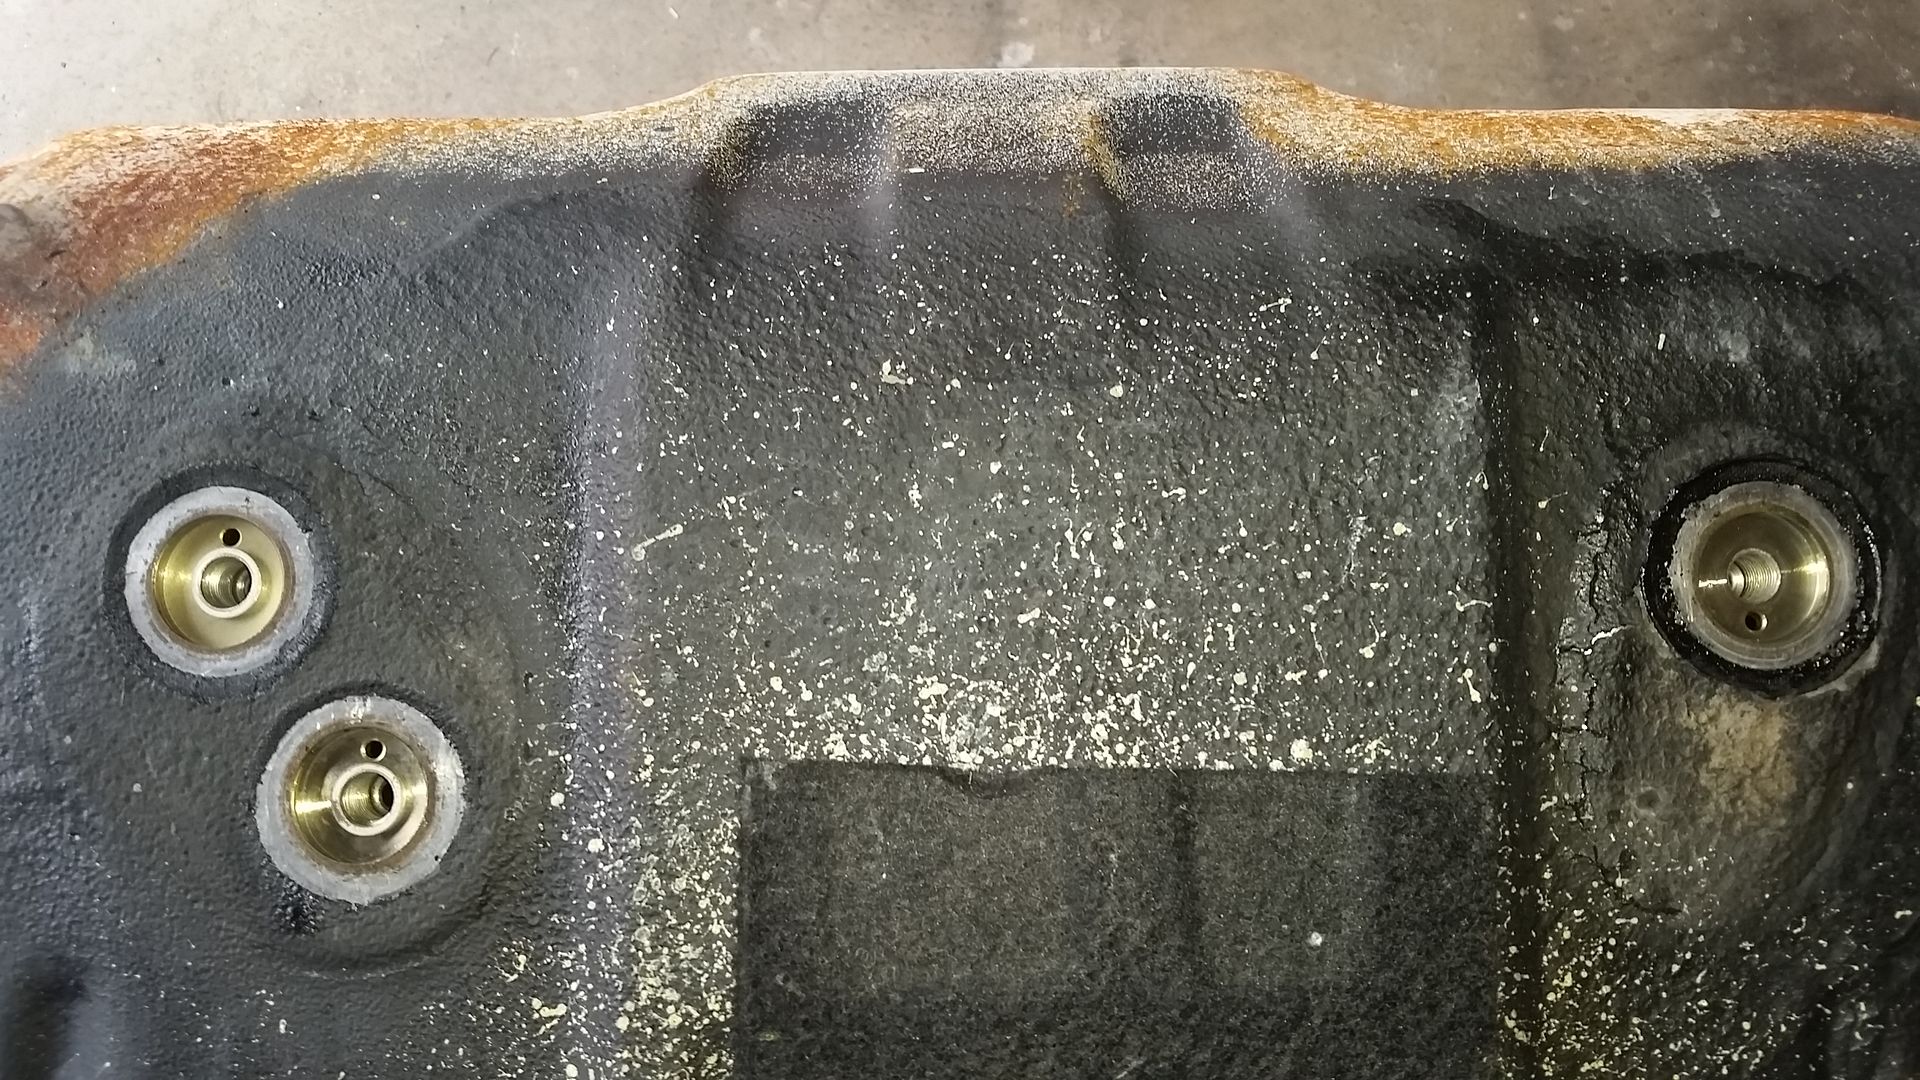
Here's the bottom of the tank so people can see these stupid holes everyone talks about. Thought I had a pic of the banjo but I'll get one thursday when I'm at the shop again.
The washer stuck to the bottom on the feed and return lines so ignore that, they all look like the third fitting on the right which I think is vent (someone correct me)
I'm going to try just replacing the hollow bolt with a solid one. It's a M12x1.25 bolt and I found a replacement at my local Ace which has an amazing selection of bolts and hardware. That combined with the oem banjo fitting should seal it up.
There's some good info and pics in Gerrb's build thread around pages 48-50 or so where he did his "meth lab" fuel set up. I'm going to try to document as much as I possibly can because I had never seen any of this stuff before and it was all very confusing. Parts should be arriving today and tomorrow and the build up starts tomorrow night so i should have something Friday here.
There's some good info and pics in Gerrb's build thread around pages 48-50 or so where he did his "meth lab" fuel set up. I'm going to try to document as much as I possibly can because I had never seen any of this stuff before and it was all very confusing. Parts should be arriving today and tomorrow and the build up starts tomorrow night so i should have something Friday here.
I have seen Gerry's setup.....but it way overkill for what I am planning on doing....
I wanted to have 2 TT denso pumps feeding both sides of fuel rail....and a single return line....I plan on eliminating all factory fuel lines and running new ones from the tank up to the fuel rail...
In order to do this do you just block off the 3 holes on the bottom of the tank or could they be reused?
In one of the SC , I used that feed and return holes / lines (banjos) as both return lines with one of them having the flex fuel sensor. 3 Denso pumps supply the Fuel log and from there -10an to front.
In another SC, I got them welded shut since my weldon feed -10an feed and -8an return are on the top hat . Return has the flex fuel sensor.
And on the third SC I left them as is .... feed and return for the TT Denso pump for up to 400rwhp and on kill mode the Weldon kicks in but has its own feed / return line on the top hat. Stock return has the flex fuel sensor.
Leave the one of the right as a vent for the charcoal canister . You need a good vent for your tank if you are flowing a lot of fuel. You want air to replace the fuel being pumped out or your tank will collapse.
How much HP will the stock lines and return support....?
How much HP will the stock lines and return support....?
500 for the feed line is doable but are pushing it , if you are aiming for +500rwhp , I would get another -6an or even bigger depending on power goals and fuel used.
the return should be alright up to 750 or probably even more but it all depends on your pump requirements . Some pumps like the weldon pumps need a huge return as per their requirements. If you look at the return hole of even a Weldon regulator , it is small, so in most cases not unless you are going higher than 750, the stock return which is between -4an and -6an should suffice.
You can't go wrong overbuilding your fuel system cause getting lean is what you do not want to experience .
Here's the bottom of the tank so people can see these stupid holes everyone talks about. Thought I had a pic of the banjo but I'll get one thursday when I'm at the shop again.
The washer stuck to the bottom on the feed and return lines so ignore that, they all look like the third fitting on the right which I think is vent (someone correct me)
I'm going to try just replacing the hollow bolt with a solid one. It's a M12x1.25 bolt and I found a replacement at my local Ace which has an amazing selection of bolts and hardware. That combined with the oem banjo fitting should seal it up.
More pics to come later in the week.
Just to give you a heads up as I have already tried this already. Putting a solid bolt through those holes for the tank will not work and will cause the tank to leak a significant amount. Luckily you have the tank out of the car already so this makes things much easier for you. What I did was cut off the banjo nut off of the factory line and welded it shut where the line comes off the side and bolted it back into the tank and no more leaks. I believe there is something to do with the small pin hole that aligns the factor line. I could be wrong but just from experience putting a solid bolt through the tank didn't work for me. I will try to find a pic of what I did.
the other option you can do is weld plugs or AN bungs to the tank making sure you all opening are open an no fumes are present.
 06-21-15, 02:49 PM


 pretty please