Jdm lowrider
 11-01-13, 03:26 PM
#16

cool to see the celsiors come with those front strakes/guards/diffuers to guide the oncoming air. i have not seen them on USDM cars, maybe a 98-up thing?
thanks for also reviewing the XYZ coilovers. i never heard of them stateside to it's good to know there are other brands out there to choose from, with higher spring rates too! 25k/20k cool!!!!


 more info on this please!


 11-06-13, 10:53 AM
#23
Driver School Candidate
Thread Starter
11-06-13, 10:54 AM
#24
Driver School Candidate
Thread Starter
 11-06-13, 06:46 PM
#28
Driver School Candidate
Thread Starter
11-08-13, 02:59 PM
#29
Driver School Candidate
Thread Starter
So the time had finally come for me to roll up my sleeves and dig into some real work on the Celsior, the fenders. I wanted to keep the outside shape of the fenders completely stock. No pull, no new arch, all Toyota goodness. The first thing I did was remove the corner and head lights, so that I could take off the fenders. Taking the fenders off wasn't necessary but it makes the next couple of steps way easier. I've probably only done 6 fenders start to finish fully by myself ( I've seen Gerard do 16 in a weekend !!! ) so I wanted to do everything I could to ease the process.
So that stupid trim I previously mentioned and removed is screwed into these plastic holders in the fender lip. If you were to just start rolling now these would be visible in the finished outer fender. To negate that you must cut the fender lip back to where it is one congruent line.


So draw your line


Then cut it, taper out the ends and sand and file the burs

This is what you are left with, this unbroken line will roll smooth and flat giving you a far nicer finished edge.
Trimmed front fender edge
Photo Missing sorry guys I guess I didn�t take this photo. I find it hard/ annoying to stop and take photos as I progress, especially when my phone is the source of music and my hands are filthy.
Now I put the fenders back on to the car for the next step: Folding the lip. Just like any fender roll apply heat to lessen the stress on the paint. The easiest way to fold the lip back on itself is to use a hammer and dolly. Slowly working back and forth until the previously horizontal lip is now vertical matching the outer fender. I had some paint chips on the lip as now the metal makes a 180 bend, but nothing major I sanded these down so that it is a smooth transition.
Now it was time for the rears..........
Having never owned a Lexus before I never had to deal with the super thick rear fender lip. All of my previous cars had a standard lip that could " easily " be rolled up for clearance. I treated the rears as i did the front by first marking out my cut line. This was ( as with the fronts ) in line with the furthest in any of the holes went. I then used a flapper wheel to smooth it down and make it even thinner yet.
Cut

Trimmed

So now just seam seal and you�re done... But that�s not me.
I decided to just massage the metal a little to give me a slight bit more clearance. So yeah...... I basically bashed the **** out of the inner fender to the point that it completely separated from the outer fender.
Separated inner from outer

This is would be pretty standard issue if you were doing a complete fender transformation as now you would just shape your outer, join the two, seal it up and call it a day. But I wanted the outside to look completely unmolested so having tack welds burn through the paint wasn't an option. With the Fenders apart ( Inner & Outer ) I cleaned out the OEM foam. These are the tiny black dots.
Then I worked the inner metal to sit back against the outer, this worked well in the upper areas but I couldn't move the metal enough down by the lip and didn't want to accidentally strike the back side of the outer fender wrecking the shape was trying to keep. I essentially needed to roll the inner to sit flush against the outer but the wheel on the fender roller is huge so I couldn't get in where I needed.
So I took apart my roller blades and used one of the wheels, this worked perfect !!!!! I was able to get in and work only the area that was needed. After heating and working the metal I was able to get the inner within 5mm of the outer which was good enough for me.

Next up was to join the 2 back together, not wanting to weld I decided to panel bond them. I had never worked with panel bond before only PL and other similar construction adhesives. I borrowed the required gun off a friend and grabbed a new tube of 3m panel bond.
Crazy future space gun

The only problem as I saw it now was I needed the outer and inner right beside each other. But didn�t want the outer being pulled inwards, as opposed to the desired inner being pulled outwards. I traced the shape of the fender on to some plywood and cut it out with a jig saw.
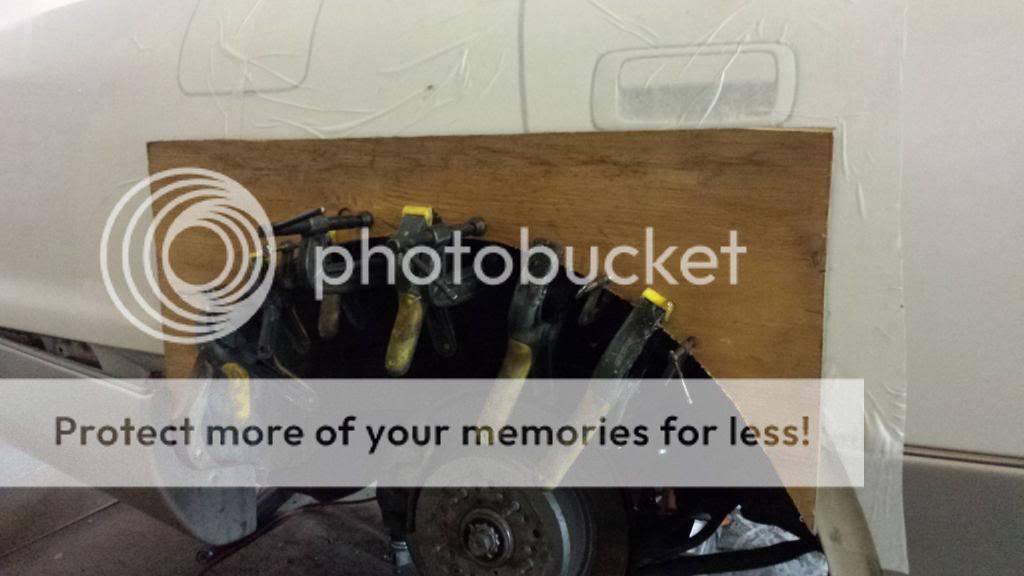
I used this up against the car ( with transfer vinyl on the paint ) to spread the load and pull the inner out. Now I just applied the panel bond in between the inner and outer and clamped them together. After waiting the suggested 4 hours I removed the clamps and repeated this on the other side. As the panel bond was drying I used a knife to trim off the stuff that had been forced out when it got clamped, this is far easier when it is slightly malleable. Now I was left with the inner and outer bonded together with the inner moved and clearanced where required.
The fender edge was now just a tiny lip from the outer fender, to strengthen this I added a small skim coat of everglass body filler. This also allows you to sand and create a nice round fender lip without any sharp corners

After sanding the filler smooth I painted the inner fender using a rust inhibiting paint.

So now it was time to put the car back down. First I swapped the front pads and rotors for some new ones in hopes that the intermittent brake wobble goes away. The previous pads and rotors seemed to be fine though nowhere near worn out.
So that stupid trim I previously mentioned and removed is screwed into these plastic holders in the fender lip. If you were to just start rolling now these would be visible in the finished outer fender. To negate that you must cut the fender lip back to where it is one congruent line.

So draw your line
Then cut it, taper out the ends and sand and file the burs
This is what you are left with, this unbroken line will roll smooth and flat giving you a far nicer finished edge.
Trimmed front fender edge
Photo Missing sorry guys I guess I didn�t take this photo. I find it hard/ annoying to stop and take photos as I progress, especially when my phone is the source of music and my hands are filthy.
Now I put the fenders back on to the car for the next step: Folding the lip. Just like any fender roll apply heat to lessen the stress on the paint. The easiest way to fold the lip back on itself is to use a hammer and dolly. Slowly working back and forth until the previously horizontal lip is now vertical matching the outer fender. I had some paint chips on the lip as now the metal makes a 180 bend, but nothing major I sanded these down so that it is a smooth transition.
Now it was time for the rears..........
Having never owned a Lexus before I never had to deal with the super thick rear fender lip. All of my previous cars had a standard lip that could " easily " be rolled up for clearance. I treated the rears as i did the front by first marking out my cut line. This was ( as with the fronts ) in line with the furthest in any of the holes went. I then used a flapper wheel to smooth it down and make it even thinner yet.
Cut
Trimmed
So now just seam seal and you�re done... But that�s not me.
I decided to just massage the metal a little to give me a slight bit more clearance. So yeah...... I basically bashed the **** out of the inner fender to the point that it completely separated from the outer fender.
Separated inner from outer
This is would be pretty standard issue if you were doing a complete fender transformation as now you would just shape your outer, join the two, seal it up and call it a day. But I wanted the outside to look completely unmolested so having tack welds burn through the paint wasn't an option. With the Fenders apart ( Inner & Outer ) I cleaned out the OEM foam. These are the tiny black dots.
Then I worked the inner metal to sit back against the outer, this worked well in the upper areas but I couldn't move the metal enough down by the lip and didn't want to accidentally strike the back side of the outer fender wrecking the shape was trying to keep. I essentially needed to roll the inner to sit flush against the outer but the wheel on the fender roller is huge so I couldn't get in where I needed.
So I took apart my roller blades and used one of the wheels, this worked perfect !!!!! I was able to get in and work only the area that was needed. After heating and working the metal I was able to get the inner within 5mm of the outer which was good enough for me.
Next up was to join the 2 back together, not wanting to weld I decided to panel bond them. I had never worked with panel bond before only PL and other similar construction adhesives. I borrowed the required gun off a friend and grabbed a new tube of 3m panel bond.
Crazy future space gun
The only problem as I saw it now was I needed the outer and inner right beside each other. But didn�t want the outer being pulled inwards, as opposed to the desired inner being pulled outwards. I traced the shape of the fender on to some plywood and cut it out with a jig saw.
I used this up against the car ( with transfer vinyl on the paint ) to spread the load and pull the inner out. Now I just applied the panel bond in between the inner and outer and clamped them together. After waiting the suggested 4 hours I removed the clamps and repeated this on the other side. As the panel bond was drying I used a knife to trim off the stuff that had been forced out when it got clamped, this is far easier when it is slightly malleable. Now I was left with the inner and outer bonded together with the inner moved and clearanced where required.
The fender edge was now just a tiny lip from the outer fender, to strengthen this I added a small skim coat of everglass body filler. This also allows you to sand and create a nice round fender lip without any sharp corners
After sanding the filler smooth I painted the inner fender using a rust inhibiting paint.
So now it was time to put the car back down. First I swapped the front pads and rotors for some new ones in hopes that the intermittent brake wobble goes away. The previous pads and rotors seemed to be fine though nowhere near worn out.
11-08-13, 03:37 PM
#30
are you hosting the images for this build elsewhere than your gs build? becaue i can see ALL the gs pictures through my firewall at work but not a single one on this thread...dang..guess ill have to wait to get home lol

