"Raine's SC300 (KEIRA 2.0) From the Beginning to End."
 07-02-12, 08:24 PM
#31
03.27.08
X7 Red
- Ah, brake calipers. I never liked the look of bare metal calipers, but I wasn’t about to spend a lot of money refinishing OEM SC calipers either – I’d rather upgrade the brakes as a whole someday. Anyhow, standard car logic suggested that I paint my stock calipers a different color (LOL) so I went with standard red since A. red is my favorite color, and B. it matches the car color so it doesn’t stand out. I’ve used different paints before, such as Krylon, Duplicolor, etc. all with various results. I’ve even tried those “caliper paint kits” in the past. When I ended up painting my SC brake calipers I went with a secret paint (well, not a secret anymore lol) that I’ve found to actually be pretty damn good for the job – Tamiya X7 Red.

Yes – it’s hobby paint, but I experimented with it one day on a bare metal caliper and, though it took 3-4 coats (by hand, with a brush, like a boss) it came out like a laquer. After driving around to let it “bake in” the color was vivid and the texture was smooth. Granted, it’s not the same as going full “G2 Caliper System” or whatever it is others use, but it handles the heat and if any touch-ups are needed it just takes a quick brush and a couple minutes drying time, and you wouldn’t know it was chipped in the first place.
(continued on post #35)
X7 Red
- Ah, brake calipers. I never liked the look of bare metal calipers, but I wasn’t about to spend a lot of money refinishing OEM SC calipers either – I’d rather upgrade the brakes as a whole someday. Anyhow, standard car logic suggested that I paint my stock calipers a different color (LOL) so I went with standard red since A. red is my favorite color, and B. it matches the car color so it doesn’t stand out. I’ve used different paints before, such as Krylon, Duplicolor, etc. all with various results. I’ve even tried those “caliper paint kits” in the past. When I ended up painting my SC brake calipers I went with a secret paint (well, not a secret anymore lol) that I’ve found to actually be pretty damn good for the job – Tamiya X7 Red.
Yes – it’s hobby paint, but I experimented with it one day on a bare metal caliper and, though it took 3-4 coats (by hand, with a brush, like a boss) it came out like a laquer. After driving around to let it “bake in” the color was vivid and the texture was smooth. Granted, it’s not the same as going full “G2 Caliper System” or whatever it is others use, but it handles the heat and if any touch-ups are needed it just takes a quick brush and a couple minutes drying time, and you wouldn’t know it was chipped in the first place.
(continued on post #35)
Last edited by raine; 07-30-12 at 02:03 PM.

")

 07-03-12, 02:53 AM
#35
05.09.08
Less Rattle
- Got a roll of FatMat sound deadener from a friend to try out, so I did. I had to pull both front seats, rear seats, center console, and floor carpet, followed by some wall to wall cleaning with isopropyl and a few cotton rags. I was surprised at how much weird stuff made it underneath the carpet over the years… from dust and little rock pebbles, to a few sunflower seeds, about $3.58 cents in change, and a complete, unwrapped stick of juicyfruit gum – again, UNDER the carpet (not the floor mats – the actual cabin carpet!)


As for the actual install, it took about 3 evenings to complete. The floor panels were relatively simple; most of it was flat so I could lay down uninterrupted squares. The rear seatback, being solid on our cars, was also easy, but when it came to the rear package shelf it called for a lot of fitting, cutting, and refitting due to all the holes that needed to stay open. The result was a quieter cabin – the road noise, though already pretty low in stock form – sounded even less at higher speeds. Also, the actual “tone” of any noise was a little lower on the octave scale. It wasn’t as quiet as Dynamat (which I’ve used in the past with excellent results) but it gave me a quieter ride at less than half the price (if I paid) of Dynamat.
Less Rattle
- Got a roll of FatMat sound deadener from a friend to try out, so I did. I had to pull both front seats, rear seats, center console, and floor carpet, followed by some wall to wall cleaning with isopropyl and a few cotton rags. I was surprised at how much weird stuff made it underneath the carpet over the years… from dust and little rock pebbles, to a few sunflower seeds, about $3.58 cents in change, and a complete, unwrapped stick of juicyfruit gum – again, UNDER the carpet (not the floor mats – the actual cabin carpet!)
As for the actual install, it took about 3 evenings to complete. The floor panels were relatively simple; most of it was flat so I could lay down uninterrupted squares. The rear seatback, being solid on our cars, was also easy, but when it came to the rear package shelf it called for a lot of fitting, cutting, and refitting due to all the holes that needed to stay open. The result was a quieter cabin – the road noise, though already pretty low in stock form – sounded even less at higher speeds. Also, the actual “tone” of any noise was a little lower on the octave scale. It wasn’t as quiet as Dynamat (which I’ve used in the past with excellent results) but it gave me a quieter ride at less than half the price (if I paid) of Dynamat.
Last edited by raine; 08-01-12 at 01:30 PM.
07-03-12, 02:54 AM
#36
06.28.08
JDM Clear
- I am fortunate to have an old friend/part-time car parts hunter who lives in Japan; she lives there, and the �part-time� part is how she�ll on occasion tag along with her car-guy husband when he goes on parts runs. Claire always keeps an eye out for anything that I might be interested in for my SC. When she comes across something she sends me a photo and we go from there, and one of her finds was a set of clear headlamp lenses for the Soarer. The first question I responded with was �are they SuperMade or Final Konnexion?� and after some research her reply was that �they were both�� as in they were apparently pulled from the same mold used by both companies. Interesting. I gave her the �go� signal and she had them on a plane heading to me in a jiffy.
As mentioned above, they were lenses only, so I had to remove my OEM lenses first. With the home oven not working (read: broken) I went with plan B: a heat gun and a pair of heat-resistant gloves. This method took longer to remove the OEM lenses, and might have contributed to a later issue (more on that in a bit.) Once I had the OEM lenses off, I decided to experiment with a halo light insert around the low-beam projector. I installed a 95mm halo behind the headlamp bezel, around the front flange of the OEM projectors. I then installed the lenses, wired everything up, and all was working fine � let alone the more noticeable fact that the new lenses took years off the cars age in appearance.


After about half a year though, the right side lamp started getting condensation inside. It appeared that the lens edge and the channel where the lens should fit into on the headlamp enclosure wasn�t aligning right; my thinking was that I had unknowingly twisted the housing a bit while taking off the OEM lenses with just a heat gun and raw strength. By then the headlamp had visible moisture inside, and I was left with two options: repair it by (once again) removing the lens, cleaning out the moisture, and reinstalling the lens again; OR replace them with another set of headlamps for the time being. I tried disassembling and cleaning them (twice) but after the third presence of moisture inside, I gave up on them and sold them on eBay.
I ended up going back to a pair of very clean, yellow-free, crack-free, unbroken-tabbed pair of 1998 OEM headlamps at a good price of $200/shipped.
(continued on post #39)
JDM Clear
- I am fortunate to have an old friend/part-time car parts hunter who lives in Japan; she lives there, and the �part-time� part is how she�ll on occasion tag along with her car-guy husband when he goes on parts runs. Claire always keeps an eye out for anything that I might be interested in for my SC. When she comes across something she sends me a photo and we go from there, and one of her finds was a set of clear headlamp lenses for the Soarer. The first question I responded with was �are they SuperMade or Final Konnexion?� and after some research her reply was that �they were both�� as in they were apparently pulled from the same mold used by both companies. Interesting. I gave her the �go� signal and she had them on a plane heading to me in a jiffy.
As mentioned above, they were lenses only, so I had to remove my OEM lenses first. With the home oven not working (read: broken) I went with plan B: a heat gun and a pair of heat-resistant gloves. This method took longer to remove the OEM lenses, and might have contributed to a later issue (more on that in a bit.) Once I had the OEM lenses off, I decided to experiment with a halo light insert around the low-beam projector. I installed a 95mm halo behind the headlamp bezel, around the front flange of the OEM projectors. I then installed the lenses, wired everything up, and all was working fine � let alone the more noticeable fact that the new lenses took years off the cars age in appearance.
After about half a year though, the right side lamp started getting condensation inside. It appeared that the lens edge and the channel where the lens should fit into on the headlamp enclosure wasn�t aligning right; my thinking was that I had unknowingly twisted the housing a bit while taking off the OEM lenses with just a heat gun and raw strength. By then the headlamp had visible moisture inside, and I was left with two options: repair it by (once again) removing the lens, cleaning out the moisture, and reinstalling the lens again; OR replace them with another set of headlamps for the time being. I tried disassembling and cleaning them (twice) but after the third presence of moisture inside, I gave up on them and sold them on eBay.
I ended up going back to a pair of very clean, yellow-free, crack-free, unbroken-tabbed pair of 1998 OEM headlamps at a good price of $200/shipped.
(continued on post #39)
Last edited by raine; 08-14-12 at 01:57 AM.
07-03-12, 06:29 AM
#38
Driver School Candidate
iTrader: (2)

Join Date: Jul 2011
Location: tn
Posts: 45
Likes: 0
Received 0 Likes
on
0 Posts
Sorry for the mad grammar I'm on the grave yard shift guess I got a little sleepy while writing but I appreciate you guys and the guide lines that you give me and everybody that contributes to clublexus in all the DIY hopefully it saves me a lot of money .
07-03-12, 11:16 AM
#39
08.01.08
The Basslink
- Coming from a DJ background (I�ve done gigs both here in the U.S. as well as overseas in the Philippines back in the day) I love my music. Combine that with being a car guy and I�m willing to bet that a lot of us who love cars also love to listen to music in our cars. The OEM Pioneer system at the time was fine for me; it had decent sound, it had the OEM stock appearance to thwart thieves, and it had a factory sub. However the sub, as we all know, wasn�t exactly a heavy hitter � not to mention that my OEM sub happened to be blown out due to age. Before going the usual �upgrade it all!� route that is inevitable, I decided to try an add-on sub. For this addition I had a few guidelines to try to stick to: A. Must be self-amplified; B. Must not take up more than 1/3 of the already small SC300�s trunk space; C. Must be easy to remove (at the time I needed all the trunk space I could save for work projects); D. Must cost no more than $300. I picked up a new-in-box Infinity Basslink-T � and it featured a built-in 250-watt Class-D amplifier, was only 7� thick at its base, was light enough to pull out of the trunk with one arm, and I found one for sale with a $299 price.
I mounted the Basslink-T in the trunk and removed the OEM subwoofer to give the bass a passageway from trunk to interior. Power was from a Kicker 4-ga amp kit, and signal was using the speaker-level inputs wired to the OEM rear speakers. The added bass was pretty good, but not good enough; the bass was being muffled by the rear panel (the one in front of the fuel tank), the fuel tank itself, and the OEM subwoofer�s 10� opening.

Not an actual photo, because I can�t find one, but this is what it basically looked like in the trunk.
The Basslink
- Coming from a DJ background (I�ve done gigs both here in the U.S. as well as overseas in the Philippines back in the day) I love my music. Combine that with being a car guy and I�m willing to bet that a lot of us who love cars also love to listen to music in our cars. The OEM Pioneer system at the time was fine for me; it had decent sound, it had the OEM stock appearance to thwart thieves, and it had a factory sub. However the sub, as we all know, wasn�t exactly a heavy hitter � not to mention that my OEM sub happened to be blown out due to age. Before going the usual �upgrade it all!� route that is inevitable, I decided to try an add-on sub. For this addition I had a few guidelines to try to stick to: A. Must be self-amplified; B. Must not take up more than 1/3 of the already small SC300�s trunk space; C. Must be easy to remove (at the time I needed all the trunk space I could save for work projects); D. Must cost no more than $300. I picked up a new-in-box Infinity Basslink-T � and it featured a built-in 250-watt Class-D amplifier, was only 7� thick at its base, was light enough to pull out of the trunk with one arm, and I found one for sale with a $299 price.
I mounted the Basslink-T in the trunk and removed the OEM subwoofer to give the bass a passageway from trunk to interior. Power was from a Kicker 4-ga amp kit, and signal was using the speaker-level inputs wired to the OEM rear speakers. The added bass was pretty good, but not good enough; the bass was being muffled by the rear panel (the one in front of the fuel tank), the fuel tank itself, and the OEM subwoofer�s 10� opening.
Not an actual photo, because I can�t find one, but this is what it basically looked like in the trunk.
Last edited by raine; 07-03-12 at 01:39 PM.
07-03-12, 11:17 AM
#40
08.02.08
More Thump
- Audio Control to the rescue! I’ve used their excellent, competition-spec signal processors before, and the unit that came to the rescue was their famed Epicenter Plus bass restoration processor. Without getting super technical, what it does is analyze the audio signal’s frequencies and uses them to recreate lower bass. It doesn’t just crank up the low-end like turning the “bass” **** up – it restores the lower bass that you wouldn’t normally have playing your music on a regular sound system. The “Plus” version included extra features, like speaker-level inputs and an aux. channel input for an extra audio source (iPod, etc.). I installed it in between the OEM rear speakers and the Basslink-T, and it felt like I went from a single 10” subwoofer with 2 passive radiators (what the Basslink-T is) to a trio of 12” subs in the trunk! This level of bass enhancement would come in handy in the future.

(continued on post #49)
More Thump
- Audio Control to the rescue! I’ve used their excellent, competition-spec signal processors before, and the unit that came to the rescue was their famed Epicenter Plus bass restoration processor. Without getting super technical, what it does is analyze the audio signal’s frequencies and uses them to recreate lower bass. It doesn’t just crank up the low-end like turning the “bass” **** up – it restores the lower bass that you wouldn’t normally have playing your music on a regular sound system. The “Plus” version included extra features, like speaker-level inputs and an aux. channel input for an extra audio source (iPod, etc.). I installed it in between the OEM rear speakers and the Basslink-T, and it felt like I went from a single 10” subwoofer with 2 passive radiators (what the Basslink-T is) to a trio of 12” subs in the trunk! This level of bass enhancement would come in handy in the future.
(continued on post #49)
Last edited by raine; 07-30-12 at 02:04 PM.
07-03-12, 12:20 PM
#41
Pole Position
Killer car, and thread as always man. Thanks for posting!
07-13-12, 03:59 AM
#42
Lexus Test Driver
iTrader: (7)
Join Date: Oct 2006
Location: So*Cal
Posts: 1,083
Likes: 0
Received 0 Likes
on
0 Posts
03.29.07
Comfort Spec
- I finally ordered a set of TEIN CS-T (Comfort Spec) coilovers. Now that I think about it, I'm not sure why I chose these first, maybe the whole "luxury car is comfortable" idea. Anyhow, the CS-T's had mild valving and 10kg/6kg spring rates.
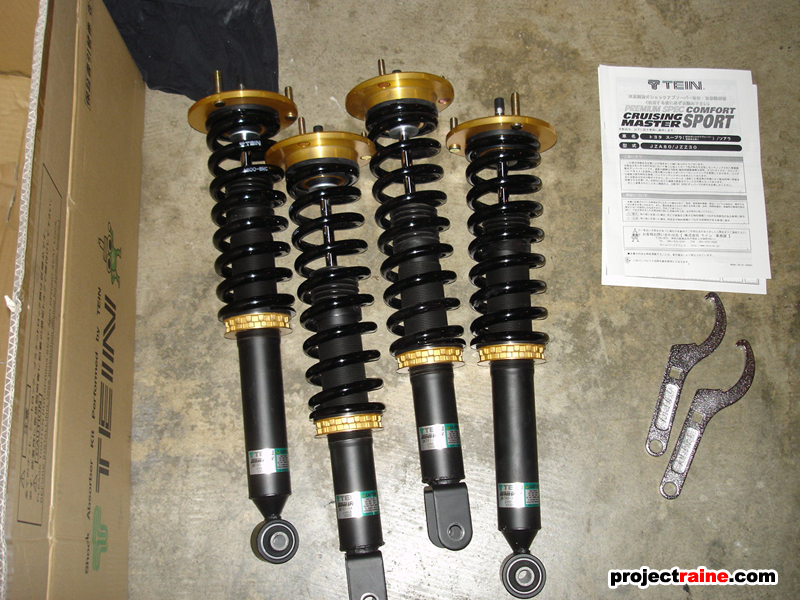
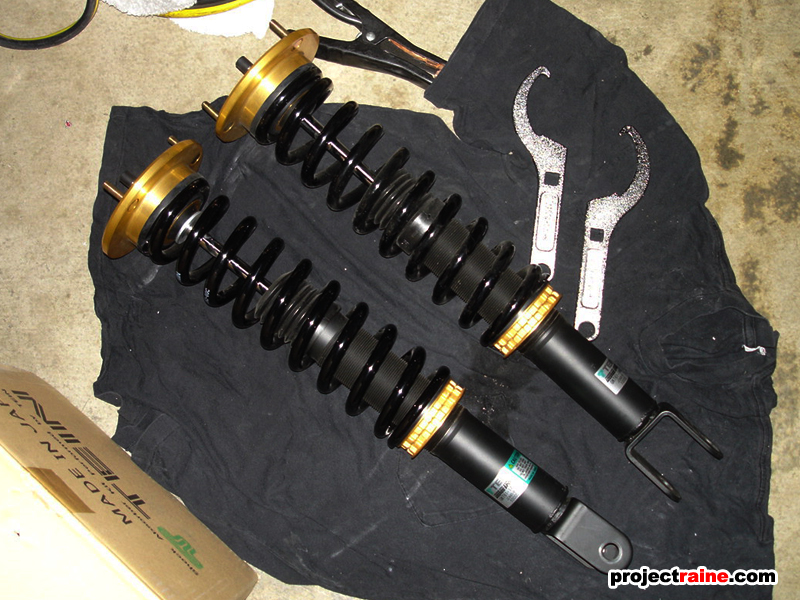
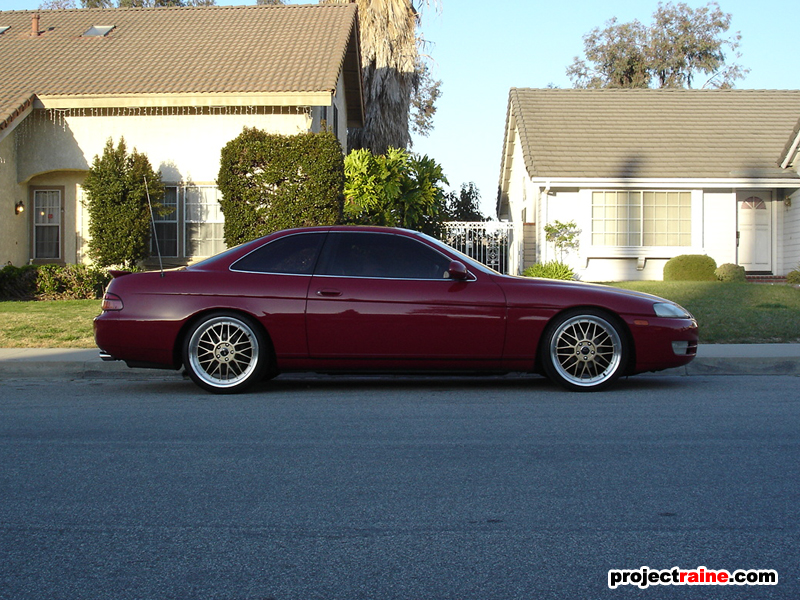
After installing them the first time, the ride was nice and comfortable � as advertised. Turn-in was a little more crisp, there was less dive during braking� but the ride height was high. Back to the garage, I jacked up the car, adjusted the coil overs lower, and then checked the ride height again - still too high. Car went up again, and I dialed the coil overs to the lowest setting as possible � even if the springs weren�t held in place at full extension - and WTF it was still too high for my taste! From the photo above, the CS-T's at lowest setting were almost identical in height to the Espelir ASD setup! No bueno for me, but I had to wait until the next weekend to install the solution.
Comfort Spec
- I finally ordered a set of TEIN CS-T (Comfort Spec) coilovers. Now that I think about it, I'm not sure why I chose these first, maybe the whole "luxury car is comfortable" idea. Anyhow, the CS-T's had mild valving and 10kg/6kg spring rates.
After installing them the first time, the ride was nice and comfortable � as advertised. Turn-in was a little more crisp, there was less dive during braking� but the ride height was high. Back to the garage, I jacked up the car, adjusted the coil overs lower, and then checked the ride height again - still too high. Car went up again, and I dialed the coil overs to the lowest setting as possible � even if the springs weren�t held in place at full extension - and WTF it was still too high for my taste! From the photo above, the CS-T's at lowest setting were almost identical in height to the Espelir ASD setup! No bueno for me, but I had to wait until the next weekend to install the solution.


