Build Threads Details on Club Lexus SC owner vehicles

"Raine's SC300 (KEIRA 2.0) From the Beginning to End."

Old 04-21-16, 11:32 AM
  #436  
raine
Lexus Test Driver
Thread Starter
iTrader: (7)
 
raine's Avatar
 
Join Date: Jun 2006
Location: CA
Posts: 1,515
Likes: 0
Received 16 Likes on 15 Posts
Default

Originally Posted by tiguy99
Amazing car
was. heh
Old 04-22-16, 04:51 PM
  #437  
joe diego
Lexus Test Driver
iTrader: (3)
 
joe diego's Avatar
 
Join Date: Jun 2007
Location: CA
Posts: 951
Received 25 Likes on 16 Posts
Default

Originally Posted by raine
was. heh
I purchased the car because it was in good shape.

But...

To each is own... Function>form.

unnecessary gauges, lights, wheel spacers, poor wiring, fiberglass kit... etc. NA-T ftw.
Old 04-29-16, 07:26 PM
  #438  
jimmymac30
Advanced
iTrader: (8)
 
jimmymac30's Avatar
 
Join Date: Sep 2011
Location: Illinois
Posts: 534
Received 56 Likes on 47 Posts
Default

joe, let's see pics of the car how it sits now... This car was one of the sexiest SC's most of us have ever seen. Would like to see it with your spin on it.
Old 05-07-16, 09:28 AM
  #439  
hknubsauce
Lead Lap
iTrader: (2)
 
hknubsauce's Avatar
 
Join Date: Oct 2006
Location: CA
Posts: 500
Likes: 0
Received 0 Likes on 0 Posts
Default

This was one of the nicer SC builds
Old 02-13-18, 02:01 PM
  #440  
bboyjohn04
Pit Crew
 
bboyjohn04's Avatar
 
Join Date: Oct 2011
Location: CA
Posts: 149
Received 106 Likes on 47 Posts
Default

quick question, how were you able to relocate the tail light bulbs? would like to do this to my 98. I know this is an old thread but any response will be helpful with some tips
Old 02-13-18, 02:05 PM
  #441  
raine
Lexus Test Driver
Thread Starter
iTrader: (7)
 
raine's Avatar
 
Join Date: Jun 2006
Location: CA
Posts: 1,515
Likes: 0
Received 16 Likes on 15 Posts
Default

Originally Posted by bboyjohn04
quick question, how were you able to relocate the tail light bulbs? would like to do this to my 98. I know this is an old thread but any response will be helpful with some tips
Unplug the sockets, move them around to the right spot, plug them back in.
Old 07-07-20, 11:02 AM
  #442  
nlemus12
Driver School Candidate
 
nlemus12's Avatar
 
Join Date: Oct 2014
Location: ca
Posts: 7
Received 1 Like on 1 Post
Default

Originally Posted by raine
08.26.10
Black Out

- Not even one month after the radiator incident, disaster #2 struck: on the way to the market I started hearing a faint, intermittent rubbing noise from the front left area. Before I got into a parking spot it happened – all electronics shut down as if someone removed the battery cable. Worse – no signals, brake lamps weren’t working, and that faint noise was now a loud scratching sound. Turns out my front left tire decided to play tug-of-war on my main harness, and the harness lost! Took me hours to extend, relocate, and rewire the main harness. Such a pain... if you are lowered, I sugest you do the harness relocation job right away.

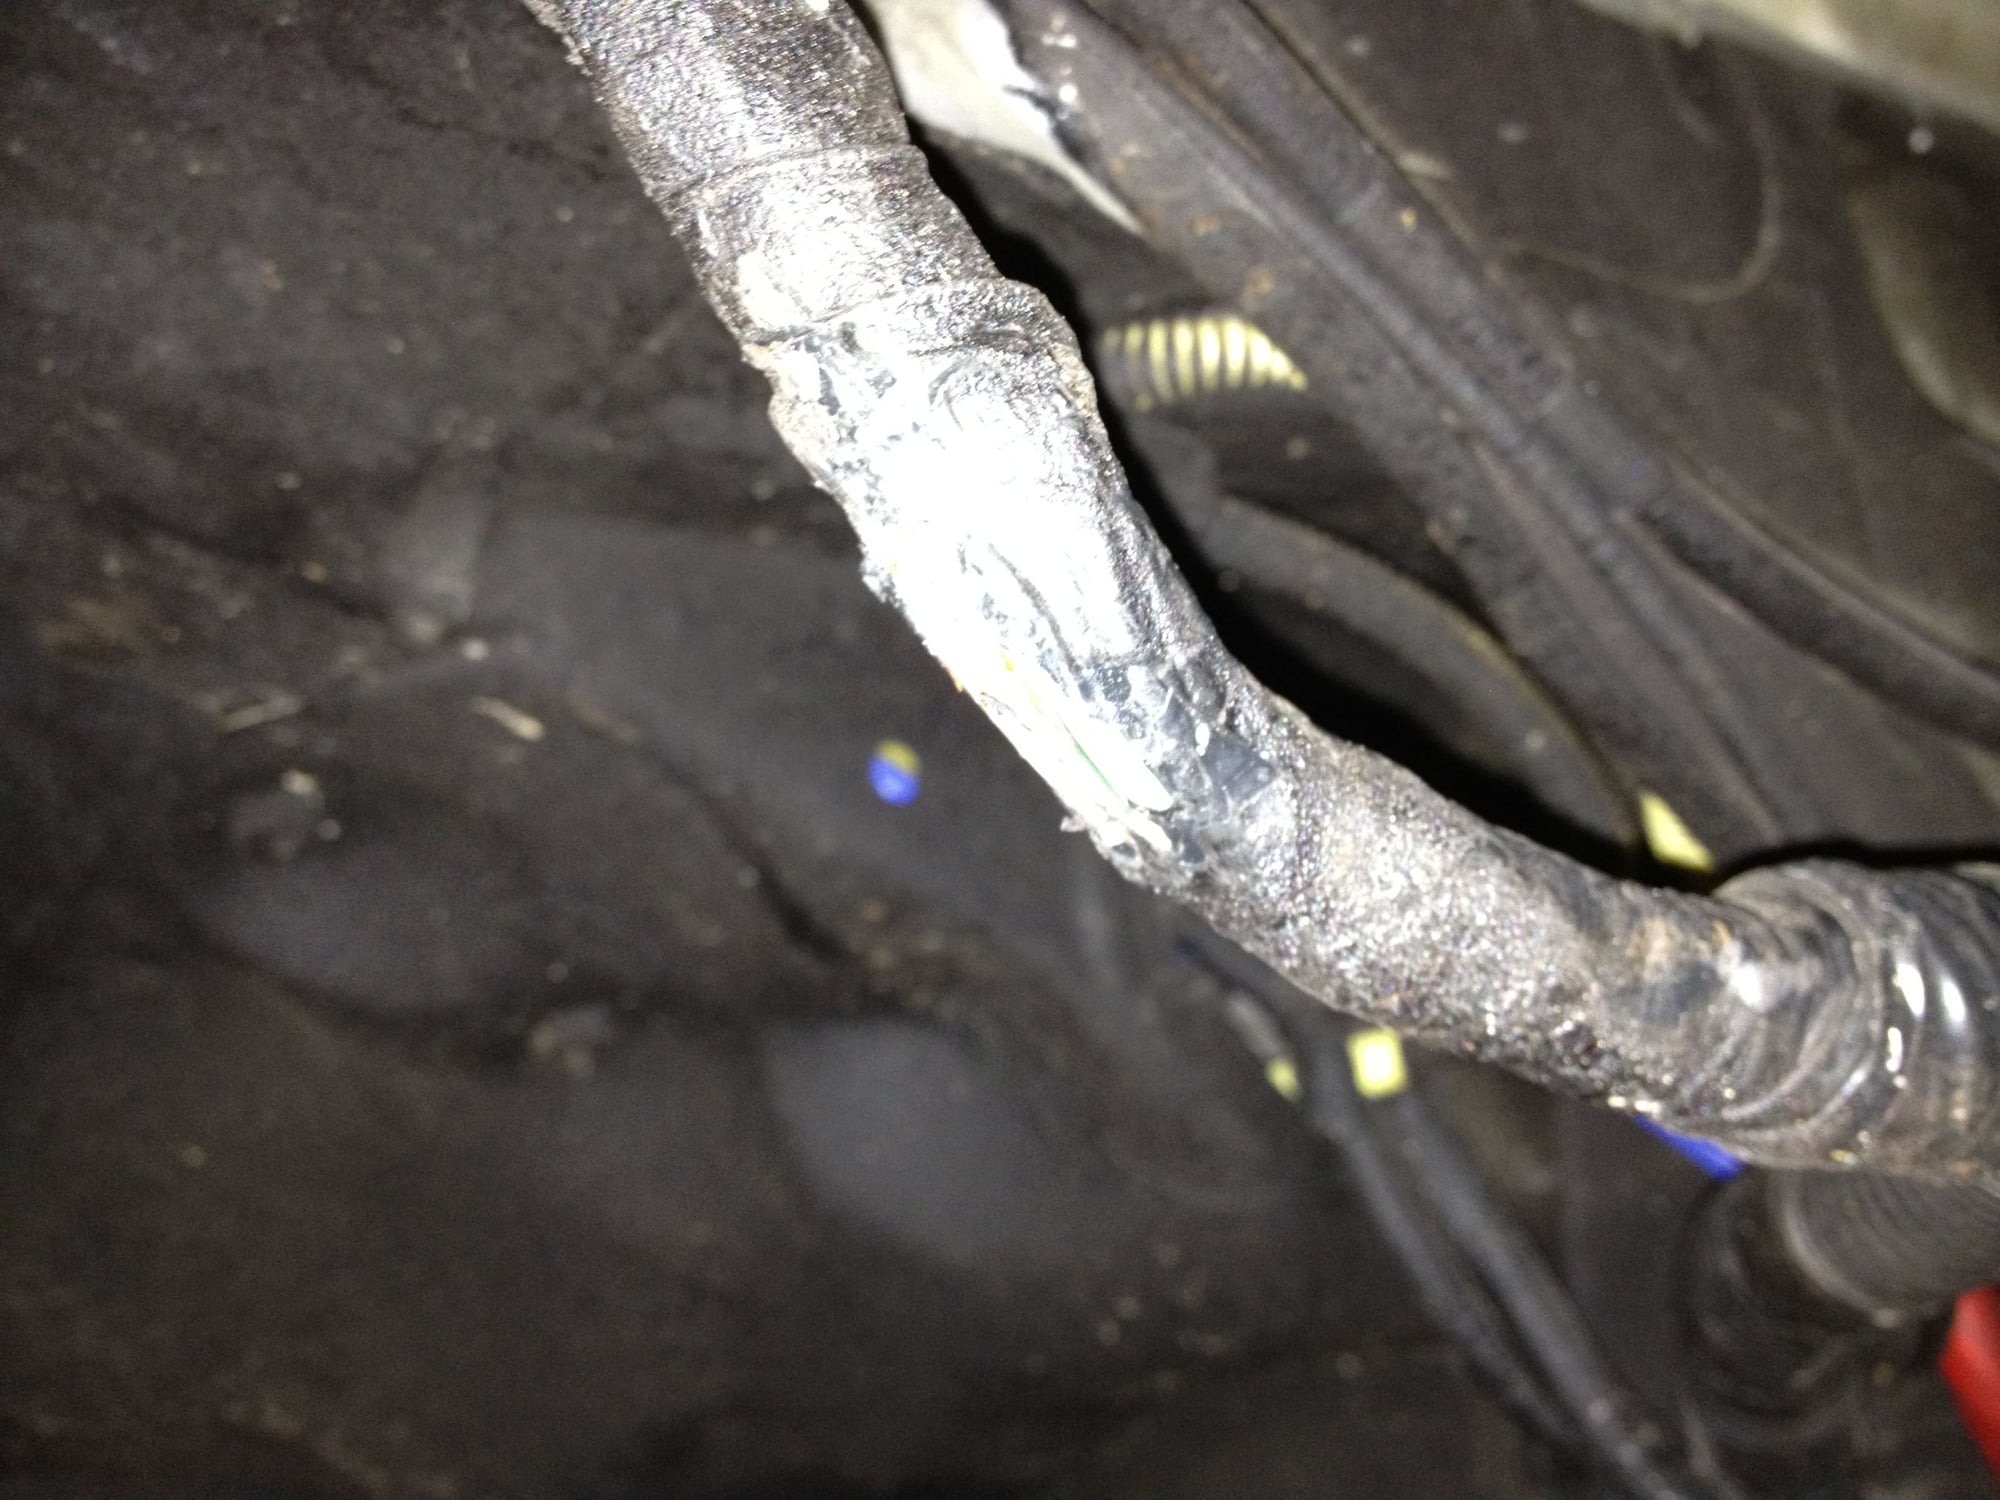
I ran into the same situation and one wire (green) has lost it's insulation. How did you fix exposed wires when this happened to you?
Old 07-07-20, 01:57 PM
  #443  
raine
Lexus Test Driver
Thread Starter
iTrader: (7)
 
raine's Avatar
 
Join Date: Jun 2006
Location: CA
Posts: 1,515
Likes: 0
Received 16 Likes on 15 Posts
Default

Originally Posted by nlemus12
I ran into the same situation and one wire (green) has lost it's insulation. How did you fix exposed wires when this happened to you?
You replace them.
The following users liked this post:
nlemus12 (07-08-20)
Old 07-07-20, 04:04 PM
  #444  
High PSI
Advanced
iTrader: (1)
 
High PSI's Avatar
 
Join Date: Feb 2005
Location: CT
Posts: 655
Received 3 Likes on 3 Posts
Default

Originally Posted by raine
You replace them.
Exactly. And if you've rubbed through one wire, it won't be long before you rub through the others. Best off cutting the whole lot and extending/re-routing it now, or raising your car and painting it with liquid electrical tape until you have time to do so later.


The following users liked this post:
nlemus12 (07-08-20)
Old 07-08-20, 01:19 AM
  #445  
nlemus12
Driver School Candidate
 
nlemus12's Avatar
 
Join Date: Oct 2014
Location: ca
Posts: 7
Received 1 Like on 1 Post
Default

Originally Posted by raine
It did sell as it sat, the buyer parted it out from what I was told
Out of curiosity how much did you sell it for given all the work you put in which in my opinion is amazing
Old 07-08-20, 01:23 AM
  #446  
nlemus12
Driver School Candidate
 
nlemus12's Avatar
 
Join Date: Oct 2014
Location: ca
Posts: 7
Received 1 Like on 1 Post
Default

Originally Posted by High PSI
Exactly. And if you've rubbed through one wire, it won't be long before you rub through the others. Best off cutting the whole lot and extending/re-routing it now, or raising your car and painting it with liquid electrical tape until you have time to do so later.

So you recommend cutting all the wires so I can extend them with 18 awg wires by splicing them together or just the one that got ruined ?
Old 07-08-20, 04:12 AM
  #447  
High PSI
Advanced
iTrader: (1)
 
High PSI's Avatar
 
Join Date: Feb 2005
Location: CT
Posts: 655
Received 3 Likes on 3 Posts
Default

Originally Posted by nlemus12
So you recommend cutting all the wires so I can extend them with 18 awg wires by splicing them together or just the one that got ruined ?
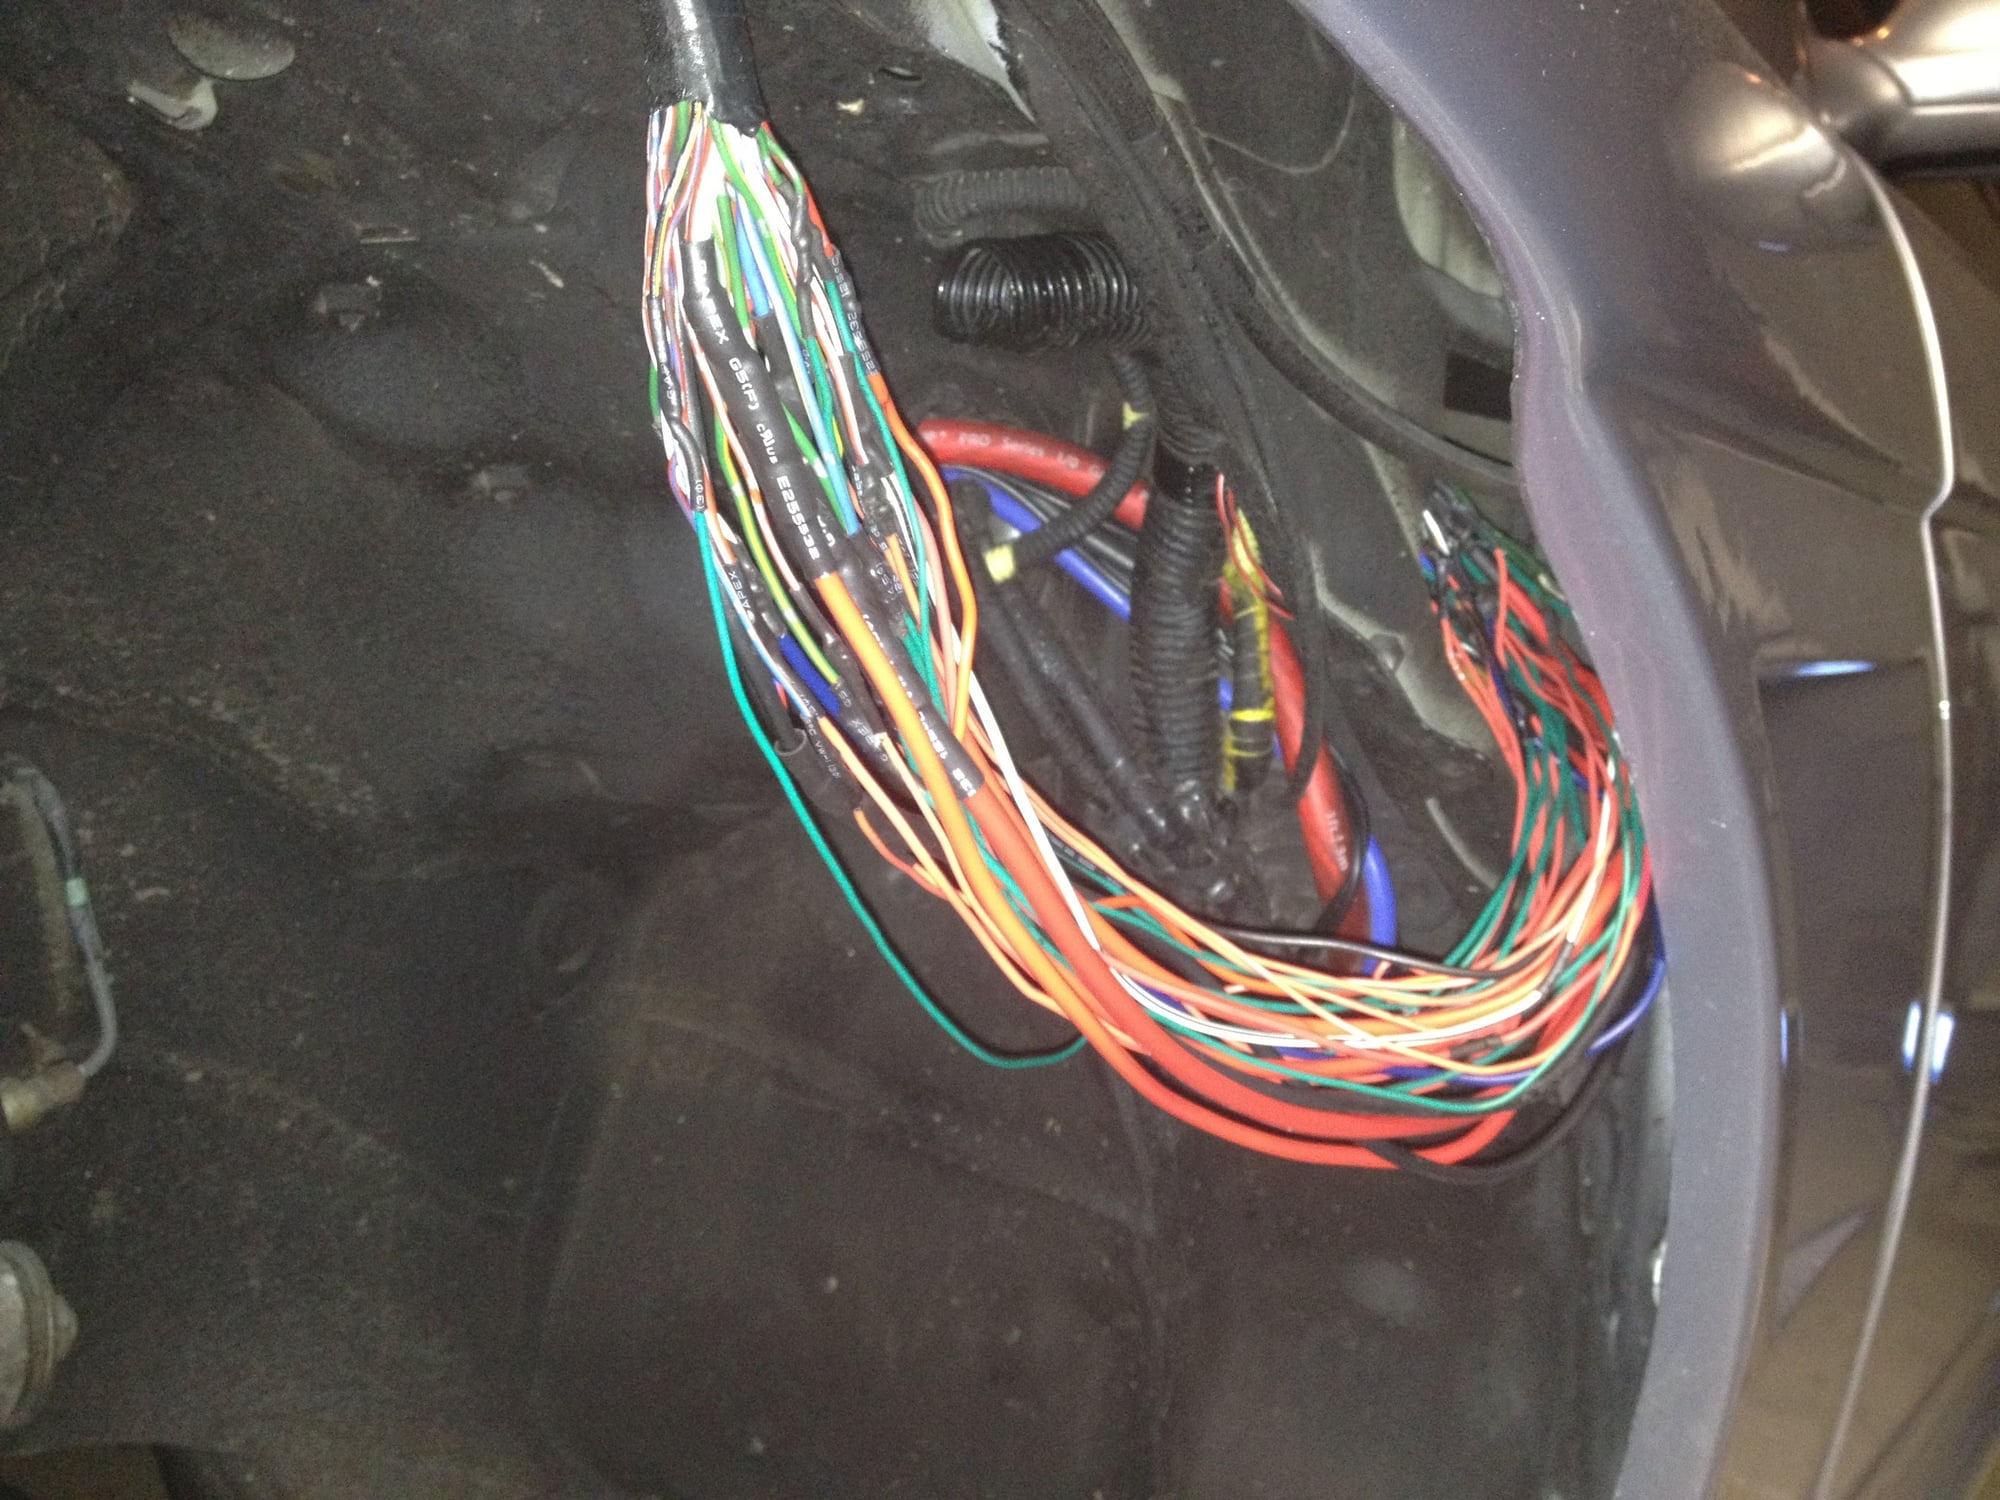
Cut and extend all of them. It's not difficult, just time consuming to do right (I soldered, and then heat-shrunk every single one, then wrapped them all tightly in electrical tape, and covered that in a conduit so it's all water-tight and appears OEM). Just cut them one-by-one and extend with an equal or greater guage wire. Not all will be 18AWG - as you can see from my pic there will be some lower-guage stuff in there as well.

As you can see from my top pic (and you would have seen when you looked at your own harness), they're all packed tightly together. If you're starting to rub through one it is only a matter of time before you rub through them all. So your options are either cut and extend them, or raise your car enough that it doesn't rub. Anything short of those two methods is a band-aid.


The following users liked this post:
nlemus12 (07-10-20)
Old 07-10-20, 12:53 AM
  #448  
raine
Lexus Test Driver
Thread Starter
iTrader: (7)
 
raine's Avatar
 
Join Date: Jun 2006
Location: CA
Posts: 1,515
Likes: 0
Received 16 Likes on 15 Posts
Default

Extend them all, use solder and heatshrink, and reroute the whole thing above the fender in the engine bay. If you just tuck them under the fender eventually they will somehow get sucked up by the tire again - so since you're already cutting and soldering, might as well take the opportunity to relocate it to inside the engine bay like I did.

Then you won't have to worry about the front tire touching the main harness ever again.
The following users liked this post:
nlemus12 (07-10-20)
Old 07-12-20, 07:09 PM
  #449  
High PSI
Advanced
iTrader: (1)
 
High PSI's Avatar
 
Join Date: Feb 2005
Location: CT
Posts: 655
Received 3 Likes on 3 Posts
Default

Originally Posted by raine
Extend them all, use solder and heatshrink, and reroute the whole thing above the fender in the engine bay. If you just tuck them under the fender eventually they will somehow get sucked up by the tire again - so since you're already cutting and soldering, might as well take the opportunity to relocate it to inside the engine bay like I did.

Then you won't have to worry about the front tire touching the main harness ever again.
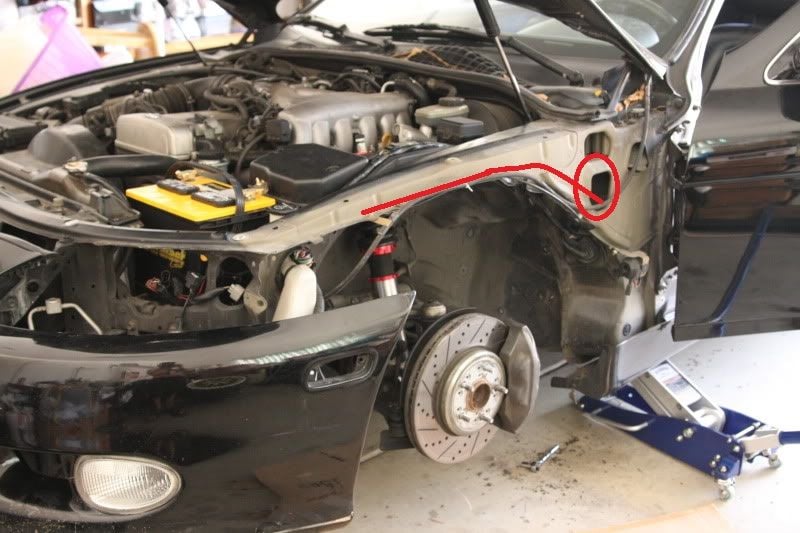
"Above" the fender? Yes. If you come through the hole I circled here, you can run the cabling up above where the fender liner would be, against the body where I've shown the red line (if you look at my pic above, you can see this is where I've brough all of my wiring out of). No chance of the tire sucking the cable up here...but technically you're under the fender itself.


IN the engine bay? I suppose if you don't mind the engine bay looking even more cluttered than it already does. But most people go out of their way to tuck wires out of the engine bay, not bring more in...
Old 07-12-20, 08:26 PM
  #450  
raine
Lexus Test Driver
Thread Starter
iTrader: (7)
 
raine's Avatar
 
Join Date: Jun 2006
Location: CA
Posts: 1,515
Likes: 0
Received 16 Likes on 15 Posts
Default

Originally Posted by High PSI
IN the engine bay? I suppose if you don't mind the engine bay looking even more cluttered than it already does. But most people go out of their way to tuck wires out of the engine bay, not bring more in...
I suppose it would look cluttered if you don't do it right

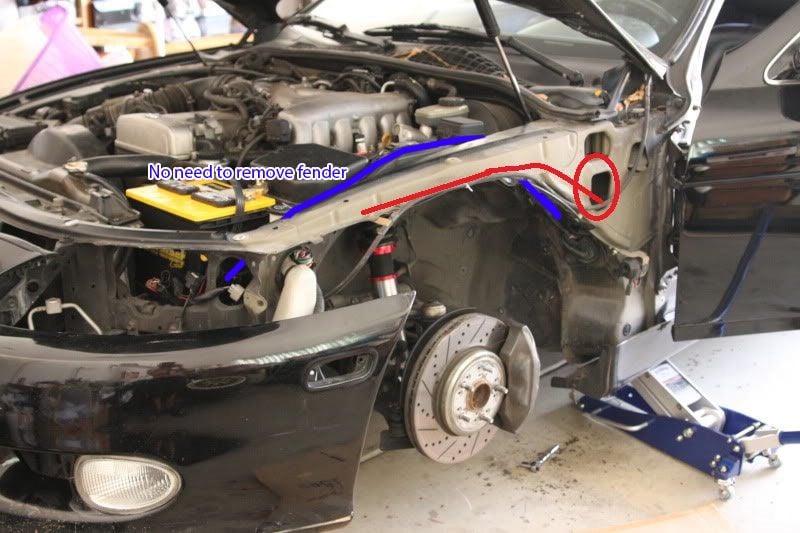
There's room to run the whole harness - including wrap - in the area shown in blue (I used your picture). If you use Tesa tape and wrap it right, most people won't even notice it's there and will think it's part of the other OEM wiring harness that's already there, and with this route 1. you don't have to remove the fender, and 2. like I mentioned in my previous post, it will never have a chance to drop onto a wheel again.


Thread Tools
Search this Thread
Quick Reply: "Raine's SC300 (KEIRA 2.0) From the Beginning to End."


All times are GMT -7. The time now is 05:29 AM.