Exotic1's latest G project!!! Tons of pics during updates


 05-28-12, 08:35 AM
#17
Rookie
Thread Starter

Thanks for the comments guys. Its gonna get better as the build goes. Looking to finish this thing before Import Alliance at Zmax in Charlotte this year. That show is in July so I gotta bust A$$ on it.
As far as installing the factory 3 piece spoiler goes... Well I kinda cheat on those now. This is my 6th spoiler install so I have a template that I made after just doing the 3rd. All I do is sit it on the car and tape it in place. Drill where the holes are and im done.
As far as installing the factory 3 piece spoiler goes... Well I kinda cheat on those now. This is my 6th spoiler install so I have a template that I made after just doing the 3rd. All I do is sit it on the car and tape it in place. Drill where the holes are and im done.
 05-29-12, 08:40 PM
#19
Rookie
Thread Starter
just got the fittings done in the valve covers to attach the -10an lines to the breather. Gonna look bada$$. I will post a how to on this as well. Rather quick and easy way to do this w/o needing a welder. Also try to find a tap for a 1/2 pipe thread fitting. About $90.00 from the store so I made my own. Any questions hit me up. Later guys.
05-29-12, 09:04 PM
#20
Rookie
Thread Starter
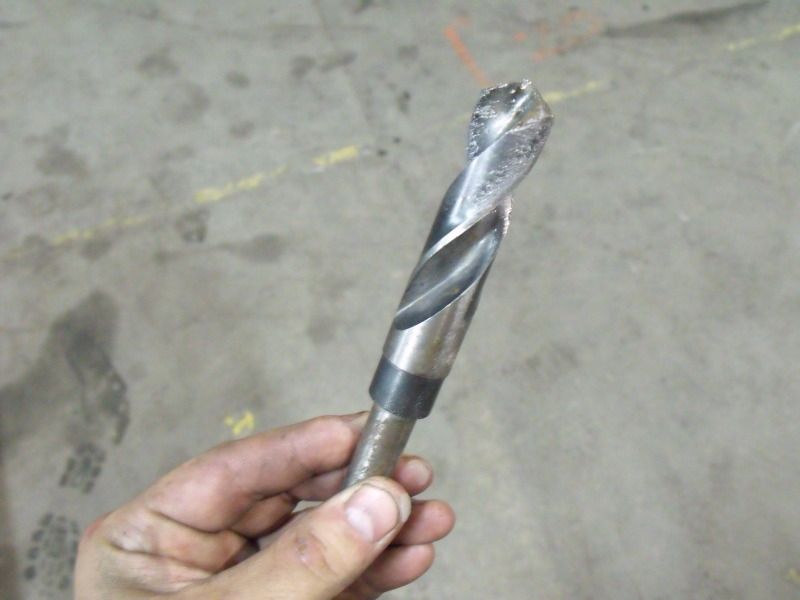
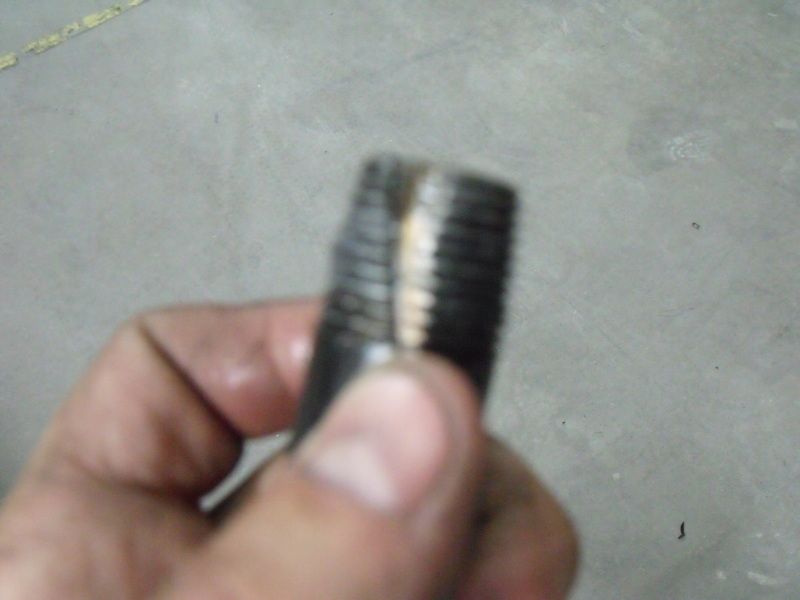
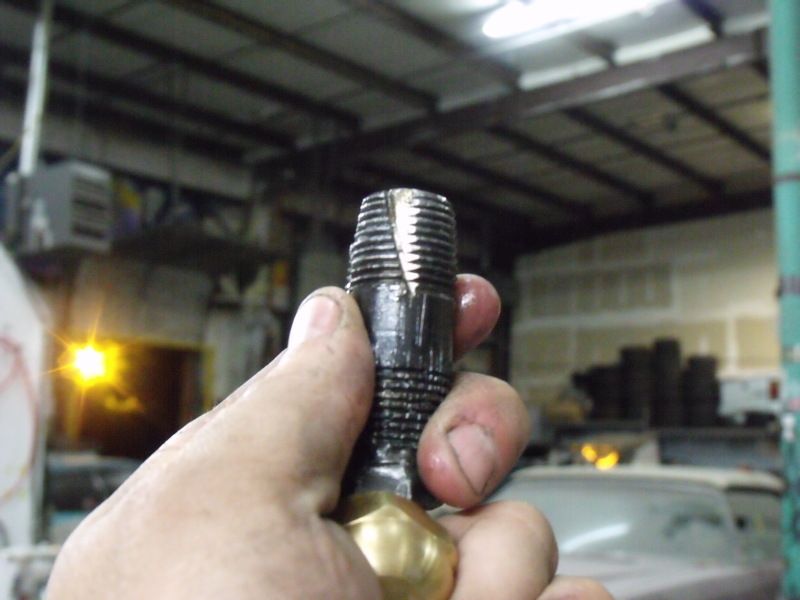
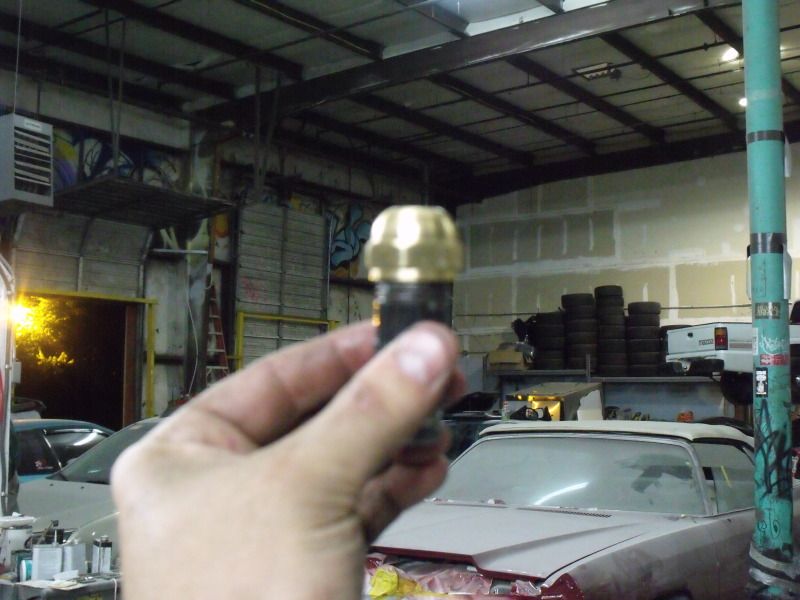
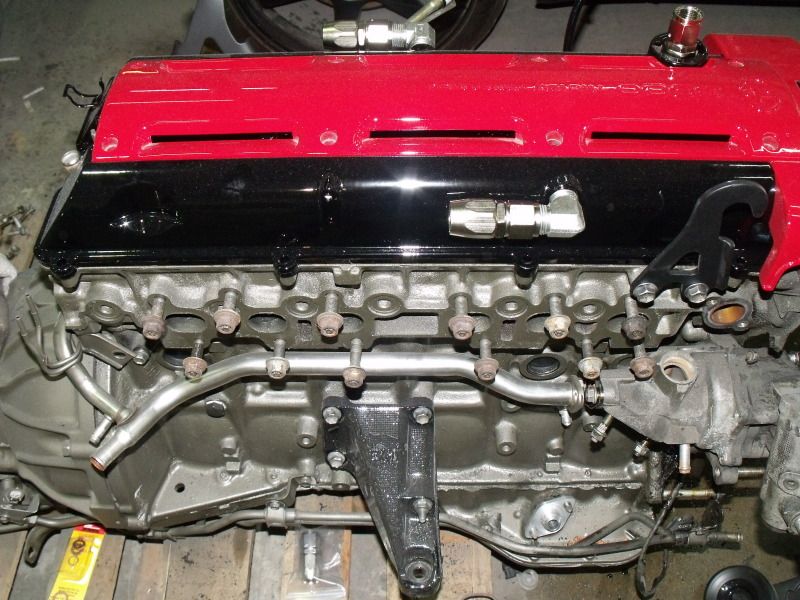
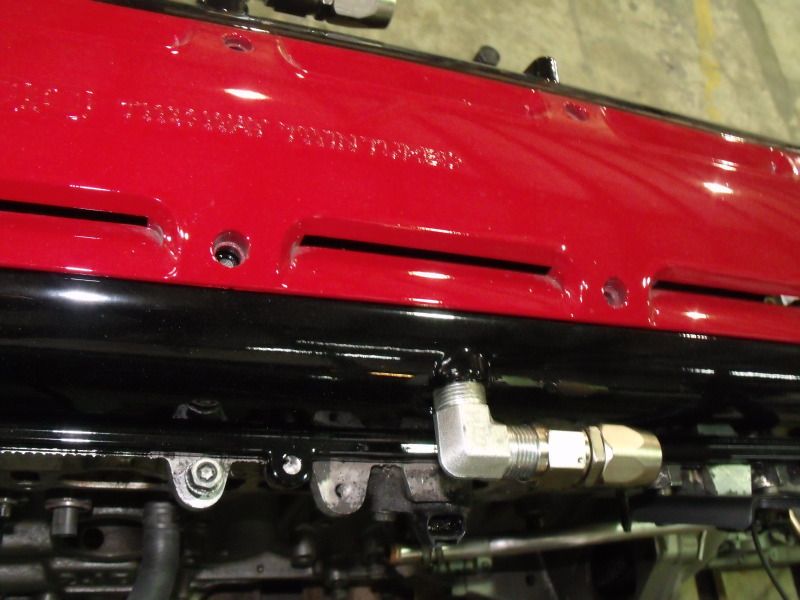
OK so here is a basic write up of how I did the valve covers. Rather than take the time to order alum. bungs and tig them into the valve covers I opted to try an easier way to do this. Also thought it would be less expensive. Well when I got into it I figured out a tap for a 1/2 pipe thread was about 90.00 so I had to figure something out. Went back to the old Nascar fab days and headed to Lowes for a threaded 1/2 pipe nipple. Got a two sided male nipple from Lowes for about $2.00 also a 1/2 pipe female cap for about $3.00. Came back to the shop, put some vise grips on it and went to town. Take a grinder with a cutting wheel on it and make three 45 degree cuts in one side of the nipple. After making the three cuts on the one side, thread the cap onto the other (Revised DONT use a brass cap, get a steel one...). This way you can get a wrench, socket, etc on it for torque. I have some pics posted. So all I used was a drill bit for the 1/2 pipe thread hole, a 1/2 pipe thread double male nipple, and a 1/2 pipe thread female cap. Turned out great. I am using -10an to 1/2npt 90's off the valve covers to keep them tight to the covers. Hate how far out those 90 fittings are after you use a straight on the valve covers. Anyway heres what I ended up with.
Last edited by Exotic1; 05-29-12 at 11:40 PM.
05-29-12, 09:23 PM
#21
Rookie
Thread Starter
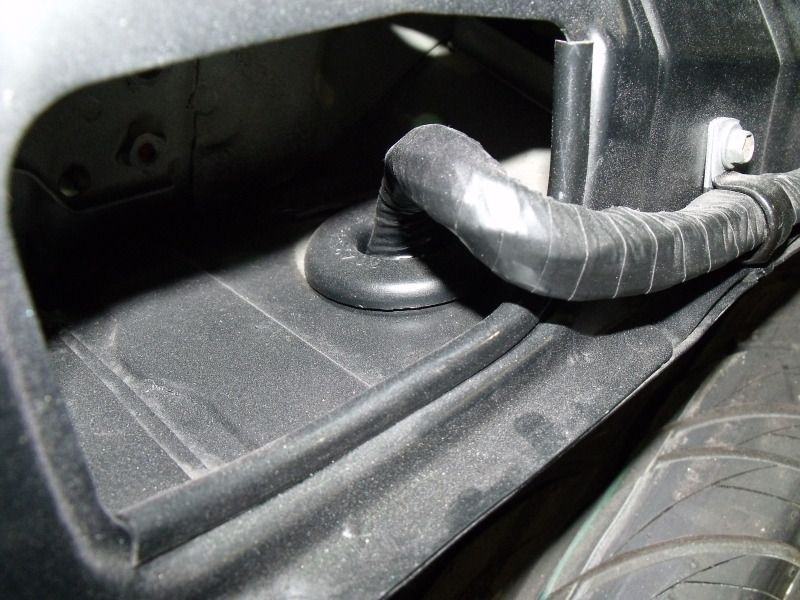
Also today finished up wire tuck/relocation for a cleaner engine bay and less rubbing from the tires!!! This is how we did it here at the shop. Factory holes used with a few large grommets to prevent rubbing the wires. Also rubber coated P clips to hold wires in place w/o rubbing. Finally used some rubber edging for the same reasons. You can see exactly what I mean in the pics. Will post those tonight as well.
05-29-12, 11:35 PM
#22
Rookie
Thread Starter
Here are the pics of the wire tuck/relocation that I have started. Removed any and all wiring that will not be needed in the engine bay and re-taped the full harness. Uses stock holes into the upper rail but I installed a large grommet to keep wiring safe. Also rubber tipped clips for the same reason down the side of the rail. If you look close I have split rubber on the edges anywhere wires could possibly touch just in case. Alittle overboard but hey it aint gonna fug up now. Also went ahead and got a shot of the new motor mounts we got in tonight. Also glass beaded two small motor mount heat shields and popped those on. I know the driver side doesnt have one from the factory but I have extras so what the hell...
Excuse the dust in the pics. It wont be there when the motor goes in
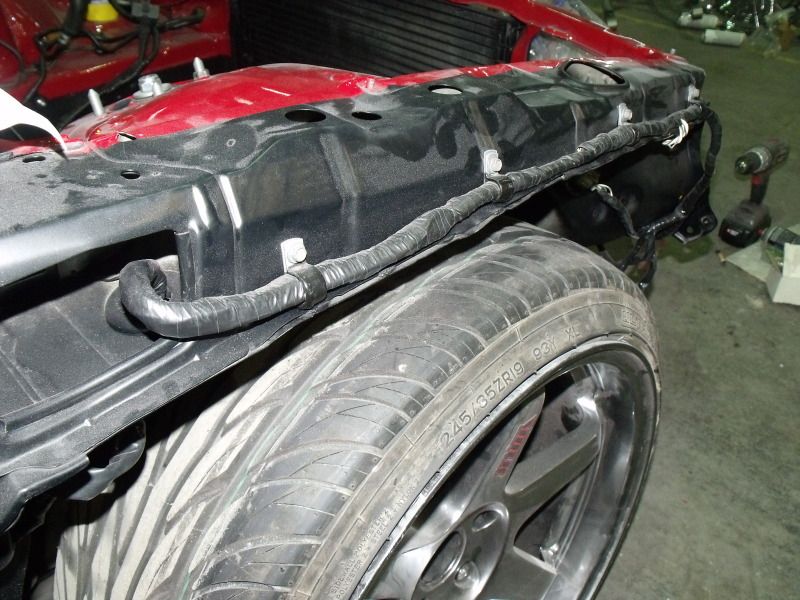
Excuse the dust in the pics. It wont be there when the motor goes in
Last edited by Exotic1; 05-29-12 at 11:41 PM.
 05-30-12, 07:43 AM
#25
Rookie
Thread Starter
Yea it turned out nice. Use whatever you guys need. I dont have that one trade marked yet so your good  Thats the cleanest and safest way I have found and I have done lots of em. Looks great, and is pretty much fool proof once its done as far as tearing ***** up later. Thanks guy
Thats the cleanest and safest way I have found and I have done lots of em. Looks great, and is pretty much fool proof once its done as far as tearing ***** up later. Thanks guy
05-30-12, 11:48 PM
#26
Rookie
Thread Starter
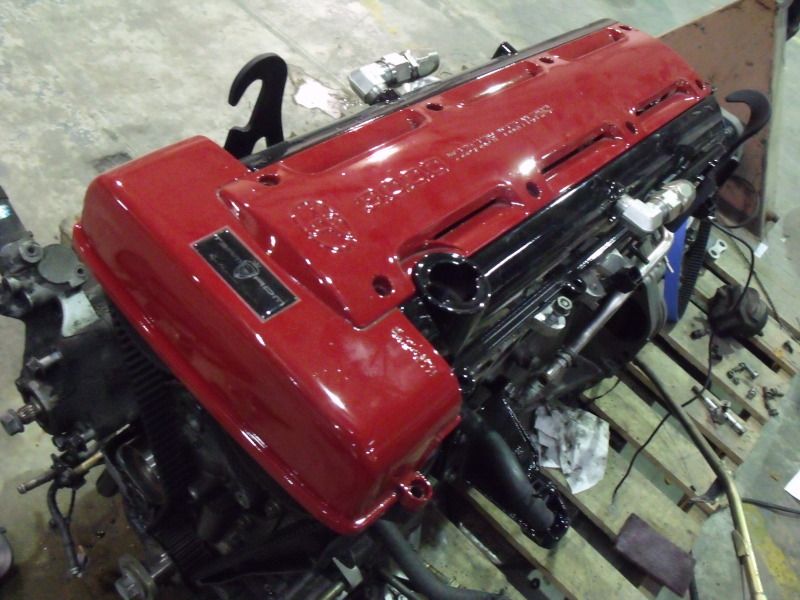
A few more pics of the powder coated valve covers with the 10an fittings installed. These are not completely tight yet, just here for the pics. Also front covers are being painted this week at some point. Waiting on new Supra water pump before I can get everything together. Enjoy the pics
Also a little teaser of the smoked JDM headlamps.
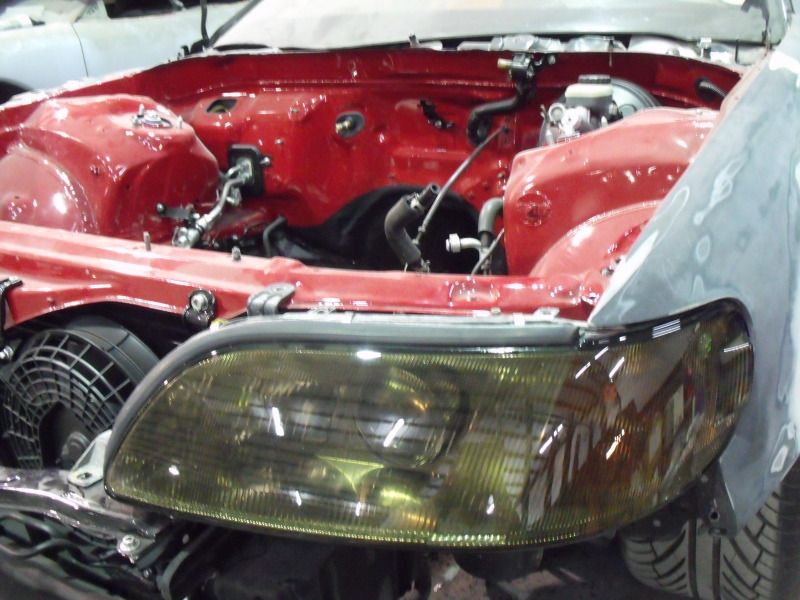
Smoked lights look better in person. Lighting in the shop is not the greatest.
Also a little teaser of the smoked JDM headlamps.
Smoked lights look better in person. Lighting in the shop is not the greatest.
 05-31-12, 03:19 PM
#28
Lexus Champion

Join Date: Jan 2003
Location: GA
Posts: 2,537
Likes: 0
Received 0 Likes
on
0 Posts
Nice progress. Can't wait to see her all done up. Your first GS was on point. Are you still friends with the "friend" who talked you into selling it, lol? If it's anything like Zeb's 2nd gen GS, this is gonna be hot!!!
05-31-12, 08:10 PM
#29
Rookie
Thread Starter
Yeah we did Zeb and Steves cars here at the shop. They turned out bada$$. Zebs car is winning stuff all up and down the East Coast. Gotta do a first gen since I wont be able to compete w his sorry a$$. haha Anyway more pics to come soon. Later guys and thanks
05-31-12, 10:54 PM
#30
that last pictures kind of crazy. The sand marks almost look like a gloss to me. Like its a flat grey with clear. Similar to the cement grey offered on the new TC in overcast lighting. I only worked a 14 hour day of driving, but that made me really look at it for a few minutes.
Getting my popcorn ready
Getting my popcorn ready