Lexus RX350 3.5L NAP (Made in Canada) 2008 Spark Plug Change
 12-26-11, 08:17 PM
#1
Driver School Candidate
Thread Starter

Join Date: Dec 2011
Location: IN
Posts: 21
Likes: 0
Received 0 Likes
on
0 Posts
Lexus RX350 3.5L NAP (Made in Canada) 2008 Spark Plug Change
For convention/orientation purposes, I have designed the "left" side of the engine the passenger's side, and the "right" side of the engine the driver's side. This is how it looks when you look at the engine standing in front of the car.
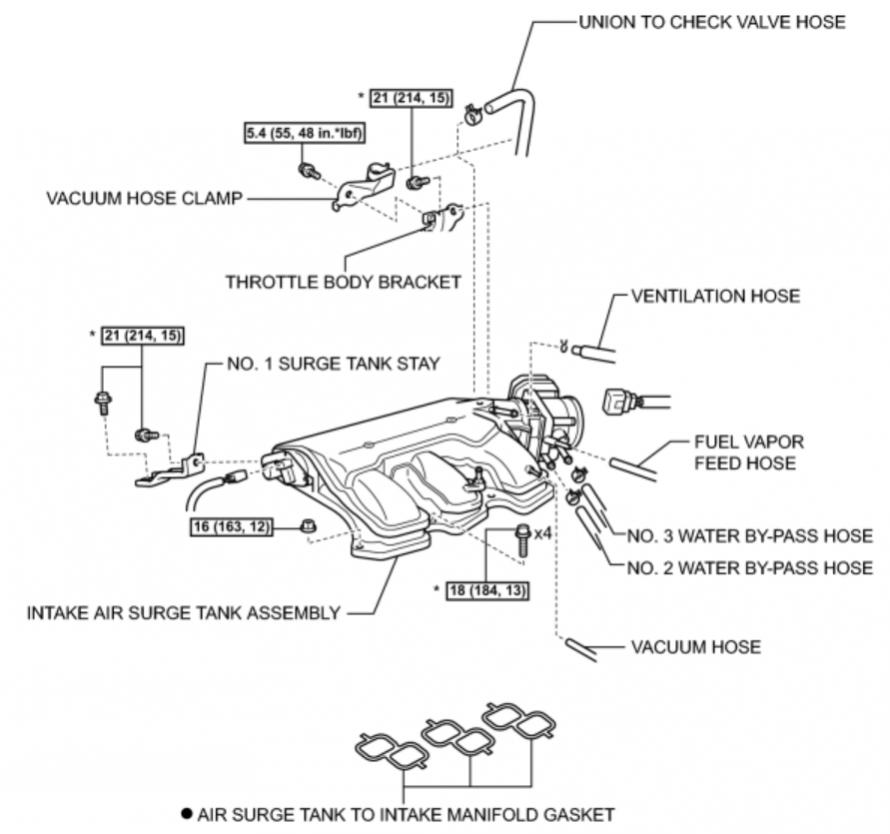
1. Remove V-bank plastic engine cover. This should just pop off by pulling it up. Remove the plastic cover (engine compartment cover) on the left side of the engine. You can remove the small (4) plastic clips by pushing a small allen wrench into the center post. This is discussed in the included manual for the car. Loosen clamp with 10mm socket and remove the large rubber hose/tube attached to right of the throttle body. Remove the (3) hoses attached to the front of the intake manifold and one in the back of the intake manifold. As shown in the diagram, the first small hose attached to the front right of the intake manifold is a vacuum hose. The next hose to the right is ventilation hose. The last hose to the right is vapor feed hose. This is located near the throttle body. The hose in the back is the union to check valve hose. I will refer to these hoses as "vacuum" hoses. Be sure to remember where each hose attaches. Taking photographs with an iPhone makes this a lot easier to remember.
2. Remove the four 10mm bolts securing throttle body to intake manifold. A small plate/bracket attached to the lower anterior bolt. Note or photograph the positioning of this plate on the throttle body prior to or during removal.
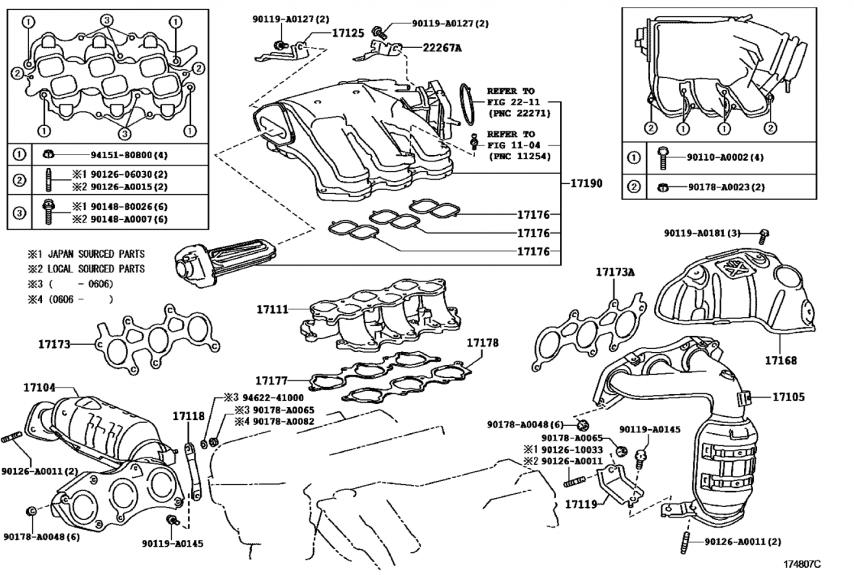
3. Move throttle body out of the way to make room for access to the two 13mm bolts behind the intake manifold. I did not remove the coolant hoses (water by-pass hoses) or the electronic connector attached to the throttle body. Be careful not to disrupt the throttle body gasket. The replacement throttle body gasket is 22271-0P020. Do not stretch the attached wiring. Be careful not to lean on various connectors, hoses, and wires while working.
4. Before loosening the (4) 5mm hexagonal bolts and (2) 10mm nuts securing the intake manifold, first remove the (2) 13mm bolts securing the back portion of the intake manifold. One of the 13mm bolts attached to the lower back of the intake manifold is located near the throttle body on the right. This is called the throttle body bracket in the above diagram. The other 13mm bolt is located along the lower back of the intake manifold near the electronic connector on the left. This is called the surge tank stay no. 1 bracket. The leftmost posterior bolt is extremely difficult to loosen and remove without removing the windshield cowl and assembly. I did not remove the windshield wiper cowl and assembly. I squeezed my right arm through the same opening near the throttle body side. I was only able to use a few fingers to anchor the wrench onto the bolt. I used my left hand to torque the bone wrench (combination wrench, open and closed ends). I was unable to use a 13mm socket wrench. There was not enough space to fit the lowest profile 13mm socket. I ended up using a conventional 13mm bone wrench (combination wrench, open and closed ends). If I could do it again, I would use a GearWrench Flex Head Metric 13mm Wrench with 180 degree flex head available at Sears, part number 44006. This will allow you to anchor the wrench once and loosen the bolt without repositioning. Do not use the gear bone wrench with two different sizes on each end given the wrench will not fit in the very tight space. I also used a small stepping stool to reach back to access the bolts. A large standing light illuminated the work area. Do not attempt to remove the other bolts and nuts anchoring the intake manifold until you can remove these two posterior 13mm bolts. One guy on this forum was unable to complete the job given he was unable to find and remove one of these bolts. You can attach a string to the wrench if you are worried about dropping it behind the intake manifold. Again, you will NOT be able to remove the intake manifold until you remove both of these 13mm bolts.
5. After successfully removing the two bolts behind the intake manifold, you can now remove the (4) 5mm hexagonal bolts and (2) 10mm nuts. Carefully lift up the intake manifold (also known as the intake air surge tank assembly) without disrupting the intake manifold gaskets. The (3) replacement intake manifold gasket part number is 17176-0P020. I moved the intake manifold out of the way without disconnecting the connector on the left side (passenger's side) of the intake manifold. Be sure not to stress or tug on the attached wires. The (3) rear induction coils are now visible. Clean the manifold interface without dropping any debris into the engine. Do not smoke or expose sparks in the work area. You'll be sniffing a bit of gas till you reattach the intake manifold. Work in a well ventilated area.
6. Leftmost Induction Coil: You will then have to remove the (2) brackets and (1) plastic cable mounting to access the induction coils. The left most bracket is again called surge tank stay no. 1 bracket. This bolt overlies the leftmost rear induction coil. The bolt securing this bracket can be partially loosened to allow the bracket to swing out of the place without completely removing the securing bolt.
7. Middle Induction Coil: A larger bracket (not attached to the intake manifold) overlies the middle induction coil. Completely remove the lower bolt. This will allow you to move this bracket out of the way to access the rear middle induction coil.
8. Rightmost Induction Coil: A plastic mount surrounds a large bundle of wires/cables. This plastic bracket wraps around the cables and is secured by one bolt. Remove this bolt to access the rear rightmost induction coil.
9. Remove the electronic connectors from the induction coils. I removed the connectors while the induction coils remained bolted in place for support. I had to use a very small screwdriver to help pry up the locking portion of the connector while I pressed back on the back of the connector with my right hand thumb. It was very difficult to remove the connector without the use a small screw driver prying up the connector latch. Practice this technique with the front three induction coils to get a feel for this.
10. Remove the 10mm bolts securing the induction coils. Be very careful and slowly remove the induction coils. I had to use the rubber covered handle of a pair of pliers to pry out and lift out the induction coils. Again, be careful not to damage the induction coil assembly. Ideally, you can test each induction coil assembly before reinstalling the induction coils.
11. Using a combination of a spark plug socket 16mm, extension, and "swivel", that is, universal joint set, remove each of the spark plugs. I bought most of these tools from Harbor Freight for cheap. Be sure to seat the socket completely on the spark plug. This is extremely important. You can break the plug which can result in possible major damage. Take you time and "feel" the socket engage the spark plug. You can get this "feel" by trying this on the new separate plugs. Mine were partially rusted in the block. It was very difficult to remove the plugs. I took my time with appropriate rest. Were the plugs coated with some anti-seize compound at the factory? Inspect each removed plug to insure that they are intact with no broken parts.
12. Install the new sparks plugs. I used (6) Denso FK20HR11 Iridium plugs. You can also use NGK IFR6A11 spark plugs. These are good for 120K miles. I used some anti-seize compound on each plug's threads. Wipe of the excess without getting any on the electrodes. First screw in the new plug by hand with the extension without the socket wrench to feel the spark plug engage the threads of the socket. Tighten to spec, 18Nm, 13ftlbf.
13. Reinstall induction coils with careful positioning of the securing bolt hole of the induction coil over mounting hole on the engine. You can use some anti-seize compound on these bolts as well. Tighten the bolts to spec, 10Nm, 7ftlbf.
14. Reinstall the electronic connectors to induction coils.
15. Reinstall the two metal brackets and cable mount overlying the induction coils.
16. Reinstall the intake manifold without disrupting the intake manifold gaskets. Tighten bolts and nuts to spec.
(4) 5mm Hexagonal Bolt: Torque 18Nm, 13ftlbf.
(2) Nut: 10mm, 16Nm, 12ftlbf.
(2) Bolt: 13mm, 21Nm, 15ftlbf.
Reattach the rightmost posterior bolt (throttle body bracket bolt) to the intake manifold. I decided not to reattach the leftmost posterior bolt (surge tank stay no. 1 bracket) near the left side of the intake manifold. This will allow for an easier change the next time I replace my spark plugs. You can also cut a slot in the top of this bracket that will allow you to partially loosen and tighten the bolt without completely removing it. Either way, with the (4) Hex Bolts, (2) 10mm nuts, and rightmost posterior 13mm bolt, the intake manifold should be adequately secured.
17. Reinstall the throttle body to the intake manifold with the (4) 10mm bolts. Be careful not disrupt the throttle body gasket.
18. Reattach (3) anterior "vacuum" hoses to the intake manifold. Reattach the hose along the back of the intake manifold.
19. Reattach large rubber hose/tube to the throttle body and tighten with the 10mm clamp.
20. Replace (3) front spark plugs, similar to the procedure described above. Reinstall engine covers.
21. Now turn the ignition to ON without starting/turning the engine and pump the gas pedal several times to refill the chamber with gas. The engine will not restart without doing this.
22. Let car idle for several minutes to insure proper operation.
23. You will likely have to disconnect the battery and reconnect it at a later time to "reprogram" the engine to the new spark plugs. You may notice decreased mileage per gallon if you don't reinitialize the computer. Be sure to reinitialize the windows, sunroof, and back hatch as has been discussed in this forum after disconnecting the battery.
I will try to post pictures of this process later in the week.
Good luck.
Rich


 12-27-11, 04:24 PM
#5
Driver School Candidate
Thread Starter
Join Date: Dec 2011
Location: IN
Posts: 21
Likes: 0
Received 0 Likes
on
0 Posts
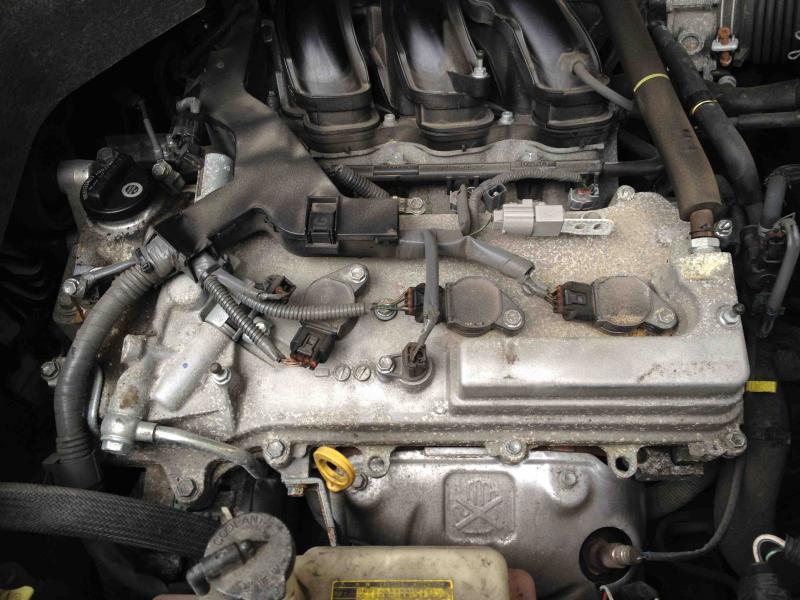
Overview of the engine

Right side of the throttle body showing (4) 10mm bolts. You need to first remove the large rubber air hose to access the 4 bolts. Again, I did not disconnect the two coolant hose or the throttle body electronic connector.

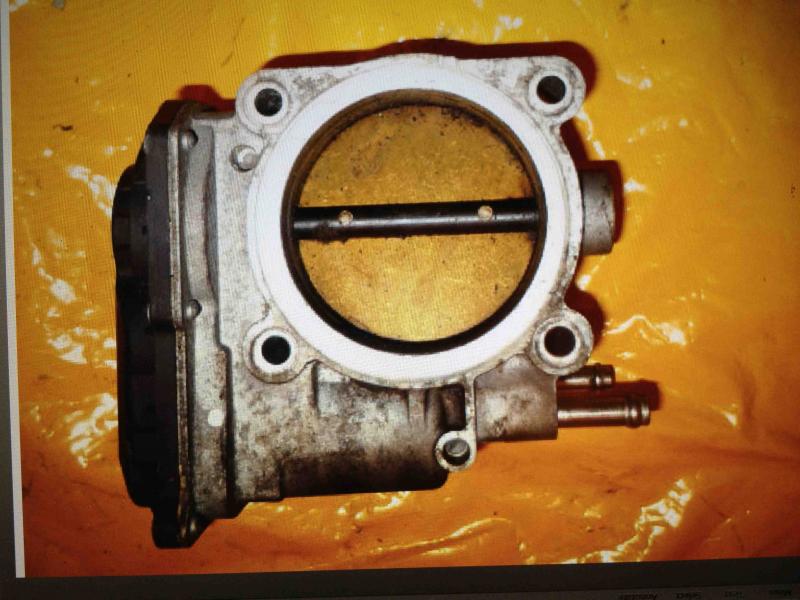
Views of the throttle body. I took these images from pics on Ebay.
View of the back of the intake manifold showing one of the hoses ( union to check valve hose).
12-27-11, 04:40 PM
#6
Driver School Candidate
Thread Starter
Join Date: Dec 2011
Location: IN
Posts: 21
Likes: 0
Received 0 Likes
on
0 Posts
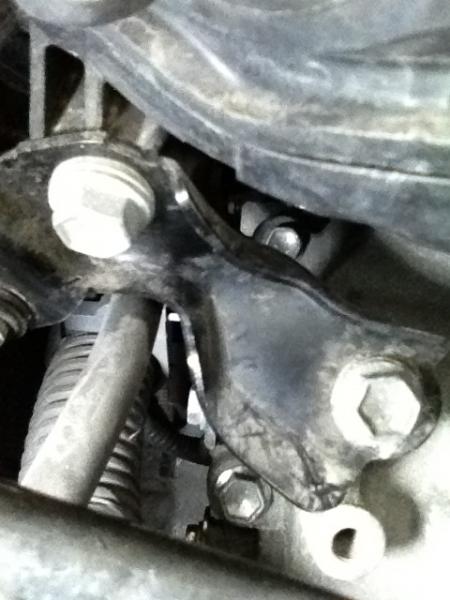
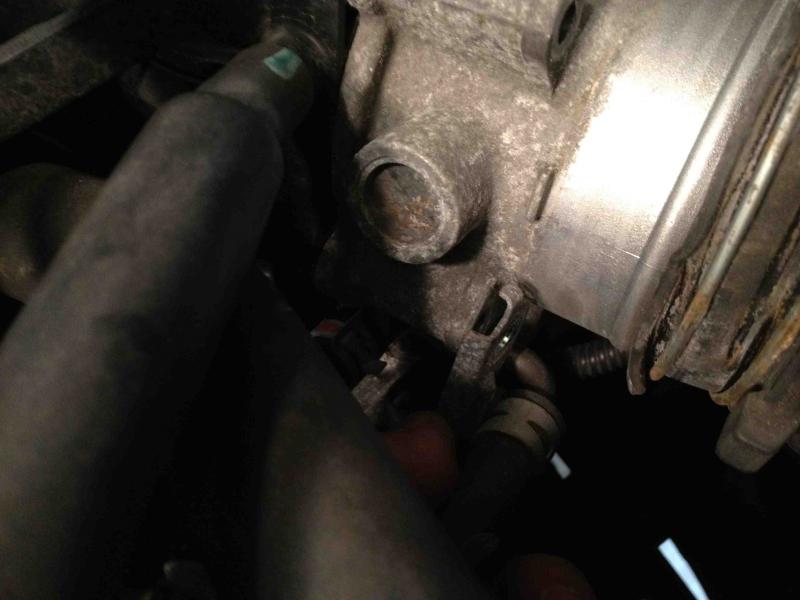
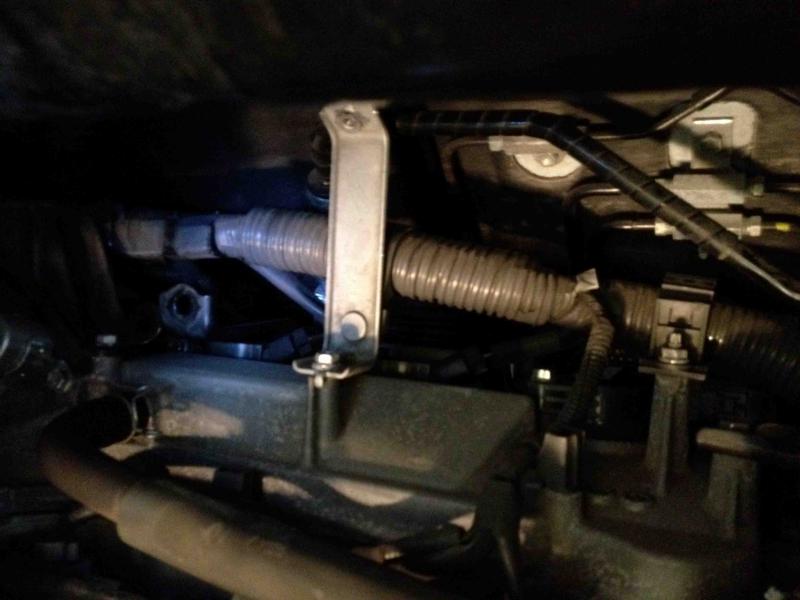
View of the throttle body bracket and bolt behind the intake manifold. I did not get a pic of the surge tank stay no. 1 bracket. Please refer to the diagrams above.
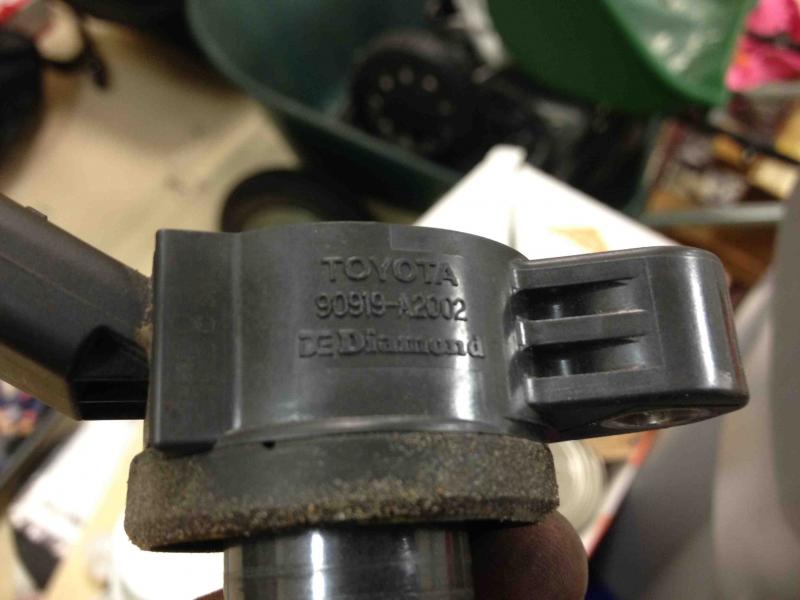
View of one of the induction coils, part number 9019-A2002.

View of the connector on the left side of the intake manifold. Again, I did not disconnect this. There was plenty of cable that allowed me to move the intake manifold out of the way without disconnecting this connector.
View of the hoses attached to front of the intake manifold. As shown in the diagram, the first small hose attached to the front right of the intake manifold is a vacuum hose. The next hose to the right is ventilation hose. The last hose to the right is vapor feed hose. This is located near the throttle body.
12-27-11, 04:48 PM
#7
Driver School Candidate
Thread Starter
Join Date: Dec 2011
Location: IN
Posts: 21
Likes: 0
Received 0 Likes
on
0 Posts
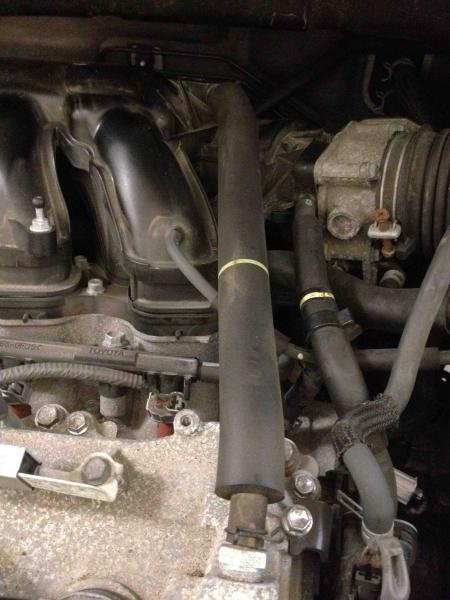
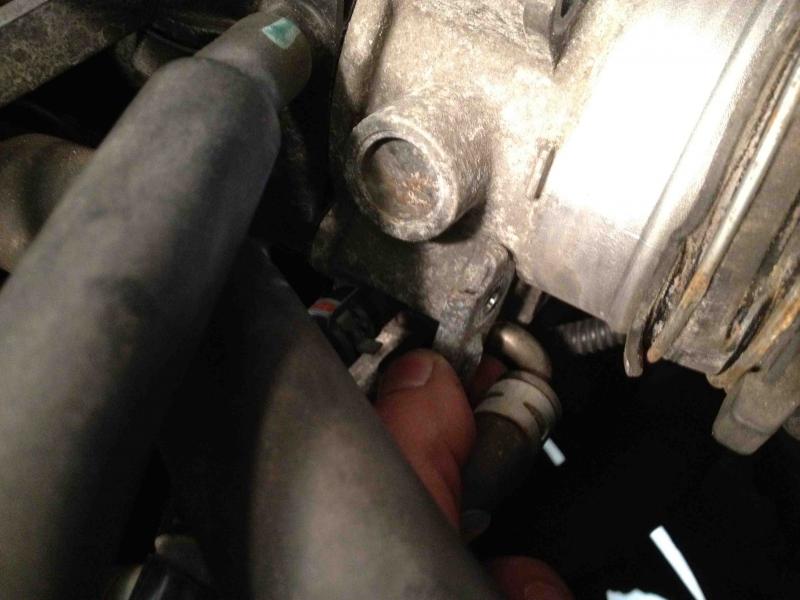
View of the coolant hoses attached to the throttle body. I did not disconnect these. I simply moved the throttle body out of the way.

Another view of the connector on the left side of the intake manifold.
Trending Topics

 12-27-11, 04:58 PM
#9
Driver School Candidate
Thread Starter
Join Date: Dec 2011
Location: IN
Posts: 21
Likes: 0
Received 0 Likes
on
0 Posts

View of my 13mm bone wrench used to loosen and remove the bolt attached to the surge tank stay no. 1 bracket. I had to gently tap the wrench with a hammer to loosen the bolt.
Two views of the small bracket attached to the lower front bolt of the throttle body.
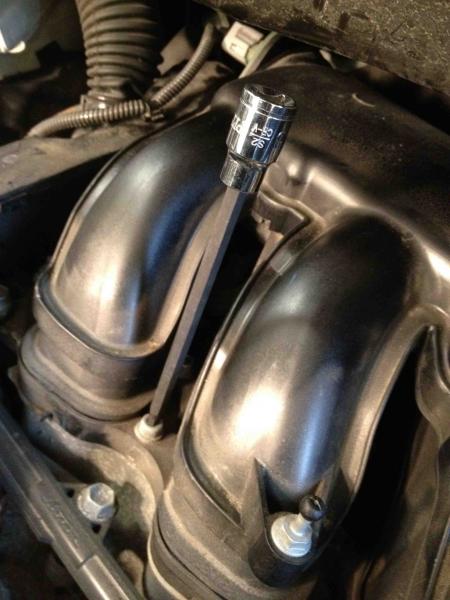
[ATTACH]231595[/ATTACH
View of a 5mm long allen wrench socket bought at Harbor Freight.
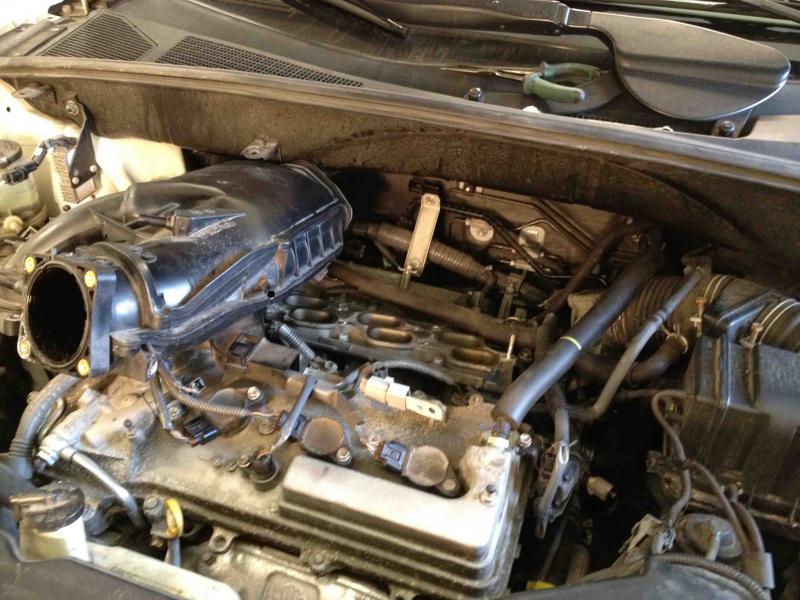
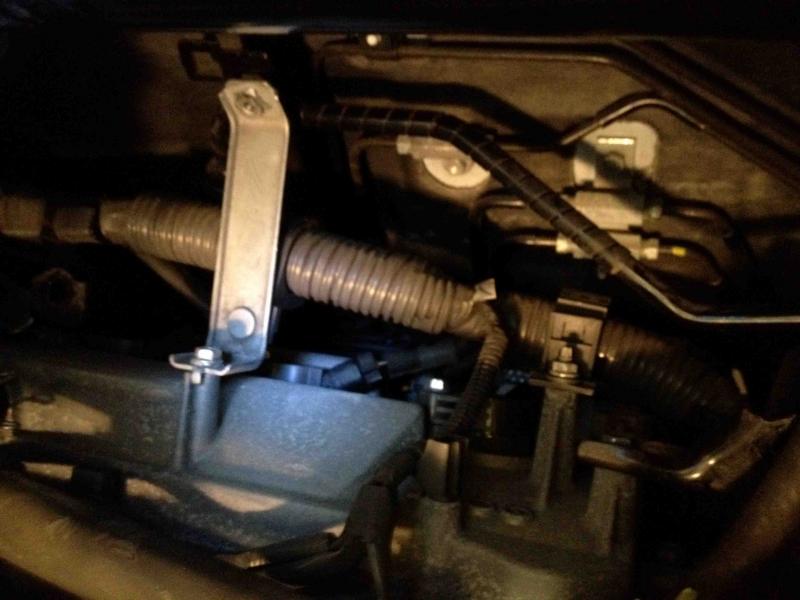
View showing the intake manifold and throttle body moved out of the way.
 12-27-11, 05:05 PM
#11
Driver School Candidate
Thread Starter
Join Date: Dec 2011
Location: IN
Posts: 21
Likes: 0
Received 0 Likes
on
0 Posts
[ATTACH]231600[/ATTACH

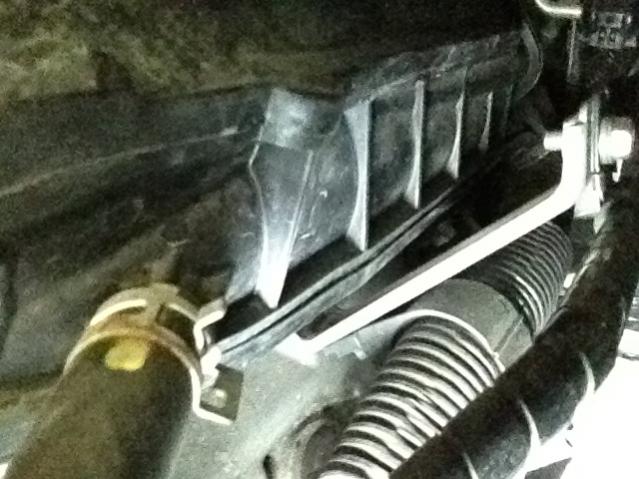
Views of the (2) brackets and (1) plastic cable tie overlying the (3) rear induction coils.
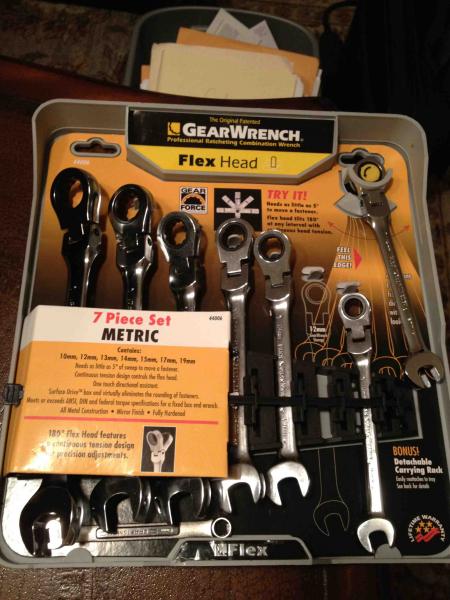
View of the tools I wish I had when I started the job. This gear wrench with 180 degree flex head would have been ideal in the removal of the bolt of the surge tank stay no. 1 bracket. This bolt secured the back left side of the intake manifold. You can still remove this bolt with a conventional wrench.
 12-27-11, 05:45 PM
#13
Driver School Candidate
Thread Starter
Join Date: Dec 2011
Location: IN
Posts: 21
Likes: 0
Received 0 Likes
on
0 Posts
Here are the tightening specs for the throttle body bolts.
Install the throttle body bracket, No. 1 surge tank stay and 4 bolts.
Torque: 21 N�m (214 kgf�cm, 15ft�lbf)
Install the throttle body bracket, No. 1 surge tank stay and 4 bolts.
Torque: 21 N�m (214 kgf�cm, 15ft�lbf)


