Boots leaking? Steering Rack(Rack and Pinion) Replacement DIY
 07-25-09, 05:31 PM
#1
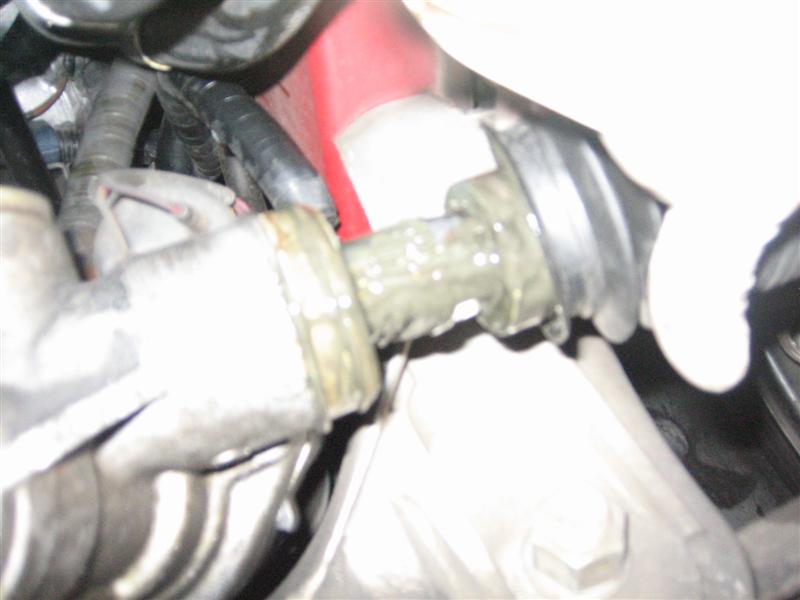
So I'm just checking my car and notice the driver side steering rack boot has a tear. I pull the boot to the side a bit to see what's going on and there was grease like substance on the inner tie rod, this was power steering fluid mixed with dirt. I peak inside the passenger side boot and out pours a boot full of ps fluid. Inside the boot should be clean and dry, if there is power steering fluid in the boot, then the seals are worn and not doing their job...time for a new steering rack. You can replace the seals, but it is much more work and a huge hassle, there's no guarantee they will not leak again. I’ve seen outrageous prices from shops to replace the rack and pinion. It’s not that hard to do, just give yourself a day and be patient. Having a friend assist you is helpful too. Thanks Ai!
Inside the boot
Purchasing Parts:
The rack and pinion at autozone is $220 + core($150) this means that you will have to pay $370 upfront, but when the part comes(you have to order it) give them your old rack and pinion and they will reimburse you $150.
I bought my goods straight from lexus...my price was $325 for a remanufactured rack and pinion, for you guys I think its $500...a new one is around $1500. This part has a one year warranty, autozone has lifetime. I just like OEM stuff and I got a deal. You don't need to get new outer tie rods, but this would be a good time to get them replaced. You can reuse your castle nuts and cotter pins (these are for the outer tie rods). They were a few dollars; I got them anyway. Also, get the brass gasket for either the return or feed lines…I forget which one but there is only one gasket on either of those.
Taking off the steering rack requires taking off the tie rod ends. To do this, you will need a pitman arm puller/tie rod end puller. You can rent one at autozone for 14 bucks. They'll refund your money when you give it to them back.
Prep:
First, center your steering wheel and make sure your tires are pointed straight ahead. Jack up your car. I chose to use two jacks to lift the car from the sides, that way I had more room to work under the car. Remember to use supports, set your e-brake and put a brick or something behind your rear tires…just in case. Now grab an oil pan and some rags for the wet mess.
Let’s start:
Always keep in mind that your steering wheel should stay centered at all times. A little movement here and there is fine, but don’t let it spin like its on crack or something. If the steering wheel starts to make a couple rotations while the rack is out, your spiral cable will either unwind or tighten and you will have some problems.
I chose this order to remove parts, you can choose whichever order you think is best.
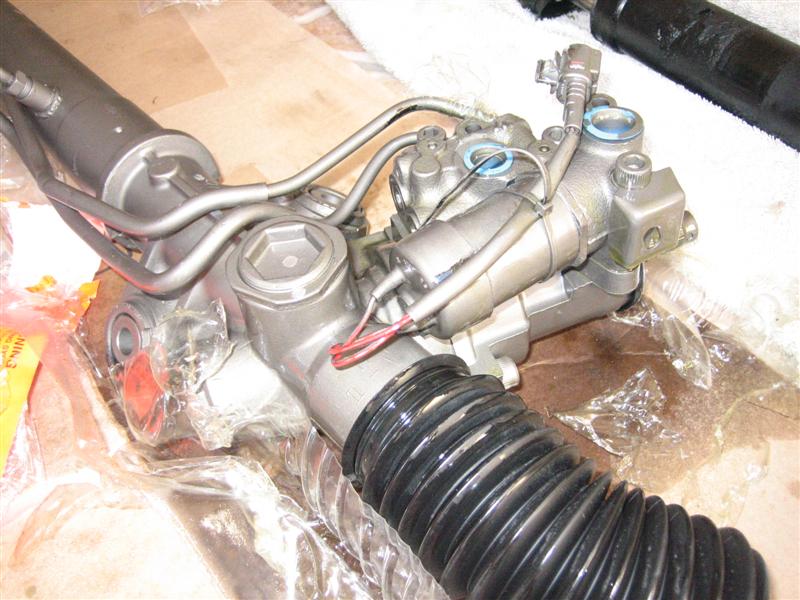
First I removed the return and feed bolts from the top of the steering rack under the steering column. They are sizes 17mm and 22mm. One of them has a brass gasket, be sure to keep it for later if you didn’t purchase one. Once you remove them, PS fluid will begin to drain about enough to fill a drinking glass. Have rags ready to clean up the mess.


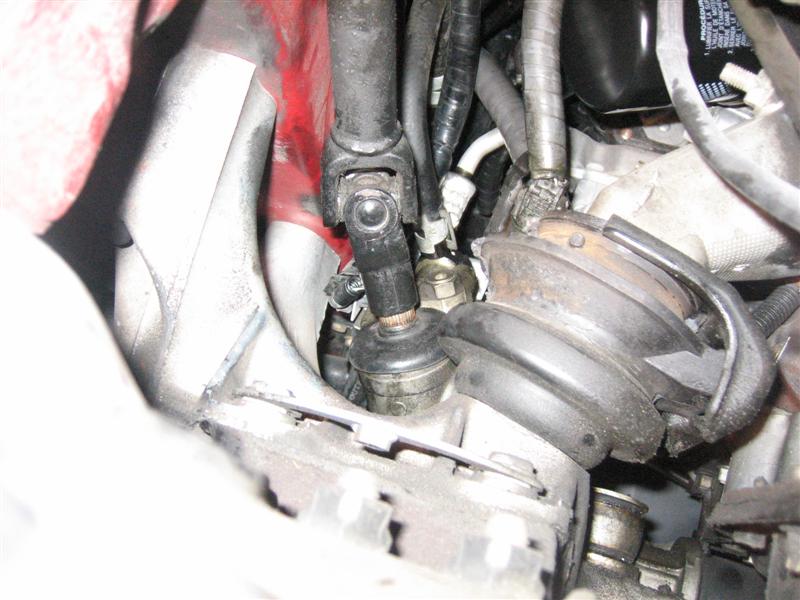
Now, remove the outer tie rods. Begin by removing the cotter pins with a flathead. Just stick the flathead between the nut and pin, pull and remove the pin, and then remove the bolt.

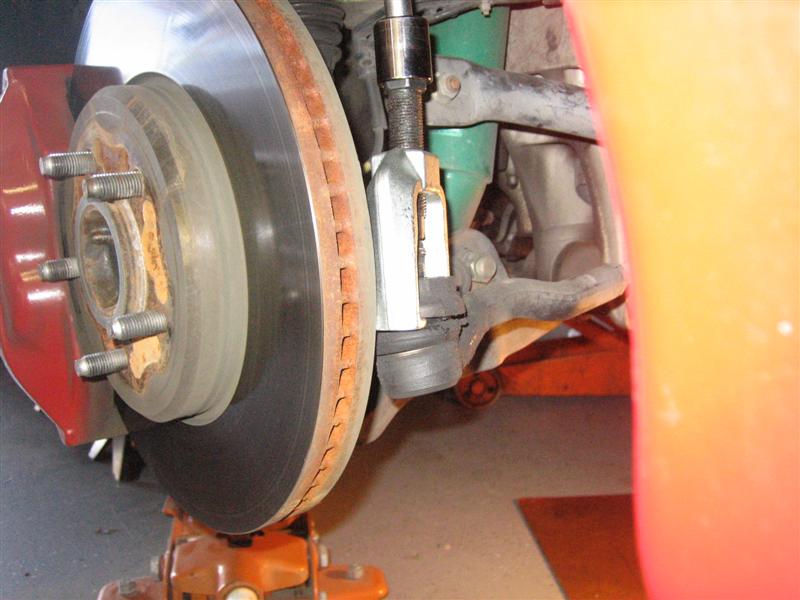
Next, use the pitman arm puller to separate the tie rod from its socket. When the big bolt in the middle of the pitman is tightened, it just presses down on the end of the tie rod bolt, separating it from the socket. Take off your wheels to make this easier. Do this for both sides.
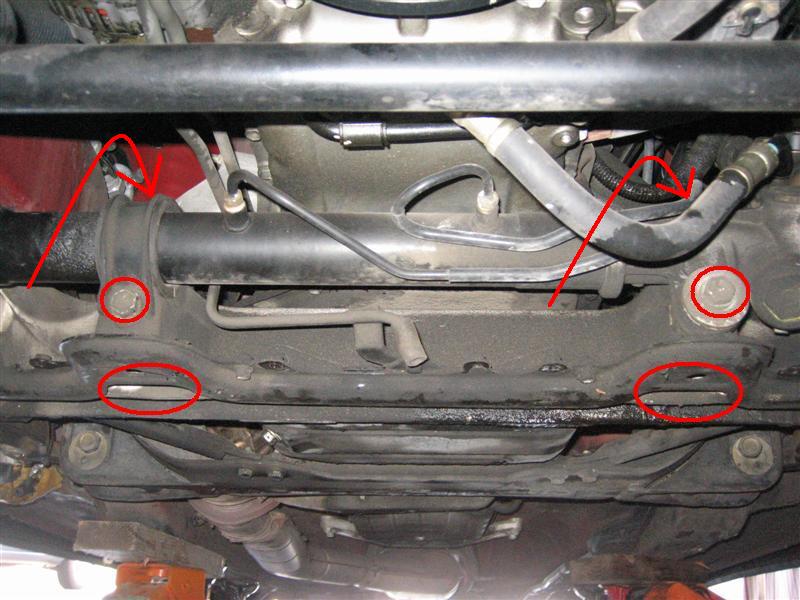
Behind the steering rack on the driver’s side, there is an area next to the transmission where you can see the steering rack connected to the steering wheel’s column shaft. Use this space and other open holes around this area to remove a 12mm bolt from this spline lock.

Now, remove the bushing bolts. These are the bolts holding the steering rack in place. They are all size 17mm, four total. You can access the nuts through the holes on the bottom of the bolts. The two other bolts are behind the rack.
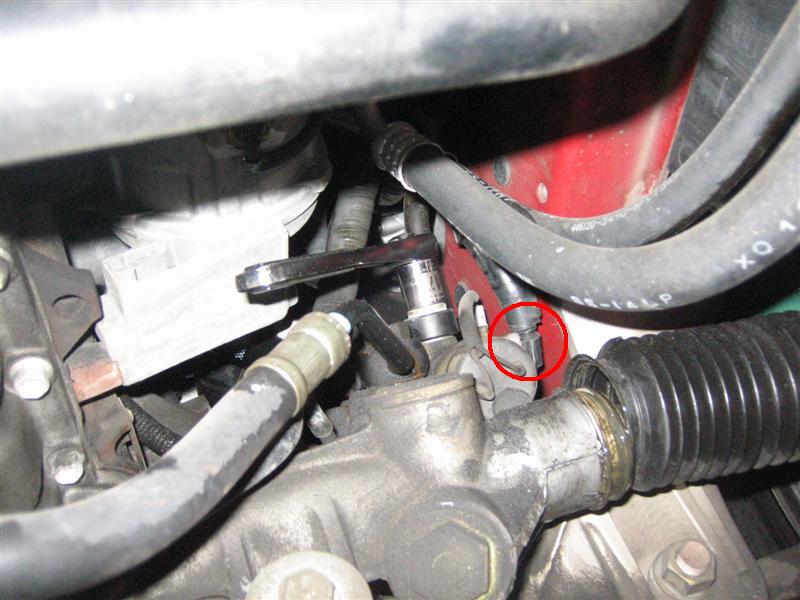
One last thing…there is a connector next to the return/feed bolts. Both ends of the plugs are connected to the steering rack. Disconnect the plug and you will notice the male plug that you just disconnected is the one connected to the steering rack and need to remove, it is held on by a little piece of plastic…use needle nose pliers to remove it, otherwise the rack will not come out.
Here’s where those back muscles come in. The whole unit is disconnected. Pull on it Several times to free it from that spline lock. I had my friend hold onto my steering wheel just in case it moves. After several pulls it will come off, even if it feels like its going no where. Check the hole from the back to see if you’re making progress.
Now its out...set the two racks next to each other
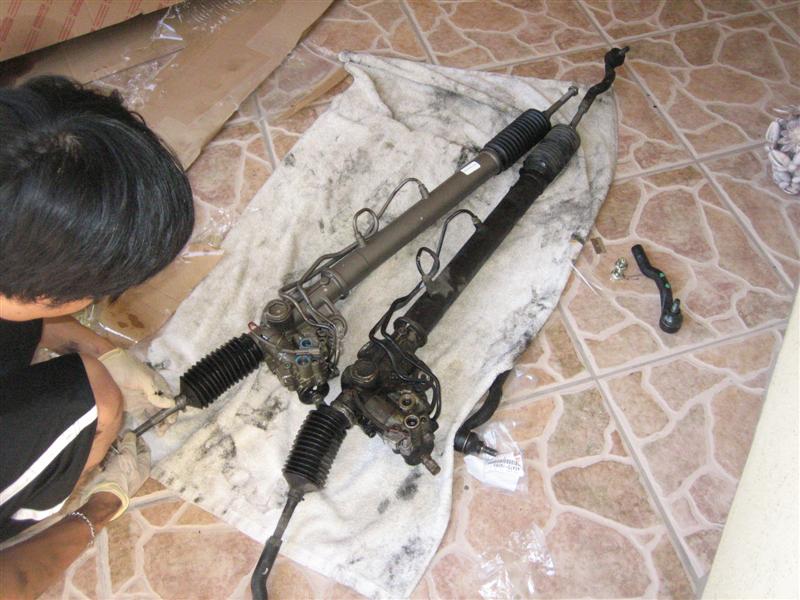
You have to either reuse the tie rods or use new ones. I had new ones so I just measured the distance from boot crease to the tie rods on the old steering rack. I then used those measurements to put on my new tie rods on the new steering rack. The locking nuts may not be the same for both steering racks, that’s why I measured from the ends of the tie rods. If you are reusing your tie rods, you need to count the number of turns it takes to remove them from your old rack then use the same number of turns to screw it on your new one. Remember to tighten the locking nut.


Now get back under the car, bench press that new steering rack back into place and have your friend help guide those tie rod bolts back into their sockets and screw the castle nut on and torque it to spec.
You’re not going to bolt the rest up yet, just temporarily screw in the bushing bolts so we can realign the wheels, just in case its not already straight. Go ahead and put your wheels on with the rack temporarily screwed in. Now, turn the wheels to be as straight as possible so that your steering rack will be centered when you push the spline back into the spline lock.
Once its straight enough (you have to get an alignment anyway) connect the plugs together and go to the rear of the car and look into that hole next to the transmission. Make sure the spine lock of the steering wheel column shaft is in position to have the spline be pushed into it. Once it is, go ahead and push it in from the front. Once its in, bolt everything back up to spec.
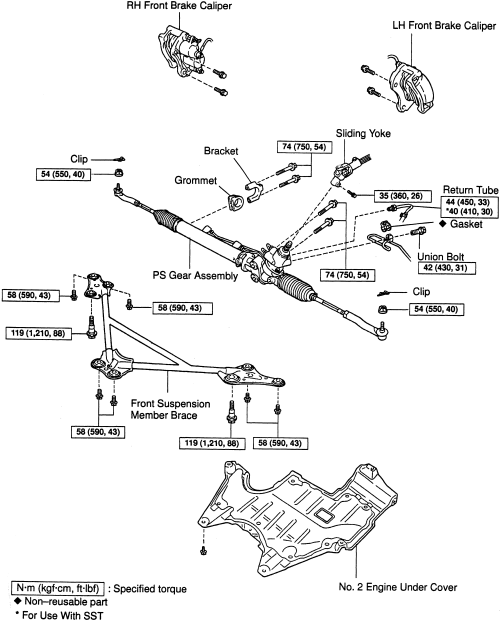
I found this pic for the IS300s, I used these torque specs… out of the 3 numbers, use the 3rd number farthest to the right.
You’re not done yet.
Your new rack is gassy, you need to get rid of most the air. I used this website.
http://www.lexls.com/tutorials/steering/psflush.html
Make sure the reservoir never runs low, once you turn on your engine it will suck away at the reservoir quickly. Once new fluid comes out, you can stop the engine(I used about a quart.) Fill the reservoir back up and start the engine again. Now slowly turn the wheel fully counter clockwise then clockwise. Your tires and steering wheels will start to stutter a bit…just keep turning, it just has air in the system. Eventually it will become smooth.
Now get an alignment, drive your baby around a bit to rid of the left over air and check the reservoir to see if it needs to be filled.
You’re Done!
Please chime in to correct or improve anything.
Additional tip from Salim:
The steering shaft has a short connecting piece with 12mm bolts. Loosen the bolt near the firewall and remove the other bolt which is at the rack end. Slide the connecting rod up and that will separate the rack from the steering rod. Rack will come out easy.
When you put serviced/new rack in you dont have to worry about the connecting rod. Just center the rack and secure it in place. Center the steering, pull the connecting rod up and then slide it down on to the geared shaft of the rack.
If the wheel is not centered, you can reposition the connecting shaft and make the two ends conform.
Torque 26 ft-lb
With the above trick, one can do the job solo.
Inside the boot
Purchasing Parts:
The rack and pinion at autozone is $220 + core($150) this means that you will have to pay $370 upfront, but when the part comes(you have to order it) give them your old rack and pinion and they will reimburse you $150.
I bought my goods straight from lexus...my price was $325 for a remanufactured rack and pinion, for you guys I think its $500...a new one is around $1500. This part has a one year warranty, autozone has lifetime. I just like OEM stuff and I got a deal. You don't need to get new outer tie rods, but this would be a good time to get them replaced. You can reuse your castle nuts and cotter pins (these are for the outer tie rods). They were a few dollars; I got them anyway. Also, get the brass gasket for either the return or feed lines…I forget which one but there is only one gasket on either of those.
Taking off the steering rack requires taking off the tie rod ends. To do this, you will need a pitman arm puller/tie rod end puller. You can rent one at autozone for 14 bucks. They'll refund your money when you give it to them back.
Prep:
First, center your steering wheel and make sure your tires are pointed straight ahead. Jack up your car. I chose to use two jacks to lift the car from the sides, that way I had more room to work under the car. Remember to use supports, set your e-brake and put a brick or something behind your rear tires…just in case. Now grab an oil pan and some rags for the wet mess.
Let’s start:
Always keep in mind that your steering wheel should stay centered at all times. A little movement here and there is fine, but don’t let it spin like its on crack or something. If the steering wheel starts to make a couple rotations while the rack is out, your spiral cable will either unwind or tighten and you will have some problems.
I chose this order to remove parts, you can choose whichever order you think is best.
First I removed the return and feed bolts from the top of the steering rack under the steering column. They are sizes 17mm and 22mm. One of them has a brass gasket, be sure to keep it for later if you didn’t purchase one. Once you remove them, PS fluid will begin to drain about enough to fill a drinking glass. Have rags ready to clean up the mess.
Now, remove the outer tie rods. Begin by removing the cotter pins with a flathead. Just stick the flathead between the nut and pin, pull and remove the pin, and then remove the bolt.
Next, use the pitman arm puller to separate the tie rod from its socket. When the big bolt in the middle of the pitman is tightened, it just presses down on the end of the tie rod bolt, separating it from the socket. Take off your wheels to make this easier. Do this for both sides.
Behind the steering rack on the driver’s side, there is an area next to the transmission where you can see the steering rack connected to the steering wheel’s column shaft. Use this space and other open holes around this area to remove a 12mm bolt from this spline lock.
Now, remove the bushing bolts. These are the bolts holding the steering rack in place. They are all size 17mm, four total. You can access the nuts through the holes on the bottom of the bolts. The two other bolts are behind the rack.
One last thing…there is a connector next to the return/feed bolts. Both ends of the plugs are connected to the steering rack. Disconnect the plug and you will notice the male plug that you just disconnected is the one connected to the steering rack and need to remove, it is held on by a little piece of plastic…use needle nose pliers to remove it, otherwise the rack will not come out.
Here’s where those back muscles come in. The whole unit is disconnected. Pull on it Several times to free it from that spline lock. I had my friend hold onto my steering wheel just in case it moves. After several pulls it will come off, even if it feels like its going no where. Check the hole from the back to see if you’re making progress.
Now its out...set the two racks next to each other
You have to either reuse the tie rods or use new ones. I had new ones so I just measured the distance from boot crease to the tie rods on the old steering rack. I then used those measurements to put on my new tie rods on the new steering rack. The locking nuts may not be the same for both steering racks, that’s why I measured from the ends of the tie rods. If you are reusing your tie rods, you need to count the number of turns it takes to remove them from your old rack then use the same number of turns to screw it on your new one. Remember to tighten the locking nut.
Now get back under the car, bench press that new steering rack back into place and have your friend help guide those tie rod bolts back into their sockets and screw the castle nut on and torque it to spec.
You’re not going to bolt the rest up yet, just temporarily screw in the bushing bolts so we can realign the wheels, just in case its not already straight. Go ahead and put your wheels on with the rack temporarily screwed in. Now, turn the wheels to be as straight as possible so that your steering rack will be centered when you push the spline back into the spline lock.
Once its straight enough (you have to get an alignment anyway) connect the plugs together and go to the rear of the car and look into that hole next to the transmission. Make sure the spine lock of the steering wheel column shaft is in position to have the spline be pushed into it. Once it is, go ahead and push it in from the front. Once its in, bolt everything back up to spec.
I found this pic for the IS300s, I used these torque specs… out of the 3 numbers, use the 3rd number farthest to the right.
You’re not done yet.
Your new rack is gassy, you need to get rid of most the air. I used this website.
http://www.lexls.com/tutorials/steering/psflush.html
Make sure the reservoir never runs low, once you turn on your engine it will suck away at the reservoir quickly. Once new fluid comes out, you can stop the engine(I used about a quart.) Fill the reservoir back up and start the engine again. Now slowly turn the wheel fully counter clockwise then clockwise. Your tires and steering wheels will start to stutter a bit…just keep turning, it just has air in the system. Eventually it will become smooth.
Now get an alignment, drive your baby around a bit to rid of the left over air and check the reservoir to see if it needs to be filled.
You’re Done!
Please chime in to correct or improve anything.
Additional tip from Salim:
The steering shaft has a short connecting piece with 12mm bolts. Loosen the bolt near the firewall and remove the other bolt which is at the rack end. Slide the connecting rod up and that will separate the rack from the steering rod. Rack will come out easy.
When you put serviced/new rack in you dont have to worry about the connecting rod. Just center the rack and secure it in place. Center the steering, pull the connecting rod up and then slide it down on to the geared shaft of the rack.
If the wheel is not centered, you can reposition the connecting shaft and make the two ends conform.
Torque 26 ft-lb
With the above trick, one can do the job solo.
Last edited by D3AN; 02-05-16 at 11:12 PM.
 07-25-09, 06:13 PM
#2

Excellent write up D3an!!! Just started on this yesterday afternoon and finished up this morning. Working by myself was a @itch!!! Also installing new LCA and outer tie rods. My LCA rear bushings (under passenger and driver compartments) were DESTROYED. This is my daughters "new" SC300 since she wrecked the first one (not her fault).
I left the 2 big bolts (17mm and 22mm) attached, and took off the three allen head bolts and left the pressure block (electronic part) in the car. I also blew out the old fluid by blowing into the reserv., and plugging the return line. I got out about a full quart. For those who leave the pressure block in the car, remove the return line and it can be pulled down and bolted to the new rack. Use petroleum jelly to hold small rubber "O" rings in place when bolting back together. Thanks again D3an for the write up.
Jim
07-26-09, 04:06 AM
#4
Pole Position

Join Date: Jun 2009
Location: Hawaii
Posts: 269
Likes: 0
Received 0 Likes
on
0 Posts
thank you very much. been looking around for this. my hose and rack is leaking so ill have to do it sometime in the near future.
btw any one ever bought reman racks from garosteering on ebay? if so any reviews? i could've got one for $265 shipped to hawaii. maybe ill get one soon.
btw any one ever bought reman racks from garosteering on ebay? if so any reviews? i could've got one for $265 shipped to hawaii. maybe ill get one soon.
Trending Topics


 09-14-10, 08:13 PM
#14
Driver

Join Date: Oct 2008
Location: California
Posts: 124
Likes: 0
Received 0 Likes
on
0 Posts
Question!
So can a bad steering rack cause this kind of issue:
In order to turn the car I have to turn the steering wheel more than usually. I turn the wheel but takes awhile for it to catch. basically just like i said. I have to turn the wheel a lot more than usual
So can a bad steering rack cause this kind of issue:
In order to turn the car I have to turn the steering wheel more than usually. I turn the wheel but takes awhile for it to catch. basically just like i said. I have to turn the wheel a lot more than usual

