2007 ES350 Integrated Sirius Self-Install Instructions
 08-14-06, 07:00 PM
#1
Driver School Candidate
Thread Starter

Join Date: Jul 2006
Location: FL
Posts: 22
Likes: 0
Received 0 Likes
on
0 Posts
Lexus 2007 ES350 Sirius Satellite Tuner Installation Instructions
Parts Needed:
* Part #PTS31-00052 (Sirius Receiver Kit – Lexus ES330 2006)
* Part #PTS31-33051 (Sirius Satellite Radio Fit Kit – Lexus ES330 2006)
* Recommended online retailer is: http://www.lexus-parts.com
* Direct link to order area is http://www.lexus-parts.com/partlist....99&ModelID=153
* Extra Sirius Antenna - smaller than included version (optional, but recommended)
* Such as http://www.circuitcity.com/ssm/DEI-M...oductDetail.do
* The above linked unit is readily available, is tiny and gets great reception
* The included antenna (Sigma antenna) is about 5 times as big, designed to be stuck to the windshield (yuck) and reportedly does not get good reception
Tools Needed:
* Ratchet or wrench to remove stereo bolts
* Strong fingers to pry off dash/trim pieces (or dash trim tool)
* Credit card or ID card to help run the antenna wire
* Towels to protect dash, wood and radio from scratches during install
Skills Needed:
* Reasonably handy
* Not afraid to take apart your dashboard and radio
* Patience helps
* Total install time should be less than 1 hour
* Otherwise, take to your dealer / favorite car stereo installer
Notes:
* This tuner has “the flaw” otherwise known as a 10 character display limitation. All songs, artists, channels, etc. are limited to 10 characters.
* However, the tuner does work perfectly and integrates with the factory stereo system (with navigation or not) perfectly, allowing for on screen controls and steering wheel controls
* IMPORTANT: Make note of the numbers on the back of the Sirius Tuner before you install it – you will need the numbers to register the radio and subscribe it at Sirius.com (there may be a small white sticker in your package with the key number on it as well)
* You should get at least 3 months free subscription when you activate the radio, this is based on it being a Lexus part.
Instructions:
1. Put car in Neutral and engage parking brake
2. Make sure car is turned off
3. Disconnect Battery for safety (optional, but recommended)
4. Remove Shift **** by unscrewing **** at top of handle --- just unscrew it counter clock-wise.
5. Remove Center Console Assembly With Ash Tray --- this was a little tricky – open the cup holder and pull (gently) the wood trim panel up until the clips start to pop out. You actually can’t break these from what I can tell, but it may feel like you are. You need to pull this panel up and back at the same time to get it separated fully. It should just lift over the shift ****, but leave it connected (the lighter is connected to power) – just let it hang to the side.
6. Remove Lower Panel (LEFT) --- you are looking for the triangular piece of plastic on the driver side, by where your right knee would be with your foot on the gas. Just work your fingers behind it and pop it out, it is connected by three clips, one at each corner.
7. Remove Lower Dash Panel (RIGHT) --- this is the part between the glove box and the center console, again triangular in shape, but a little larger than the left version. Again, this just pops out when pulled, there are clips at the three corners of the panel and one in the center.
8. Remove AC Vent panel from above the radio --- this one was tough as well, and you may need to use a small screw driver or similar to stick in the vent to pry it out if your fingers don’t fit. Be careful to not break the vent directors. Once it pops out you will know it. This on is also connected, so again just let it hang.
9. Remove the 4 bolts holding the radio (or navigation system + radio) chassis in. There are two bolts behind the AC Vent panel you just removed and one in each lower dash panel. Be careful to not drop the bolts when you unscrew them. I would suggest keeping them in the cup holder when you remove them, you will need them to re-install the radio later. I used a towel on which to position the removed radio (while not disconnecting any other plugs) so as to not scratch anything.
10. In the Sirius Kit, you will notice the one end of the cable has two smaller connectors, one male and one female. This is the end you will be connecting to the back of the radio. See the pictures for where on the radio (indicated by the yellow circles) you connect the cable. You can’t mess this up, it is the only connect that is the same as the cable you have. Unplug the connector, plug in the cable and plug the connector that you unplugged into the female end of the cable (it is a Y connector).


11. The Sirius cable is quite long, so loop it as best you can and tuck it behind where the radio will be, see the picture below.

12. Now let’s run the Sirius antenna. Note: if you have metallic window tint, my location (back window deck) may not work for you as the tint will interfere with the signal. If this is the case, you will have to run the antenna outside to the trunk lid. Since I didn’t do that, I can’t give instructions for that.
13. To start, place the antenna on the back window deck in the driver’s side corner of the window and tuck the antenna cable into the seam with a credit card. See pictures below.


Parts Needed:
* Part #PTS31-00052 (Sirius Receiver Kit – Lexus ES330 2006)
* Part #PTS31-33051 (Sirius Satellite Radio Fit Kit – Lexus ES330 2006)
* Recommended online retailer is: http://www.lexus-parts.com
* Direct link to order area is http://www.lexus-parts.com/partlist....99&ModelID=153
* Extra Sirius Antenna - smaller than included version (optional, but recommended)
* Such as http://www.circuitcity.com/ssm/DEI-M...oductDetail.do
* The above linked unit is readily available, is tiny and gets great reception
* The included antenna (Sigma antenna) is about 5 times as big, designed to be stuck to the windshield (yuck) and reportedly does not get good reception
Tools Needed:
* Ratchet or wrench to remove stereo bolts
* Strong fingers to pry off dash/trim pieces (or dash trim tool)
* Credit card or ID card to help run the antenna wire
* Towels to protect dash, wood and radio from scratches during install
Skills Needed:
* Reasonably handy
* Not afraid to take apart your dashboard and radio
* Patience helps
* Total install time should be less than 1 hour
* Otherwise, take to your dealer / favorite car stereo installer
Notes:
* This tuner has “the flaw” otherwise known as a 10 character display limitation. All songs, artists, channels, etc. are limited to 10 characters.
* However, the tuner does work perfectly and integrates with the factory stereo system (with navigation or not) perfectly, allowing for on screen controls and steering wheel controls
* IMPORTANT: Make note of the numbers on the back of the Sirius Tuner before you install it – you will need the numbers to register the radio and subscribe it at Sirius.com (there may be a small white sticker in your package with the key number on it as well)
* You should get at least 3 months free subscription when you activate the radio, this is based on it being a Lexus part.
Instructions:
1. Put car in Neutral and engage parking brake
2. Make sure car is turned off
3. Disconnect Battery for safety (optional, but recommended)
4. Remove Shift **** by unscrewing **** at top of handle --- just unscrew it counter clock-wise.
5. Remove Center Console Assembly With Ash Tray --- this was a little tricky – open the cup holder and pull (gently) the wood trim panel up until the clips start to pop out. You actually can’t break these from what I can tell, but it may feel like you are. You need to pull this panel up and back at the same time to get it separated fully. It should just lift over the shift ****, but leave it connected (the lighter is connected to power) – just let it hang to the side.
6. Remove Lower Panel (LEFT) --- you are looking for the triangular piece of plastic on the driver side, by where your right knee would be with your foot on the gas. Just work your fingers behind it and pop it out, it is connected by three clips, one at each corner.
7. Remove Lower Dash Panel (RIGHT) --- this is the part between the glove box and the center console, again triangular in shape, but a little larger than the left version. Again, this just pops out when pulled, there are clips at the three corners of the panel and one in the center.
8. Remove AC Vent panel from above the radio --- this one was tough as well, and you may need to use a small screw driver or similar to stick in the vent to pry it out if your fingers don’t fit. Be careful to not break the vent directors. Once it pops out you will know it. This on is also connected, so again just let it hang.
9. Remove the 4 bolts holding the radio (or navigation system + radio) chassis in. There are two bolts behind the AC Vent panel you just removed and one in each lower dash panel. Be careful to not drop the bolts when you unscrew them. I would suggest keeping them in the cup holder when you remove them, you will need them to re-install the radio later. I used a towel on which to position the removed radio (while not disconnecting any other plugs) so as to not scratch anything.
10. In the Sirius Kit, you will notice the one end of the cable has two smaller connectors, one male and one female. This is the end you will be connecting to the back of the radio. See the pictures for where on the radio (indicated by the yellow circles) you connect the cable. You can’t mess this up, it is the only connect that is the same as the cable you have. Unplug the connector, plug in the cable and plug the connector that you unplugged into the female end of the cable (it is a Y connector).
11. The Sirius cable is quite long, so loop it as best you can and tuck it behind where the radio will be, see the picture below.
12. Now let’s run the Sirius antenna. Note: if you have metallic window tint, my location (back window deck) may not work for you as the tint will interfere with the signal. If this is the case, you will have to run the antenna outside to the trunk lid. Since I didn’t do that, I can’t give instructions for that.
13. To start, place the antenna on the back window deck in the driver’s side corner of the window and tuck the antenna cable into the seam with a credit card. See pictures below.
 08-14-06, 07:00 PM
#2
Driver School Candidate
Thread Starter
Join Date: Jul 2006
Location: FL
Posts: 22
Likes: 0
Received 0 Likes
on
0 Posts
14. You can then tuck it along the side of the back seat and under the plastic door molding and run it to about mid-way of the driver’s seat. See photos below.

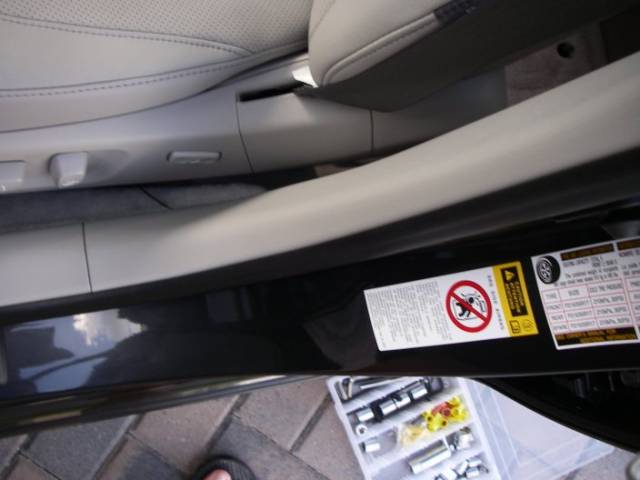
15. Then, run the antenna cable under the seat and up the other side (being careful to run it under the seat glide tracks) and run it under the loose plastic where the removed center console is. Leave yourself about 18 inches of slack and bundle the loose cable under the drivers seat (I bundled it with electric tape). See picture below.

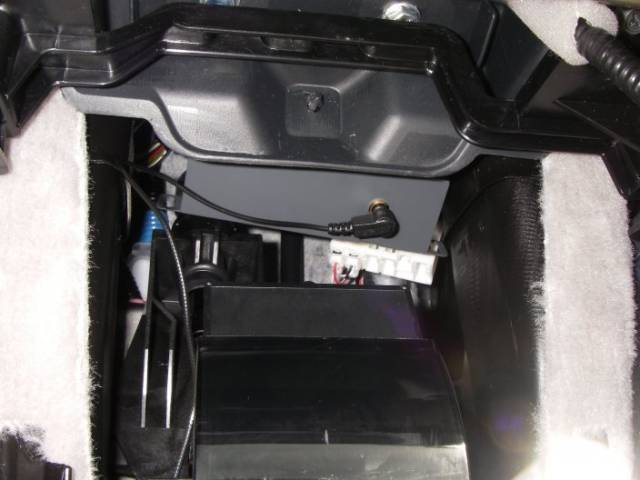
16. Now back to the Run the Sirius tuner end of the cable you connected to the stereo to where the lighter/ash-tray would be, and connect it to the Sirius Tuner, which will sit under and behind the ash tray (I just rested mine in there) and also connect the Sirius antenna to the Sirius Tuner at this time. See pictures below.

17. Now test your install by turning the car on and seeing if the Satellite Radio works when you press the AM/SAT button on your radio. Give it a few minutes on the first power up to initialize and download the data from the satellite. Assuming it works, you should be able to get channel 184 (and only channel 184) until you activate the radio. I would recommend taking a break and activating the radio now which you can do on the web or phone. You need that number from the back of the radio (also on the white sticker) to do so.
18. After the radio is activated (it must be on when you activate) – you should be able to tune to any channel, but using the tune ****.
19. That’s it. Re-install everything you did above in reverse order and enjoy your satellite radio. Images below of the resulting screens on the navigation system screen (note the 10 character text display flaw).


15. Then, run the antenna cable under the seat and up the other side (being careful to run it under the seat glide tracks) and run it under the loose plastic where the removed center console is. Leave yourself about 18 inches of slack and bundle the loose cable under the drivers seat (I bundled it with electric tape). See picture below.
16. Now back to the Run the Sirius tuner end of the cable you connected to the stereo to where the lighter/ash-tray would be, and connect it to the Sirius Tuner, which will sit under and behind the ash tray (I just rested mine in there) and also connect the Sirius antenna to the Sirius Tuner at this time. See pictures below.
17. Now test your install by turning the car on and seeing if the Satellite Radio works when you press the AM/SAT button on your radio. Give it a few minutes on the first power up to initialize and download the data from the satellite. Assuming it works, you should be able to get channel 184 (and only channel 184) until you activate the radio. I would recommend taking a break and activating the radio now which you can do on the web or phone. You need that number from the back of the radio (also on the white sticker) to do so.
18. After the radio is activated (it must be on when you activate) – you should be able to tune to any channel, but using the tune ****.
19. That’s it. Re-install everything you did above in reverse order and enjoy your satellite radio. Images below of the resulting screens on the navigation system screen (note the 10 character text display flaw).

 08-15-06, 06:59 AM
#6
Thanks for taking so much time to document your efforts for the benefit of us all. I'm confused because I thought other people were reporting that all the connections could be made in the truck of the car without having to get into the dash area.
Is the install different between models?
Is the install different between models?
08-15-06, 10:56 AM
#7
Driver School Candidate
Thread Starter
Join Date: Jul 2006
Location: FL
Posts: 22
Likes: 0
Received 0 Likes
on
0 Posts
Thanks for taking so much time to document your efforts for the benefit of us all. I'm confused because I thought other people were reporting that all the connections could be made in the truck of the car without having to get into the dash area.
Is the install different between models?
Is the install different between models?
The XM install goes in the trunk, and presumably the 2007 Sirius Kit would as well, but that has been recalled and is no longer being sold. To install the 2006 kit in an 07 ES350, as I have done, you have to plug it into the radio. I investigated the plug options in the trunk, and without doing a custom cable adapter, it doesn't fit.
Trending Topics
 08-16-06, 04:39 PM
#9
Driver School Candidate
Thread Starter
Join Date: Jul 2006
Location: FL
Posts: 22
Likes: 0
Received 0 Likes
on
0 Posts
There is an XM connector in the trunk, and that is the intended location for the 2007 Sirius kit from what I know (if that ever comes out).
08-17-06, 03:34 PM
#10
Rookie

Join Date: Mar 2001
Location: Alabama
Posts: 93
Likes: 0
Received 0 Likes
on
0 Posts
I installed Sirius in both a non-NAV and NAV equipped ES350 today. Both use the same part # fit kit previously mentioned. The tuner is the same too,it's used in every model I install Sirius into (ES,RX,LX,GX,LS,GS)
08-21-06, 10:46 PM
#12
Rookie

Join Date: May 2006
Location: ca
Posts: 96
Likes: 0
Received 0 Likes
on
0 Posts
For those who have not bought their es350 yet, Sirius came standard with my es350 from Lexus of Steven Creek. They also give you a free 9 month subscription. Apparently they do this on all their cars. I purchased my car through Ron Coury (the internet contact at Stevens Creek). He was really competitive on pricing and very straight forward to deal with. I highly recommend him.
08-22-06, 08:48 AM
#13
 08-22-06, 10:44 AM
#14
Rookie
Join Date: May 2006
Location: ca
Posts: 96
Likes: 0
Received 0 Likes
on
0 Posts
05-14-16, 09:31 PM
#15
Driver School Candidate

Join Date: May 2016
Location: CA
Posts: 1
Likes: 0
Received 0 Likes
on
0 Posts
Nice Job!!! Worked very well for me. Only suggestion is to store the extra antenna cable under the drivers side plastic threshold. Easy to remove. If you don't want to see the cable you can also put it under the carpet and up through one of the carpet holes under the front seat. I bent a piece of stiff wire and threaded it through first and then taped the cable end to it and pulled it through.

Thread
Thread Starter
Forum
Replies
Last Post

